How Can I Add my Exchange E-mail Account to My MacBook or iMac?
In these instructions, we will show you how to add an Exchange e-mail account to your MacBook or iMac.
You need to wait until your Exchange e-mail account has been created before you follow these instructions.
Information: You do not need an e-mail client such as Outlook or Apple Mail, as you can also access your Exchange account in your web browser https://exchange.uni-mannheim.de/owa. Here you can enter your Uni-ID (= previously referred to as “user ID”) to login and to access your e-mails, calendar and address books.
Step-by-step instructions
Instructions Outlook for Mac
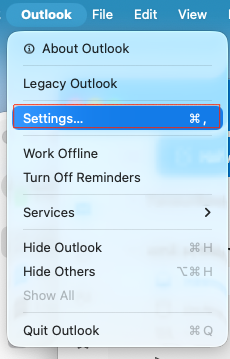
Step 1
Start Outlook 365. Click “Outlook” in the upper left corner and then “Settings”.
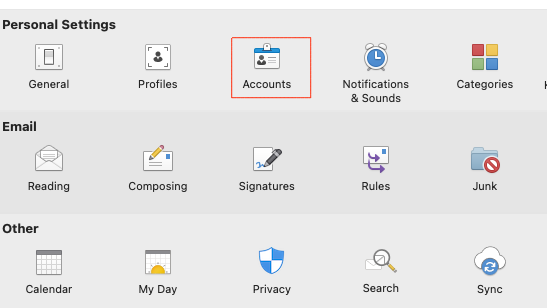
Step 2
Then click on “Accounts”.
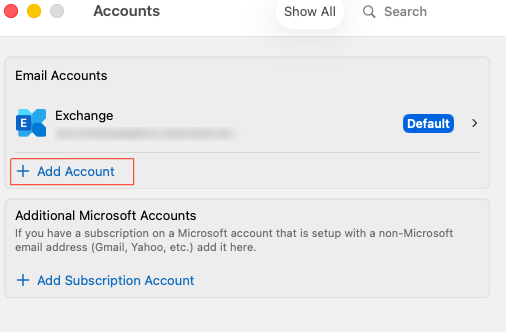
Step 3
Click “+ Add account”.
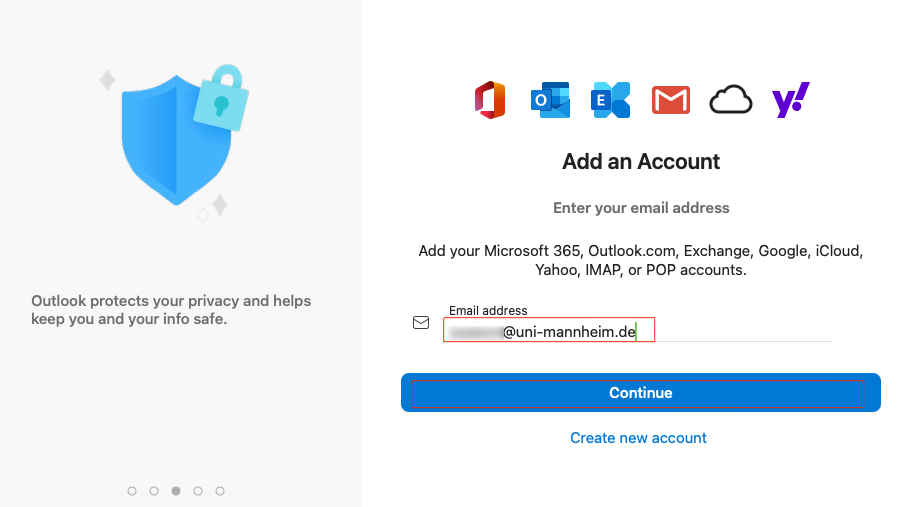
Step 4
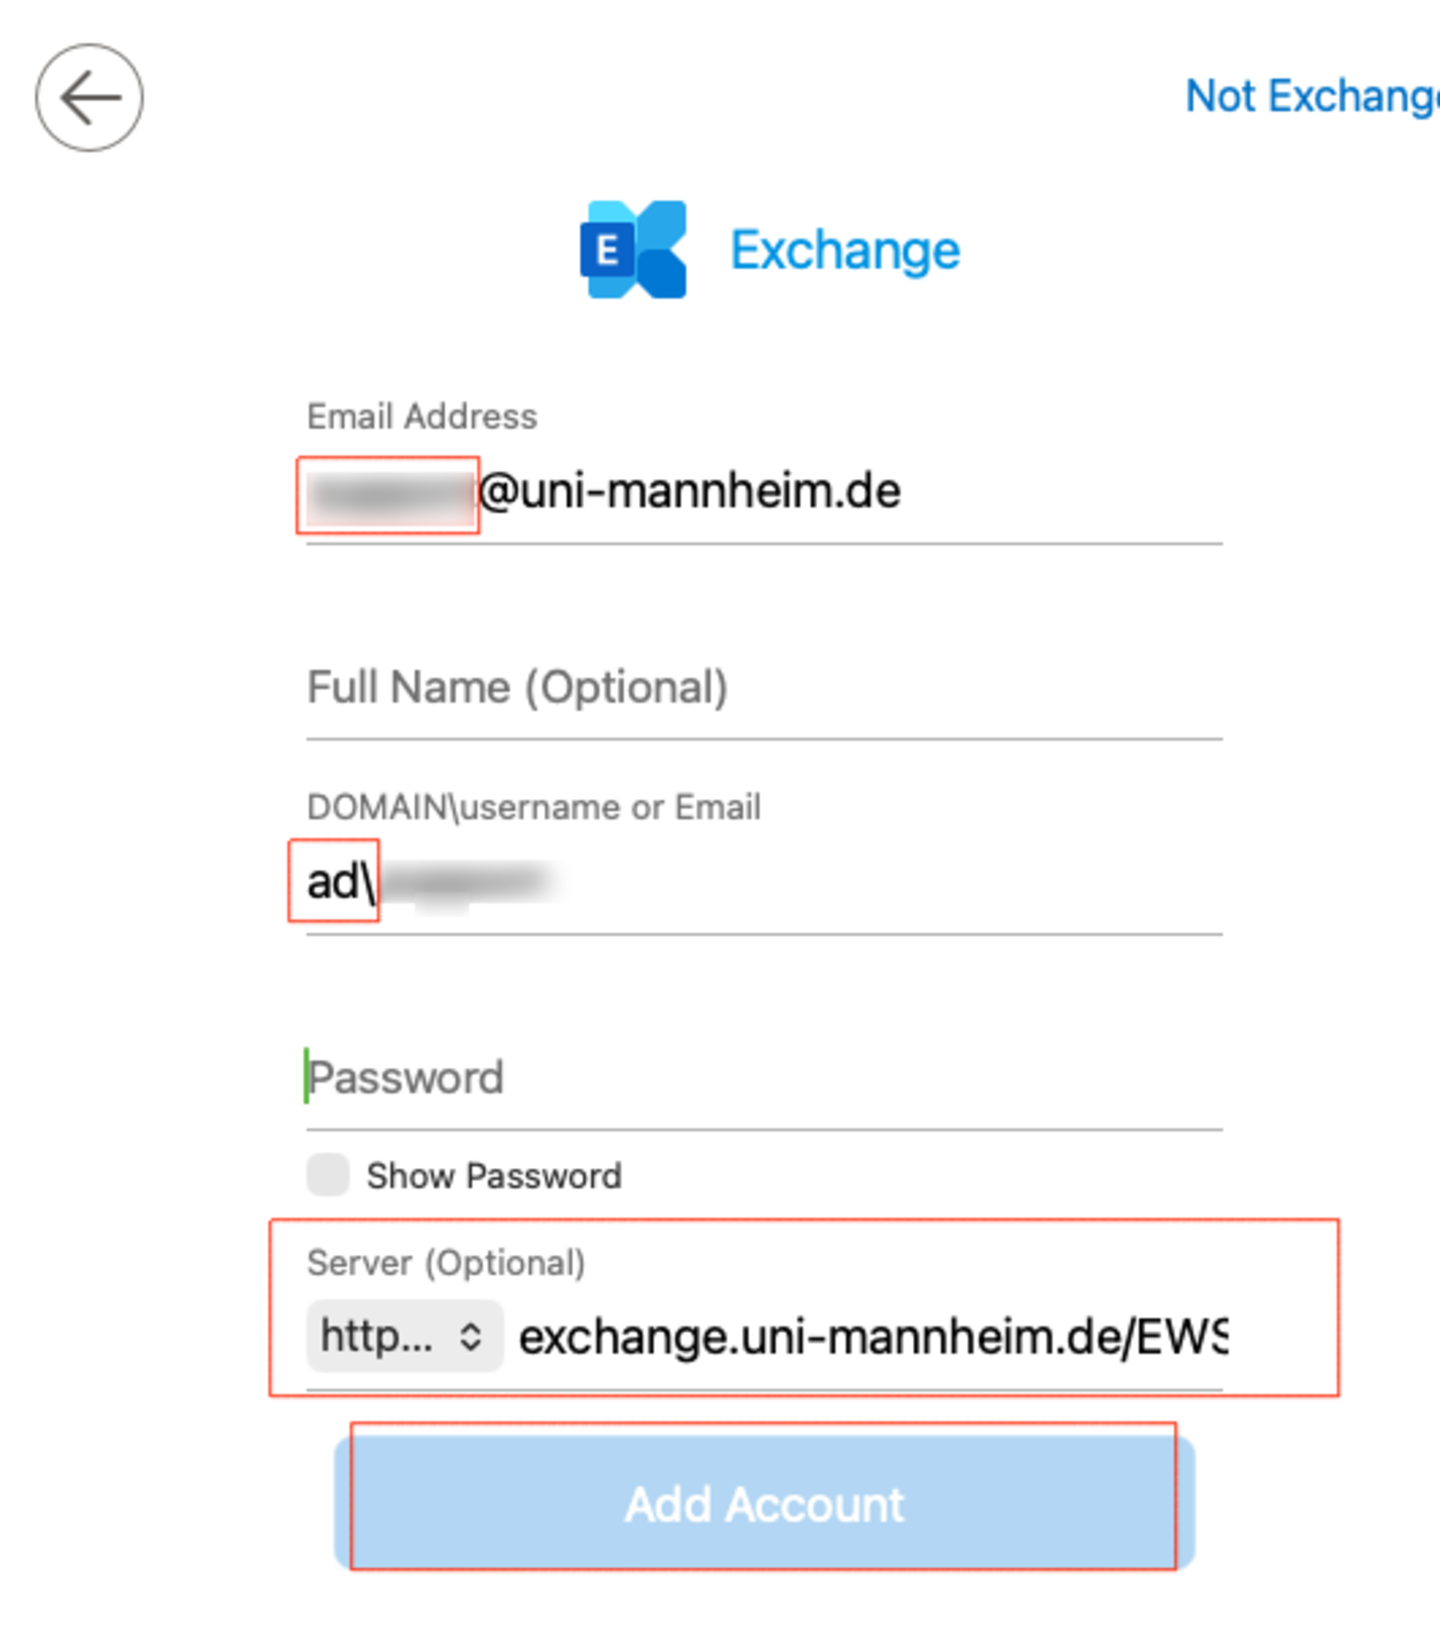
Please enter your Exchange senders address. Then click the button indicating you want to proceed.
Step 5
Enter “AD\Uni-ID” in the field “DOMAIN\User name” (such as for example “AD\memuster“).
Please make sure to use “\“ and not “/”! For this, please press ALT + Shift + 7.Enter the password of your Uni-ID and exchange.uni-mannheim.de/EWS/Exchange.asmx in the field for the server and confirm by clicking “Add account”:
Step 6
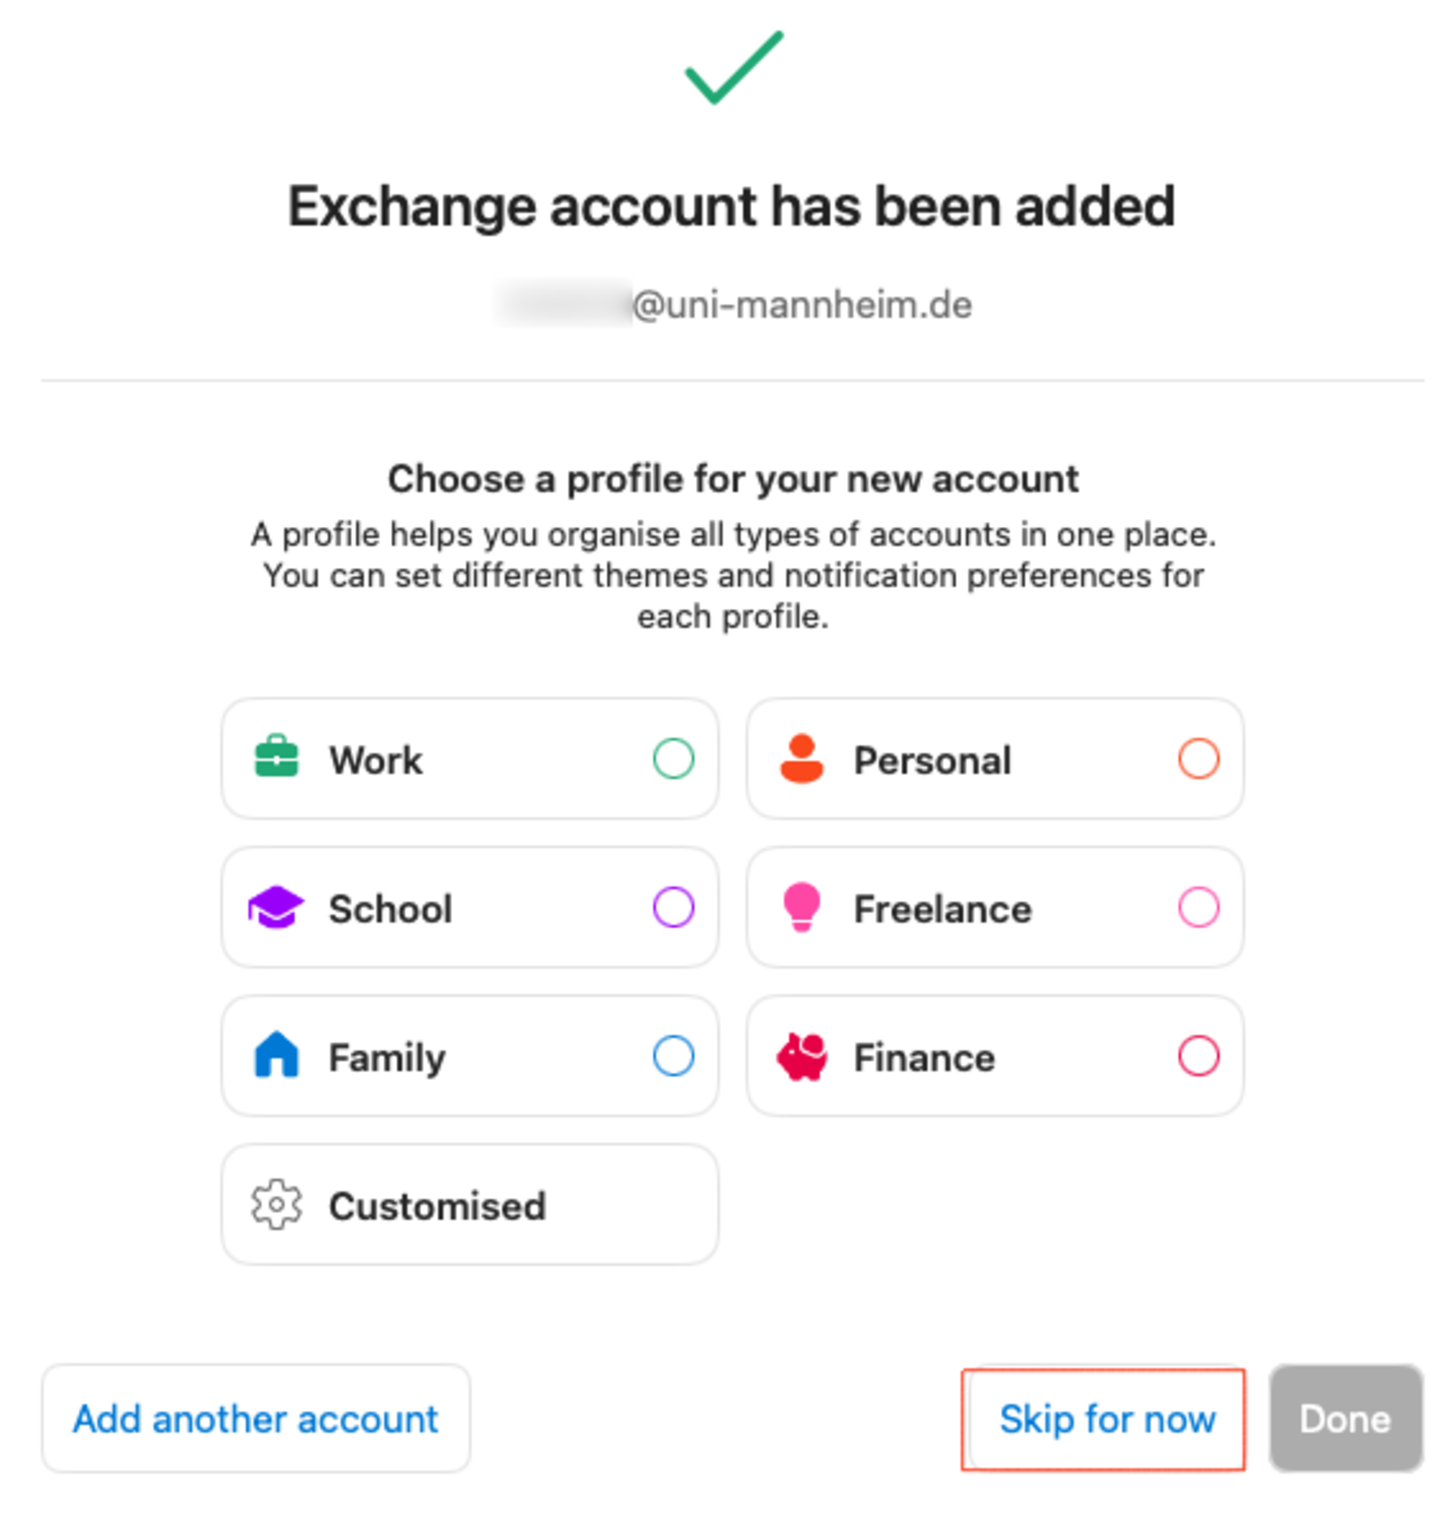
Confirm again by clicking “Skip for now”. Your mailbox is now set up and will by synchronized. Depending on the size of your mailbox, this will take some time.
Instructions for Apple Mail
Please proceed as follows if you want to add your new e-mail account to Apple mail:
1. Open your Internet browser (e.g., FireFox, Safari or Chrome) and go to https://exchange.uni-mannheim.de.
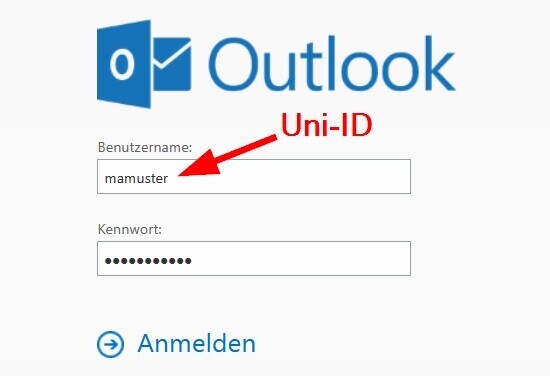
2. Enter your Uni-ID and the corresponding pasword and then click the “Login” button:
3. After the login, click on the profile picture in the upper right corner. Your e- mail sending address will be displayed in the pop-up window that opens:
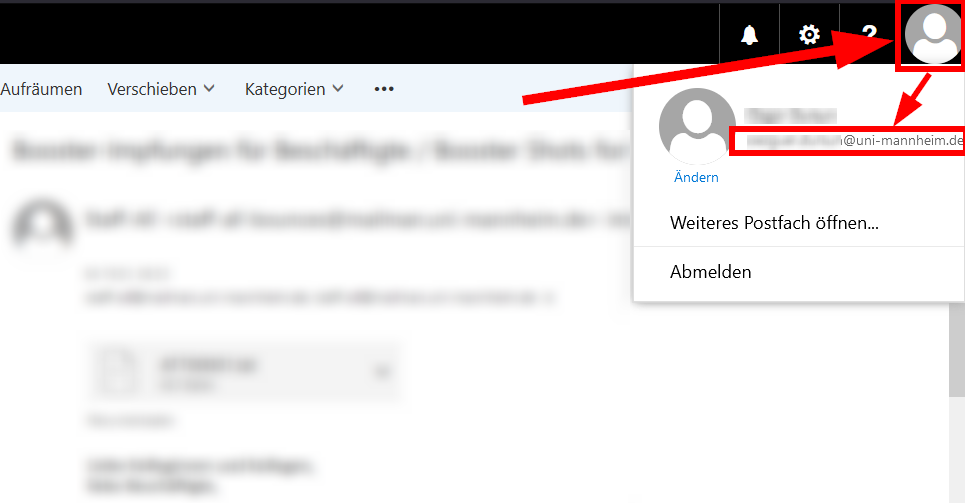
4. Please write this address down -> This is your Exchange sending e-mail address which you will need for the connection.
You have not added an account to Apple Mail? Then continue with step 7. Otherwise, continue here:
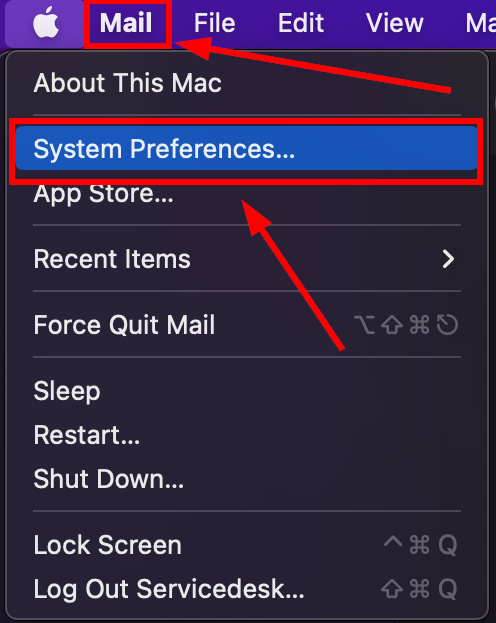
5. Start the mail app on your Mac and click “Mail” and then “System Preferences”:
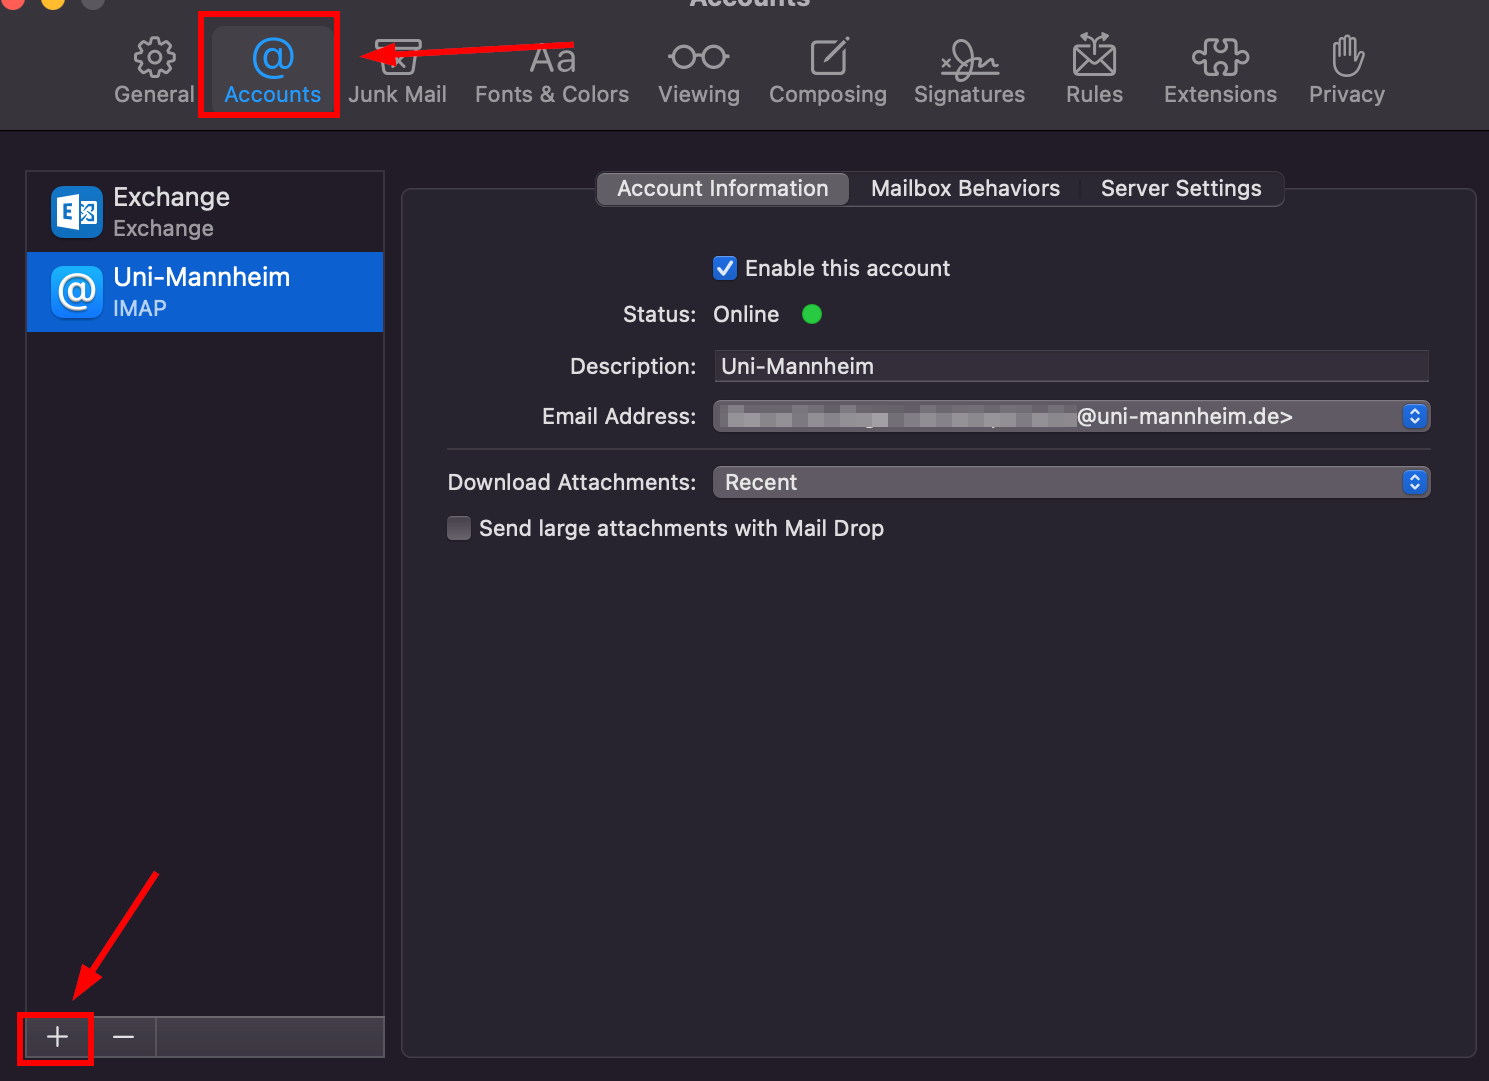
6. In the following window, click on the “Accounts” tab and then on the “+” symbol:
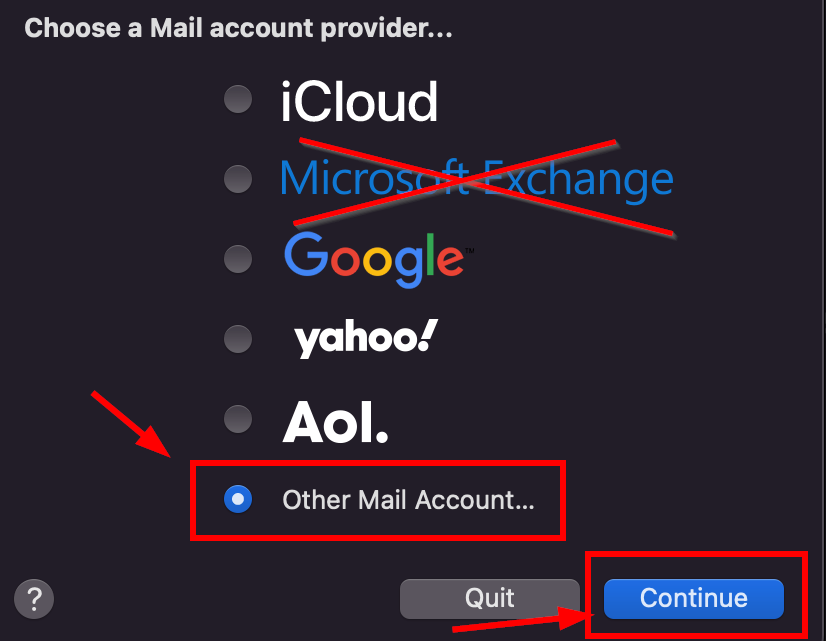
7. Select “Other mail account” and then click “Continue”:
8. In the next window, enter the chosen name, your Exchange sender address* and the password for your Uni-ID (=”User ID”). Then click “Sign In”:
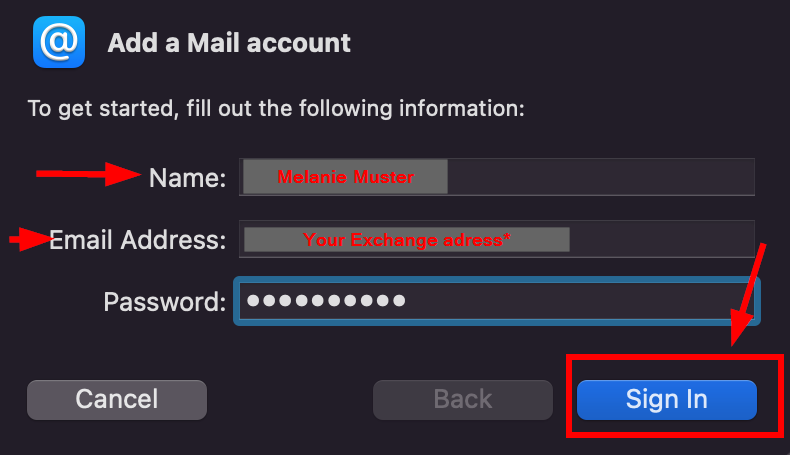
*See steps 1–4.
9. A notification will appear that the account name/
password could not be verified. This is normal. Please enter your user name in the format “AD\Uni-ID” (also for example “Ad\memuster”), enter “exchange.uni-mannheim.de” in the fields for incoming and outgoing e-mails and click on “Sign In”: 
Please note: Use “\“ and not “/”. Please press Alt + Shift + 7 to insert the backwards slash. Confirm by clicking “Sign In”:
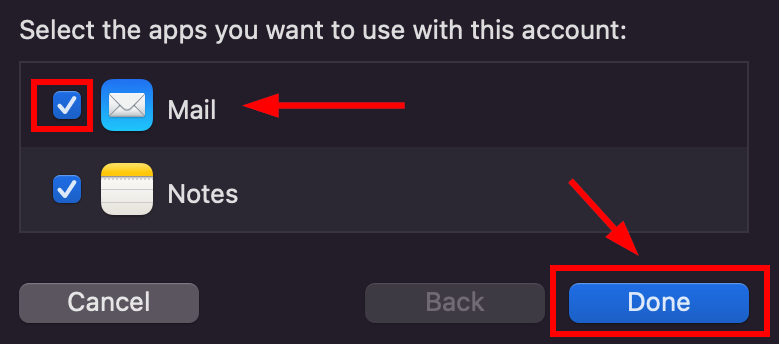
10. Select “Mail” and, if applicable, also “Notes” and click the button indicating “done”:
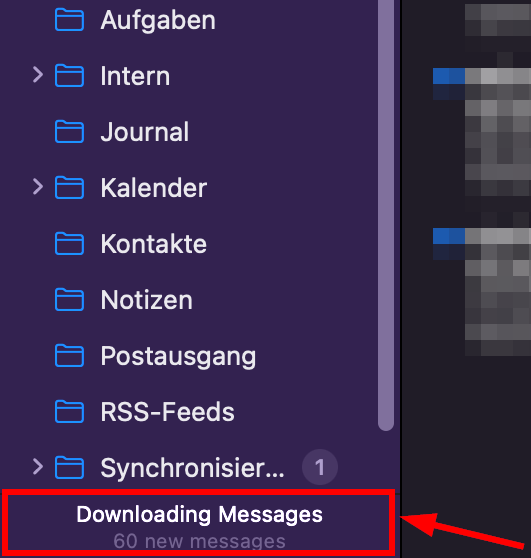
11. Your e-mail account will now be set up and synchronized. Depending on the size of your mailbox, this will take some time. You can see the status at the lower left corner:
In order to integrate your calendar, please continue with the following steps:
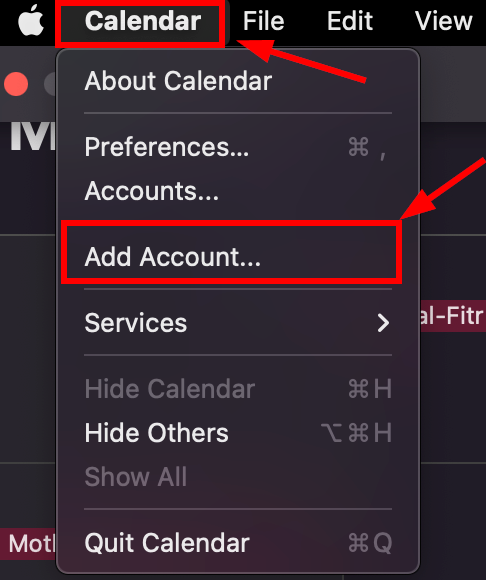
12. Open the calendar app and click on “Calendar” in the upper left corner and then on “Add account...”:
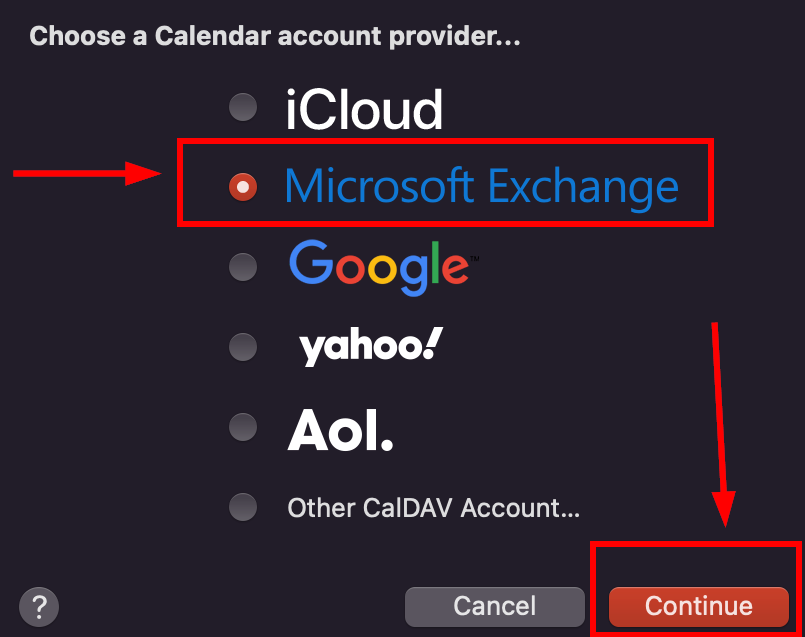
13. Select “Microsoft Exchange” and click “Continue”:
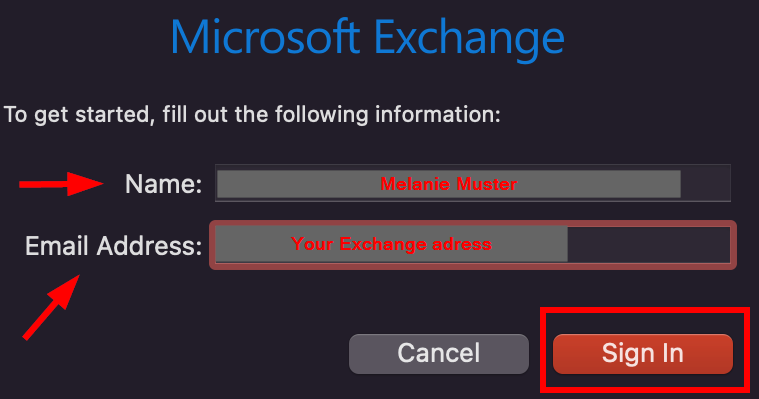
14. Enter your name and your Exchange address and click on “Sign In”:
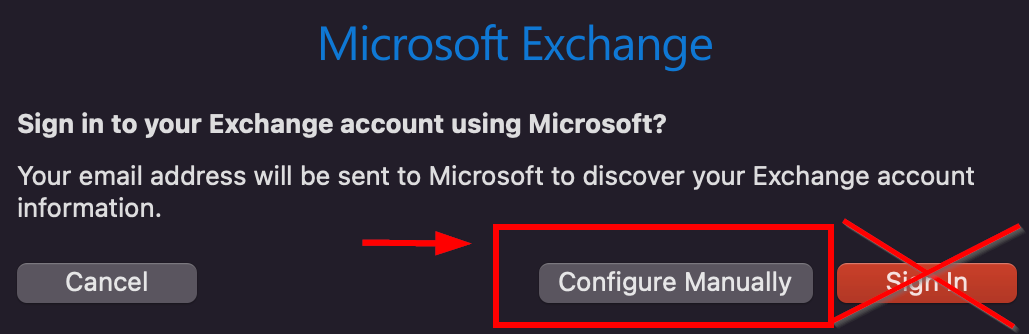
15. In the window that appears next, select “Configure manually”:
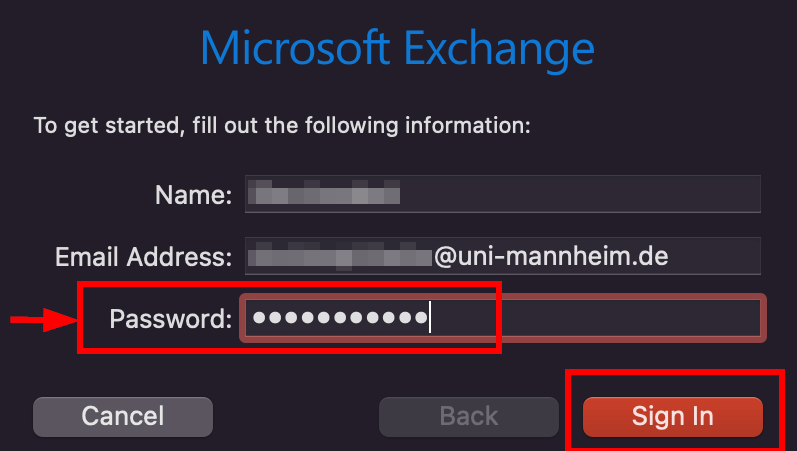
16. Enter the password of your Uni-ID and click on “Sign in”:
17. A notification will appear that the account name/
password could not be verified. This is normal. In the “User name” field, enter your Uni-ID in the format “AD\Uni-ID” (e.g., Ad\memuster“) and click “Sign In”: 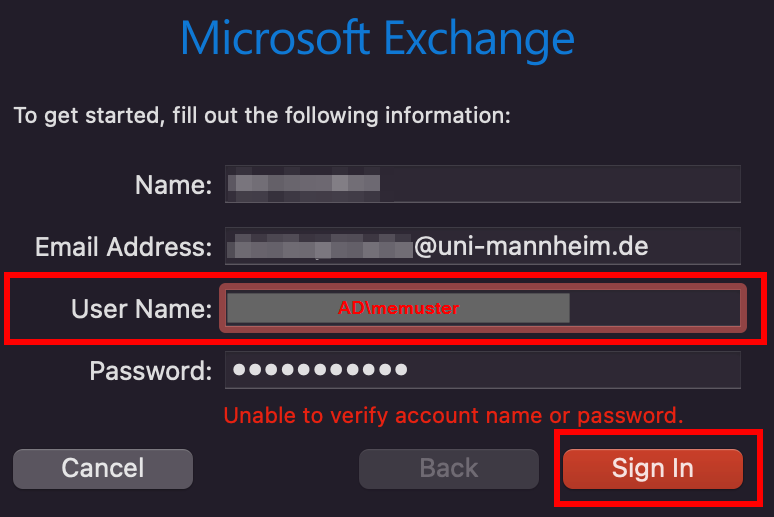
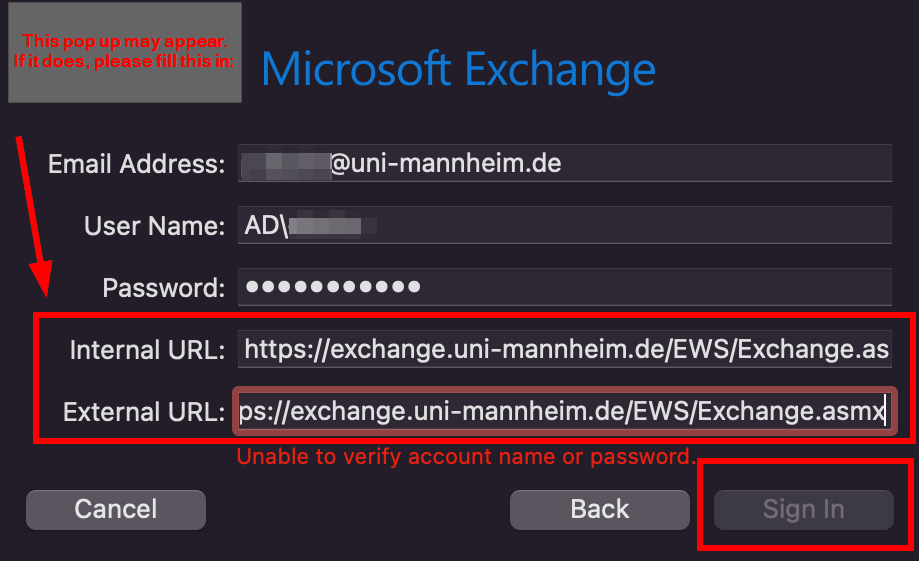
18. If the following window appears, enter “https://exchange.uni-mannheim.de/EWS/Exchange.asmx“ in the boxes Internet and external URL and click “Sign In”:
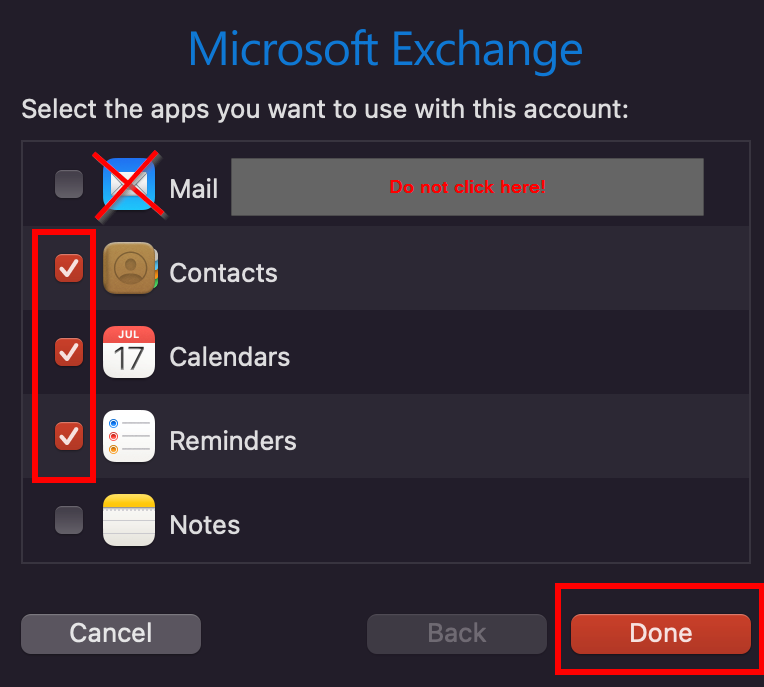
19. In the next window, select “Calendar”, “Reminders” and “Contacts” and click “Done”. Do NOT select “Mail”:
Your calendar and the calendars shared with you will now be synchronized. Depending on the size of the calendar, this may take a while.