Microsoft Teams for Employees
Microsoft Teams is a communication service that facilitates virtual collaboration between individual persons or groups. The software has several features, such as a chat and a video and audio conference feature. In addition, it is possible to create groups to facilitate communication on specific topics.
You are using Microsoft Teams for the first time? Use Microsoft’s Quick Start Guide to learn more about the basic features:
Content
Login for employees
How to login
Please follow the instructions under „How to login to Microsoft 365”.
How to logout
In order to logout, please click on the circle with your initials in the right corner of the menu bar. Then the menu will open, in which you can click on “logout”.

Profile and status message
Your profile is your business card in Teams. Your profile also indicates your presence, like an office door which is either open or closed. Your presence indicates if you are generally available for a chat or if you are already talking to someone. We recommend to upload a photo so that your colleagues see to whom they are writing. In addition, your status is indicated as a red dot below your profile picture (e.g. green indicates “available”, “red” indicates “please do not disturb”). You can also set a specific status message (e.g. that you are out of office when you are taking a vacation).

Change your profile
In order to upload a profile picture, click on the circle with your initials which is at the upper right corner of the menu bar. The context menu will then open. Please click on the big circle at the bottom.

A window will open. Now you can upload a profile picture or remove an existing profile picture. If you do not upload a profile picture, your initials will be shown instead of a profile picture.
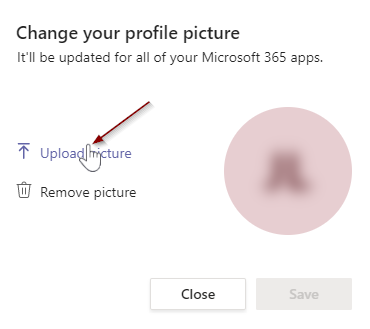
If you wish to upload a profile picture, click “Upload picture” and then the “Save” button.
If you want to delete an existing profile picture, click “Remove picture” and then the “Save” button. In this case, your initials will replace your picture.
Change your status
Change status
If you do not change your status manually, the standard setting in Teams will be displayed, which is green. However, the status will automatically change, depending on your actions. If you do not press any keys on your keyboard, your status will automatically turn yellow, meaning that you are away. If you are in a Teams call, your status will turn red, indicating that you are on the phone. If you go offline, your status will be white.In addition, you can set a status message that others will see when writing to you. If you do not set a status message, Teams will not display a status message.
Change your status
In order to change your status manually, click on your profile picture at the upper right corner of the menu bar. Select the current status (in the picture below the current status is “Available”).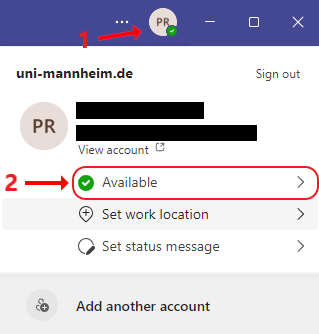
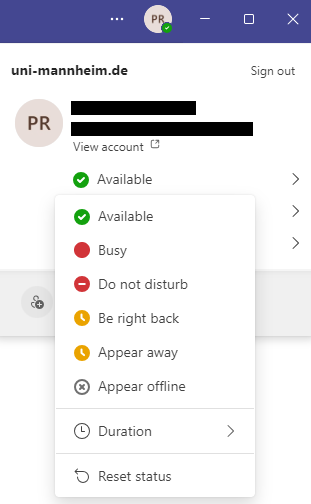
In the subsequent menu, you can select your new status. Under “Duration” you can also define how long your new status will be displayed. If you click on “Reset status” you can reset the status you set. The standard setting in Teams is green, meaning “available”.
Change status message
If you are not available for a longer period of time, we recommend to set a status message (e.g. an out-of-office message when you are on vacation). Click on your profile picture at the upper right corner of the menu bar. Then click “Set status message”.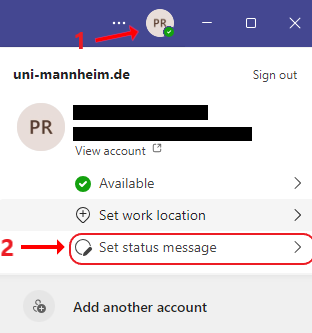
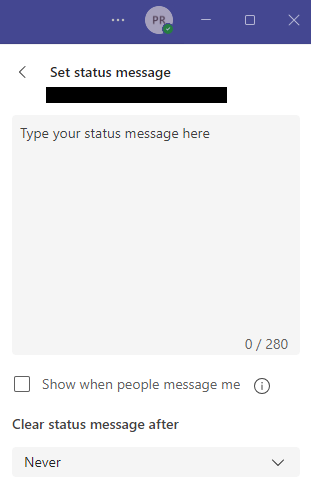
Then you can enter and save your personal status message. In the menu under “Clear status message after”, you can also define how long your status message will be shown.
Other settings
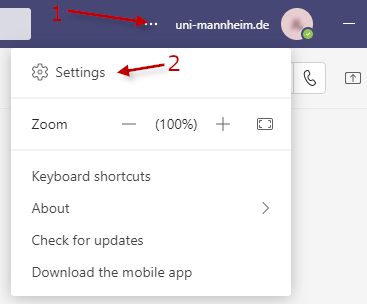
In order to adjust your settings, click on the three dots next to your profile picture in the upper right corner of the menu bar. Select “Settings”.
In this menu, you can individually adjust various settings. Under “General”, you can set a theme for Teams and under “Notifications” (“Play sound for incoming calls and notifications”) turn off the sound for calls and notifications.

For an overview and more information on how to adjust the settings, please refer to the Microsoft instructions:
Find persons and start a chat
Start a chat between two persons
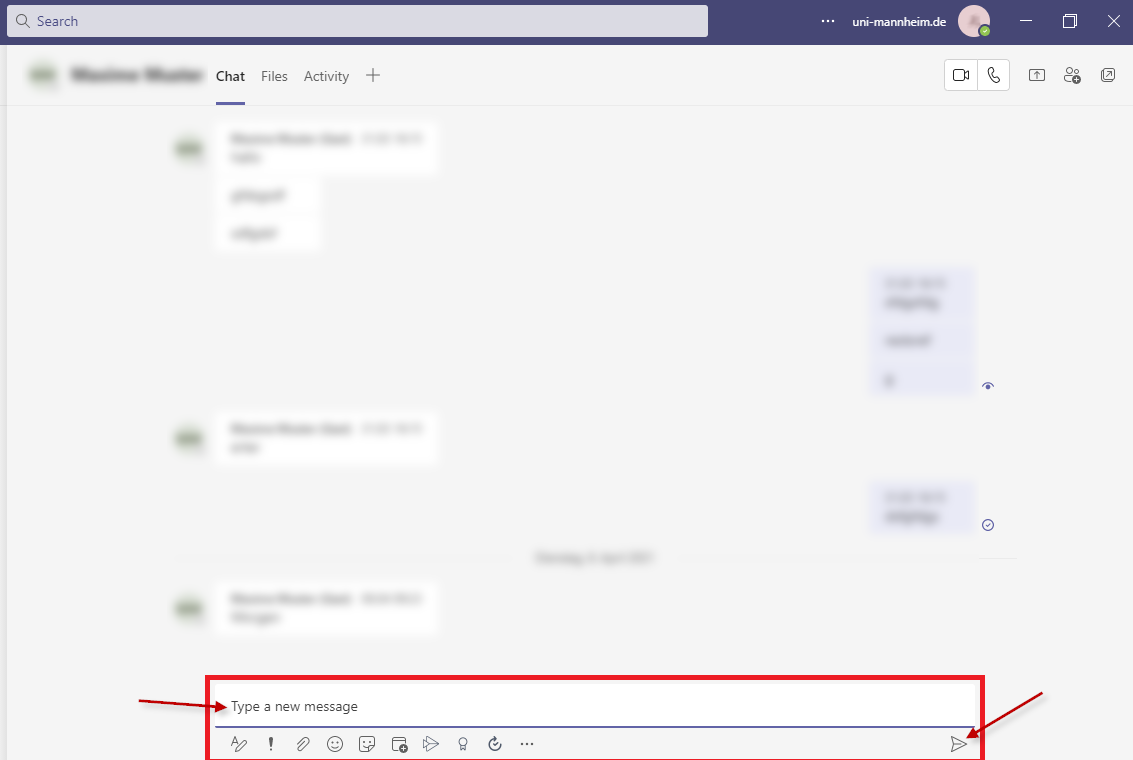
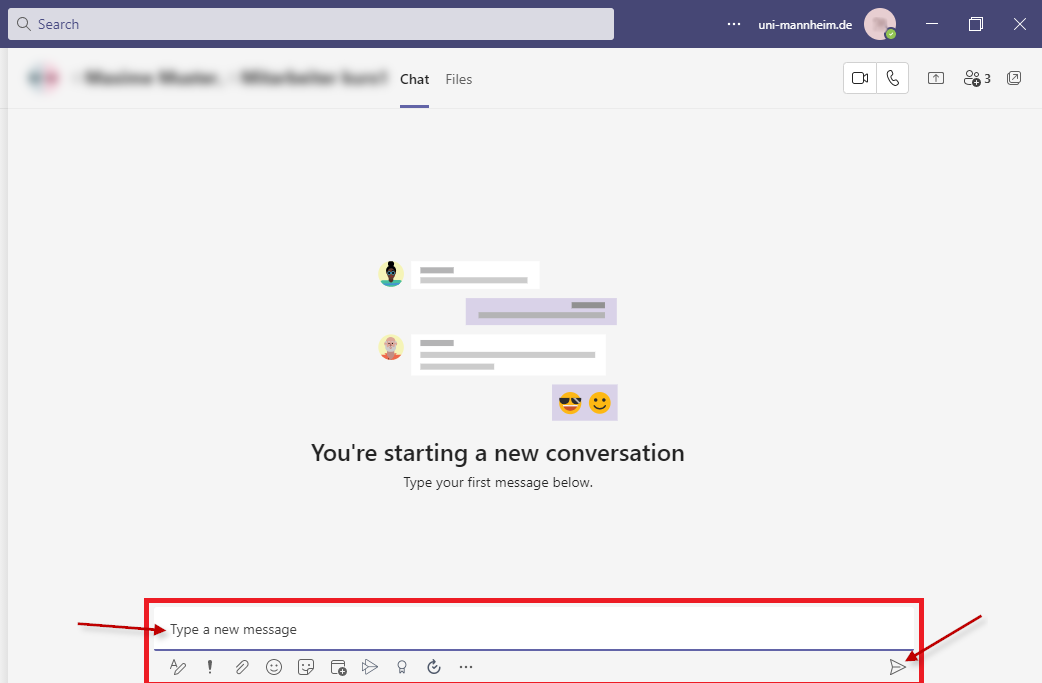
Click on the name of the person with whom you want to start a chat. Please enter the first and the last name or the Uni-ID in the search line in the middle of the menu bar and start the search by clicking enter.

A drop down menu showing the name of the person you searched for will open. If you click on the name of the person, a chat window will open. Now you can write your message in the text field at the bottom of the screen. The message will be sent if you press the enter key (or click on the send symbol at the lower right corner).
Below the text field, you will also see other options, such as formatting options, delivery options, options to attach files, emojis, sticker and many more.

Please note that you are responsible for the files sent by you and please send only e-mails that you are allowed to send (data protection law, copyright law and so on).
Video or audio calls between two persons
In order to start a video call, please select the person you want to call as described above. Click on the camera symbol in the upper right corner in the window that opens.
Please note that the call starts immediately.

In order to start an audio call, please select the person you want to call as described above. Click on the phone call in the window that opens.
Please note that the call starts immediately.

Group communication via chat, audio or video call
You can also communicate with several persons outside your working groups. Just select the persons you want to communicate with and click on the person icon at the upper right corner of the window. You cannot find the person you want to contact? Please follow the steps described under “Start a chat”.
A window will open in which you can enter the first and last name or the Uni-ID of the person you want to communicate with. Please confirm by clicking “Add people”.

The group chat will open in a new window.
All participants can now see and access the chat history at any time. This also applies to shared files.
Please note that you are responsible for the files sent by you and please send only e-mails that you are allowed to send (data protection law, copyright law and so on).
Do you want to see or hear the members of the chat? By clicking on the camera symbol or the phone symbol you can always turn the chat into an audio or video conference.


How can I remove a person from a group chat?
Select the relevant group chat and click on the person icon at the upper right corner of the window. A window will open. Click on the “X” behind the person you want to remove from the group chat.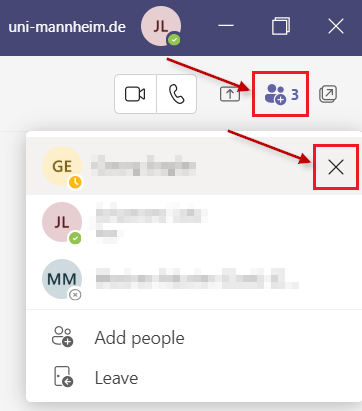
How can I leave a group chat?
Select the relevant group chat and click on the person icon at the upper right corner of the window. A window will open. Click “Leave” to leave the conversation.
Teams (working groups)
Teams in Microsoft Teams may be compared to working groups. They facilitate planning and conducting meetings with team members, sharing information and editing documents.
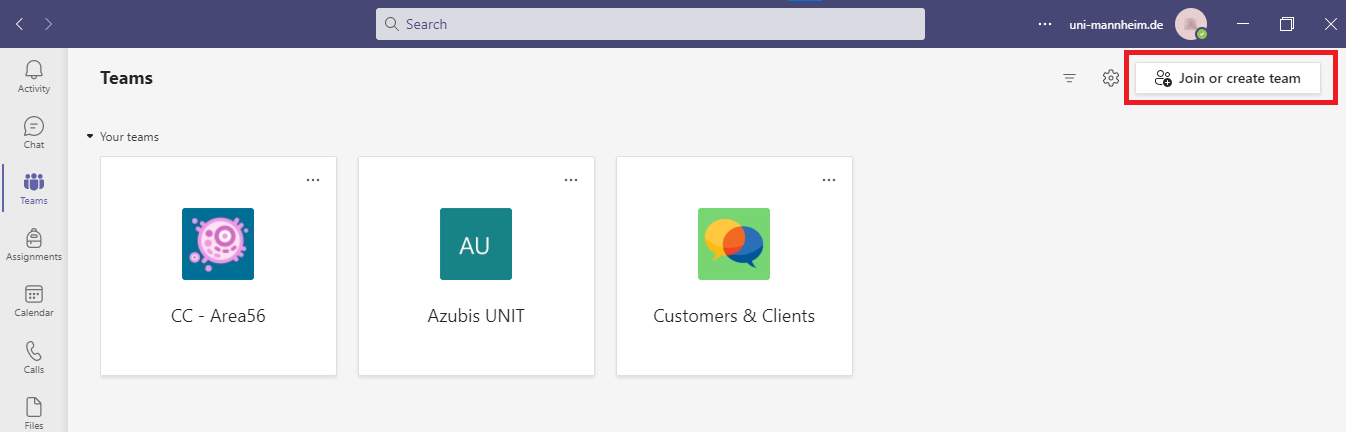
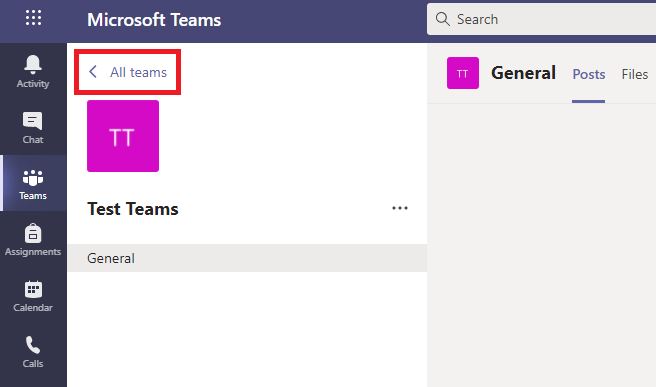
You can find your teams in the “Teams” menu on the left-hand side. If you are not a member of a team yet, you will see the option to create a new team or to join a team.
If you are already a member of various teams, you will see an overview on all teams. The option to join a team or to create a new team is in the upper right corner.

Join or create teams
Go to “Create team” on the overview page on “Join or create a team” and select “Other” in the window which opens.
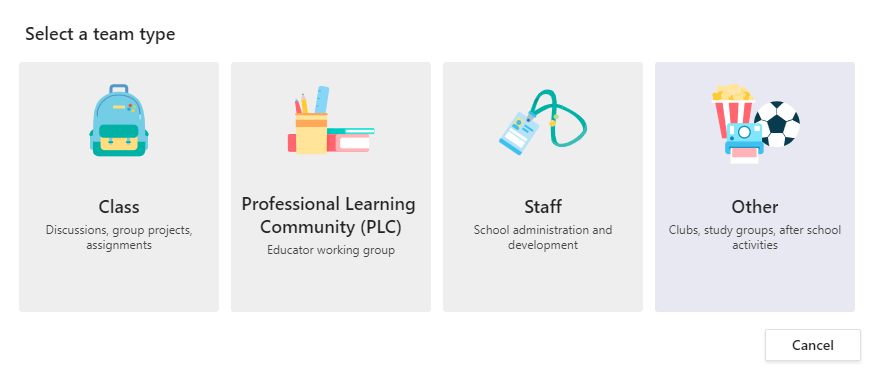
The “Create team” window will open.
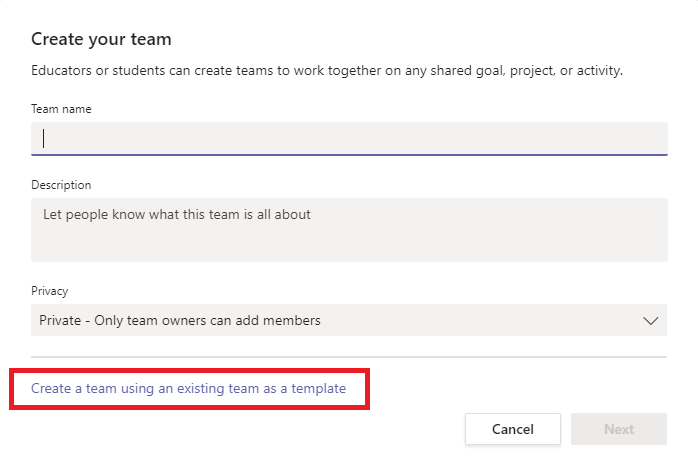

Here you enter the name for the team and add a description. With the “Privacy” option, you can define whether only the team owner can add new members or if all employees can join the team without any restrictions. We recommend to refer to a template when creating a new team. For this, you have to be a member of a team before you create your team. By clicking on “Next”, your team is created.
In the next step, you can add persons or groups to the team. You can also skip this step and add members (see next step) at a later point in time.
Add persons to a team
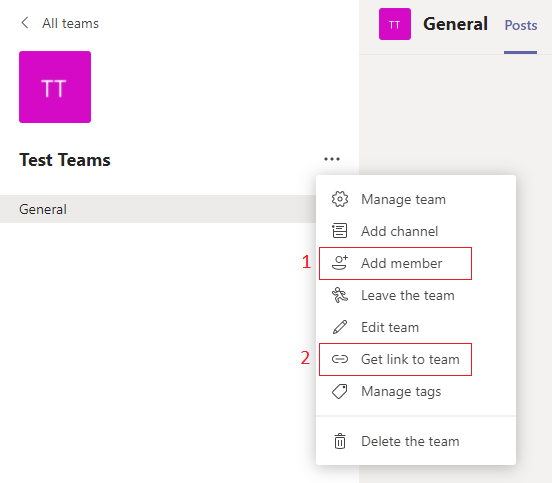
There are two ways to add persons to a team:
1. You can add individual persons to a team by clicking the “Add people” button. For this, you have to know the name of the person. If there are several persons with this name, you need to know the ID of this person.
2. If you click on “Get link to team”, a link to the team will be created. If people click on the click and confirm that they want to join the team, the team owner will receive the request to join the team. The team owner can accept or reject this request.
Guests in teams
Microsoft Teams can only be used by employees of the University of Mannheim. However, you can add guests. Only the owner of a team can add guests. Team members are not authorized to add guests. You can update the guest permissions (see the section on “guest permissions“).
What is the difference between external persons and guests?
External persons can use a link with an invitation to join a Teams meeting. A Microsoft account is not necessary for participating in the meeting. The link is only valid for a particular meeting. As soon as the meeting is over, the external person has no longer access to Teams.
Guests are persons outside the organization, who are added to a work group (team) and who can use all features. In this case, an existing Microsoft account is required.What are the rights of guests in Microsoft Teams provided by the University of Mannheim?
Guests in Microsoft Teams provided by the University of Mannheim can- start a new conversation and participate in existing conversations,
- start a meeting,
- access the files shared in the team and share new files,
- create, edit and delete channels if authorized to do so by the owner of the team and
- use the chat feature to start a personal conversation with individual persons from the team.
How to add a guest to a team
Select the team to which you want to invite a guest. Click on the three dots next to the team name and select “Add member”.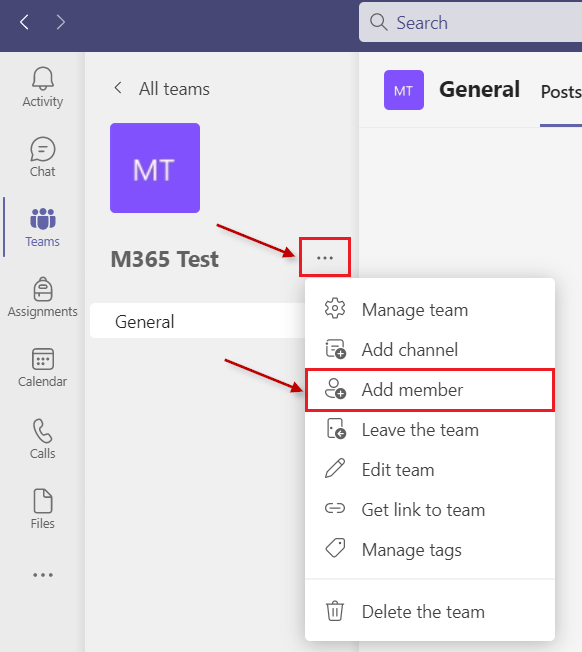
Enter the e-mail addresses of the person(s) you want to invite to the team. Click on “add” and then “close”.

The guest will receive a welcome e-mail with information about the team. Before joining the team, the guest has to accept the invitation. See also “How can I login to Microsoft Teams as a guest?”
If the invited guest is not yet part of the team after accepting the invitation, please invite the person again.
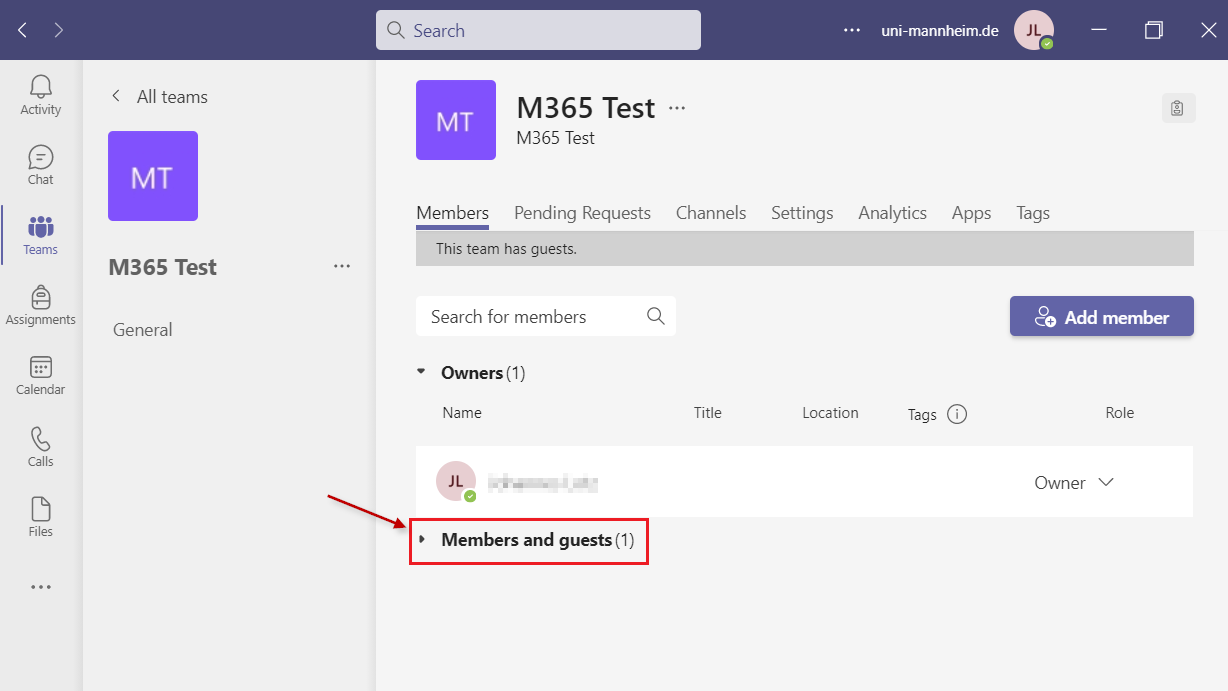
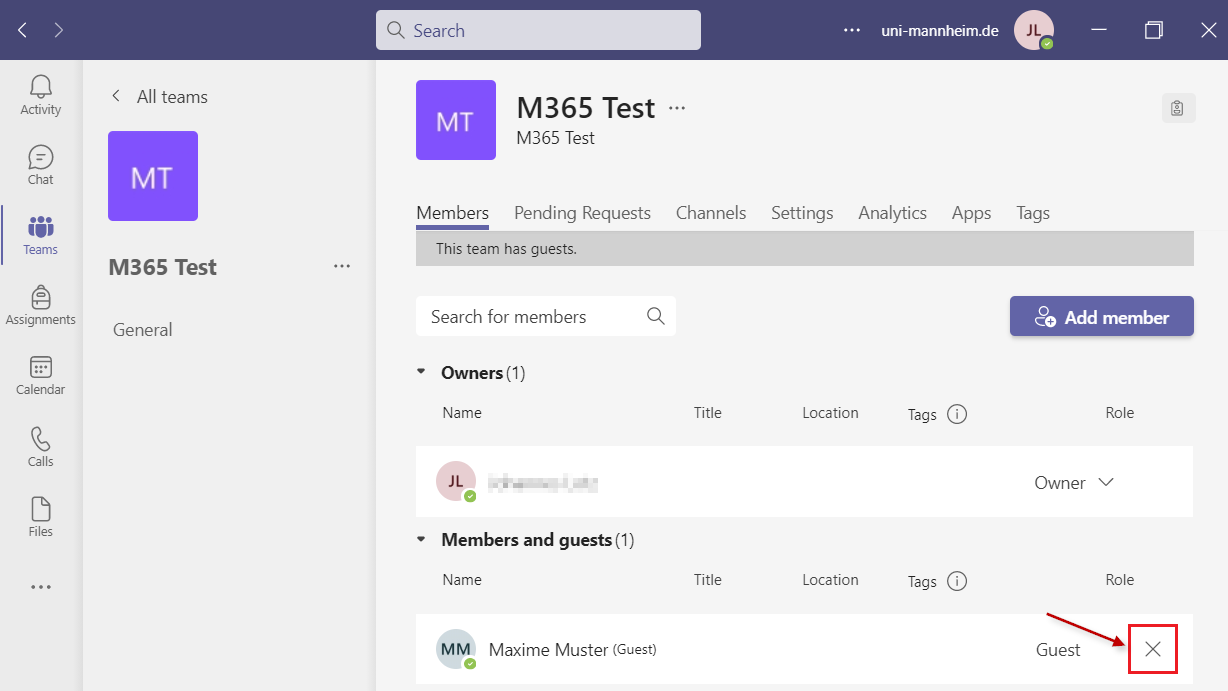
How can I remove a guest from my team?
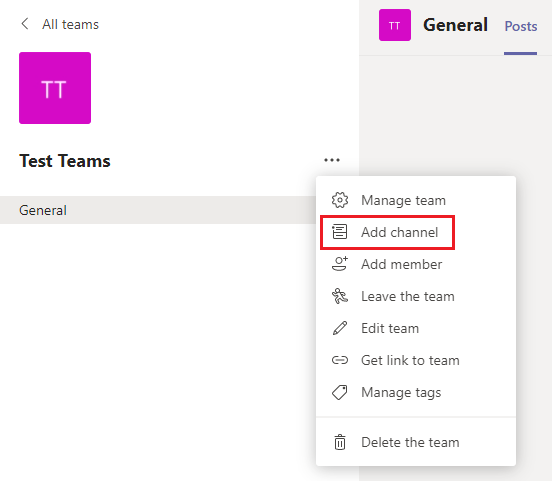
Only the owner of a team can remove guests. Select the team from which you want to remove a guest. Click on the three dots “...” next to the team name and select “Manage team”.
In the next step, click on “Members and guests”. All members and guests of the selected team will be displayed.
Click on the “X” next to the role of the guest you want to remove.
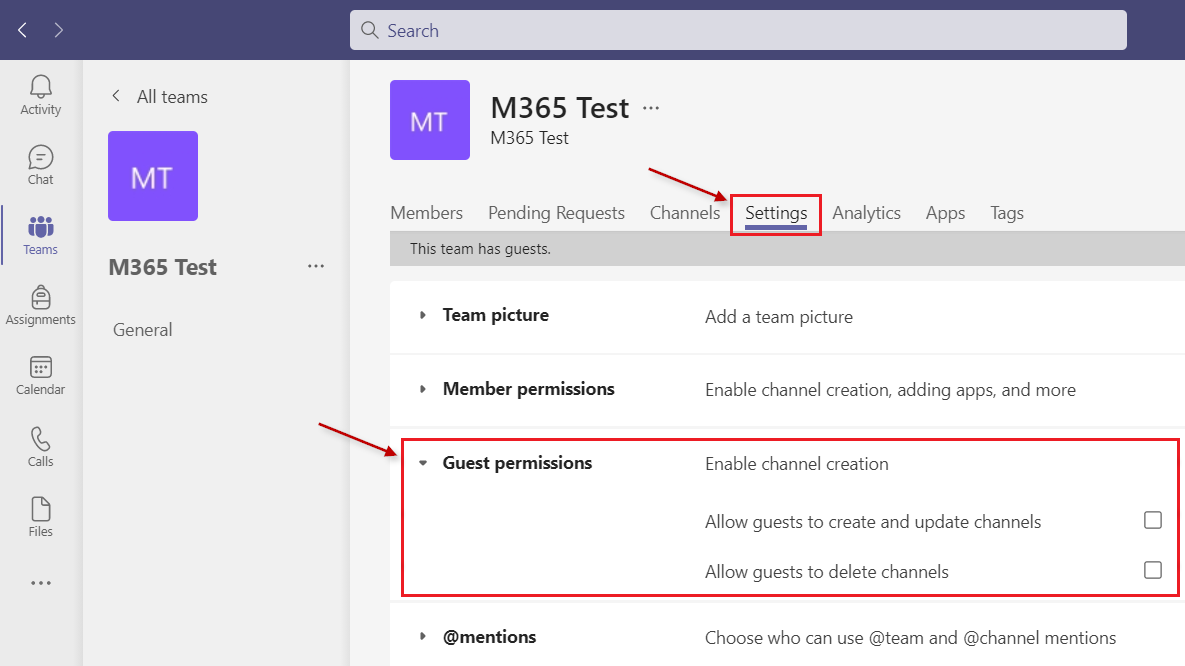
How can I update guest permissions?
Only owners of a team can update guest permissions. Select the team for which you want to update the permissions. Click on the three dots “...” next to the team name and select “Manage team”.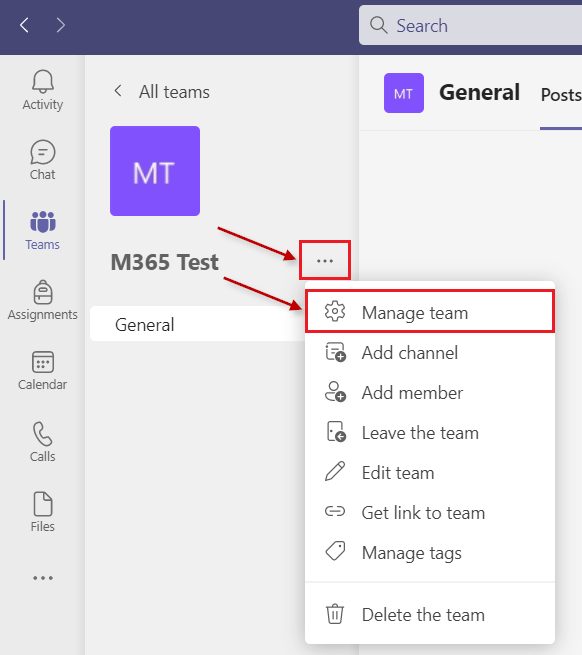
Select the “Settings” tab. In the “Guest permissions” section, you can update the guest permissions. You can decide if guests are allowed to create and update or delete a channel. The updates are saved automatically. The permissions apply to all guests of a team.
How can I login to Microsoft Teams as a guest?
Open the link in your invitation e-mail.If you have not already set up a Microsoft account for the e-mail address you entered, you can create a Microsoft account in the window that opens. You need to choose a password and a display name, before you confirm your e-mail address.
If you already have access to another Microsoft Teams instance with this e-mail address, you can login like you normally do and then switch to the Microsoft Teams instance of the University of Mannheim.
How can I be invited as guest to another Microsoft Teams instance?
If you are an employee of the University of Mannheim and you want to be invited as guest to another Microsoft Teams instance, please provide the person who will invite you with the e-mail address you use for logging in to the Teams instance of the University of Mannheim ("Uni-ID”@ad.uni-mannheim.de).How can I switch between Microsoft Teams instances?
In Teams, click on “uni-mannheim.de” in the upper right corner of Teams and select the name of the instance to which you want to switch.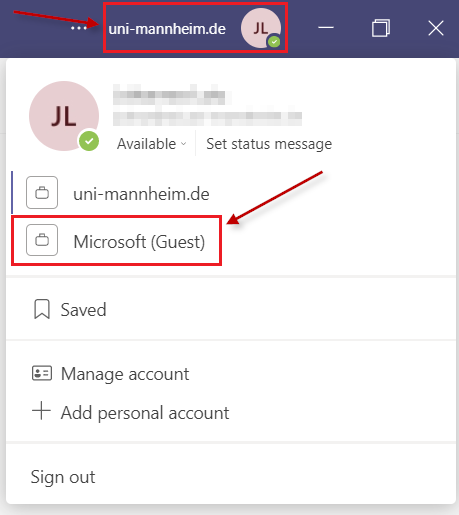
Structuring the topics discussed in a team by using channels
In order to structure the information within a team, you can create channels for individual topics. The channels may also be set up as private channels. In this case only the persons assigned to this channel are able to see the channel and its content.
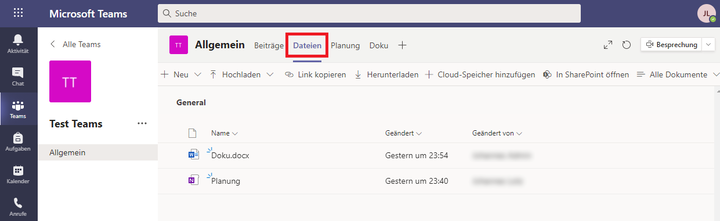
Share files with a team
In a team, you can create files for and share files with all team members. You can do this in the “Files” tab.
Please note that you are responsible for the files sent by you and please send only e-mails that you are allowed to send (data protection law, copyright law and so on).
In the menu bar at the top, you will find the following options:
- By selecting the “New” option, you can create files and folders.
- By clicking the “Upload” option, you can upload files or folders from your computer to Teams.
- If you click on “Copy link”, you can copy a link. Please note that every user of the Microsoft 365 products of the University of Mannheim who has access to this link can also access the shared file / folder. If you want to define a group of persons that has access to the shared documents, you can adjust the SharePoint settings.
- If you click on “Download”, you can download the selected file as Zip file. You will only see this option, if you have opened a folder.
- If you click on “Add to cloud”, you can add files and folders from other teams to your team.
- If you click on “Open in SharePoint”, you can open the current link in SharePoint.
These options are dynamic, that means they change if a file has been selected. Here the options “Open”, “Delete”, Pin” and “Change name” appear.
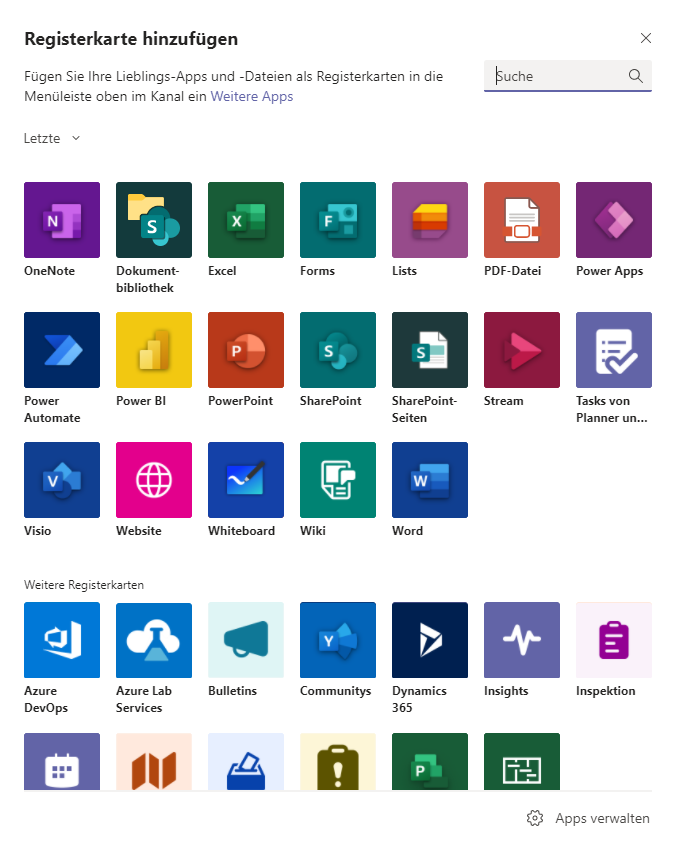
Tip: Do you regularly work with specific files? It may be useful to pin these files by clicking on the plus symbol at the top of the application. This way, you have easy access to these files.
If you click on the plus symbol, a menu will open in which you can select and pin the file type (e.g. Word or PDF). Here, all applications offered by Microsoft will be shown. Therefore you should use the search bar and enter for example “Word” to filter the results.
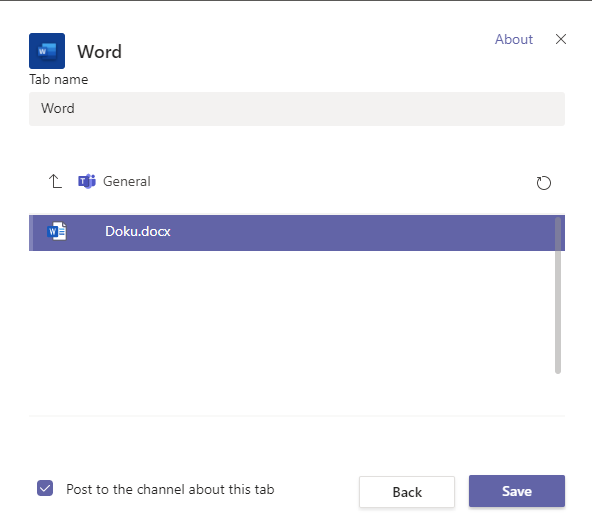
You can add a name to the tab and select the file. Confirm your selection by clicking “Save”.
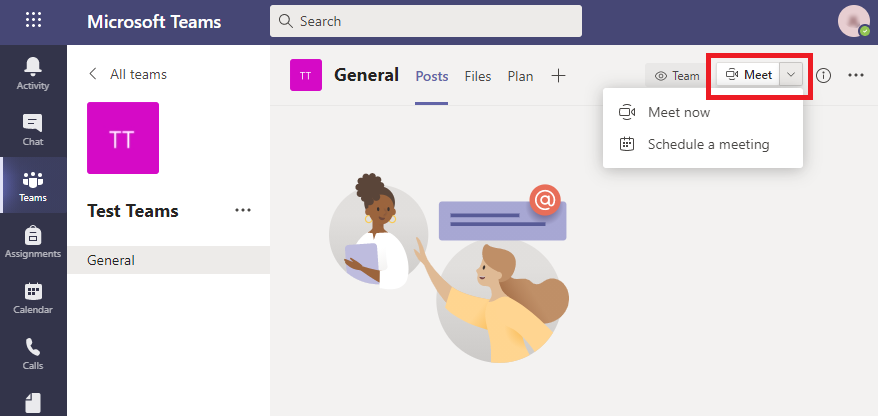
Team meetings
If you click on “Meet” in the upper right corner, you can schedule a meeting with all members of a team.
Please note: Please do not yet use the option “Schedule meeting” provided by Microsoft but schedule meetings via the calendar.
For more information on meetings, please refer to our instructions on the Teams calendar.
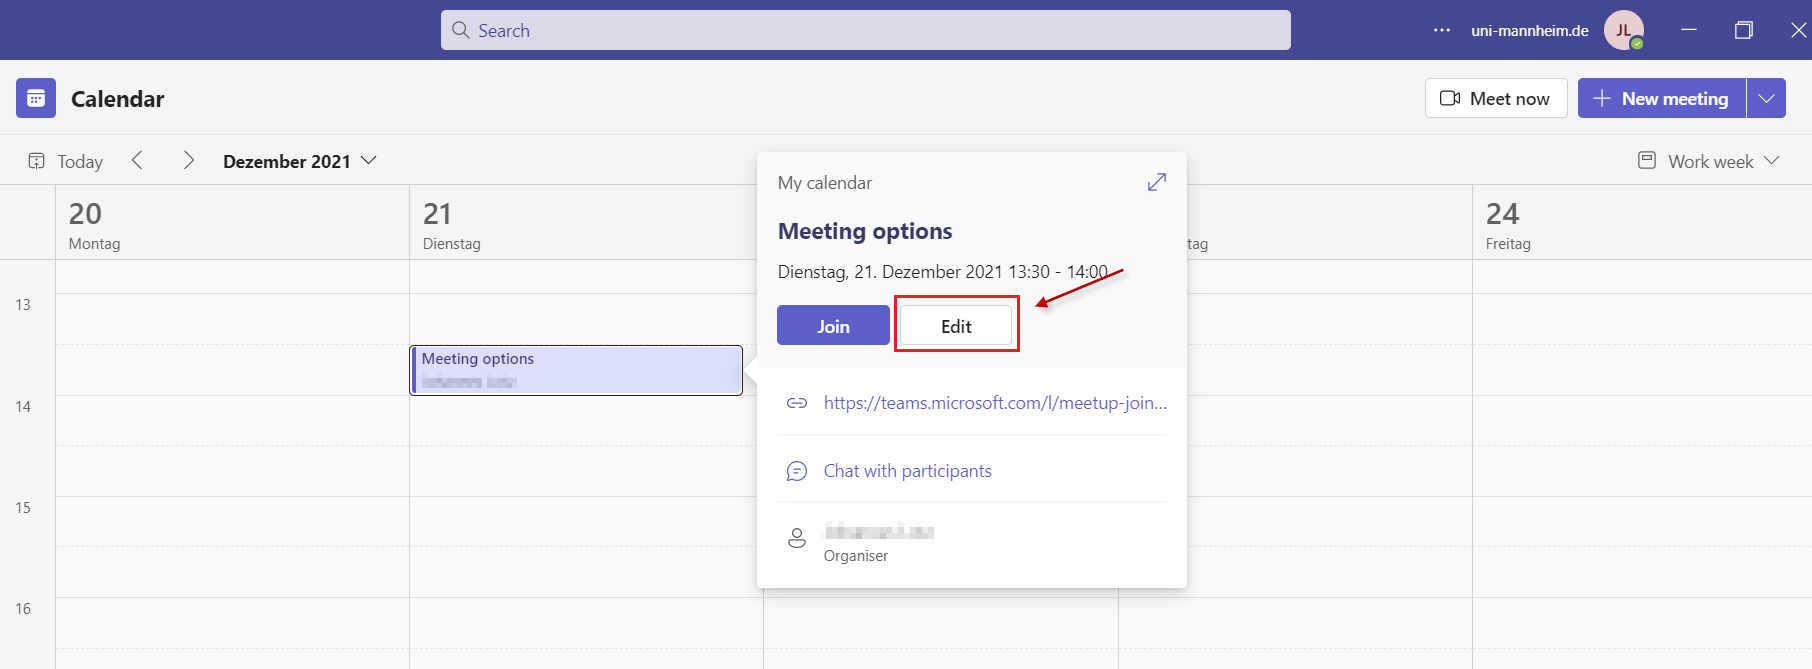
Change meeting options
In order to change meeting options, create the meeting as always and invite at least one other person. Save the meeting by clicking on the “Save” button in the upper right corner. Then click on the meeting in your calendar. Click on “Edit” in the preview window.
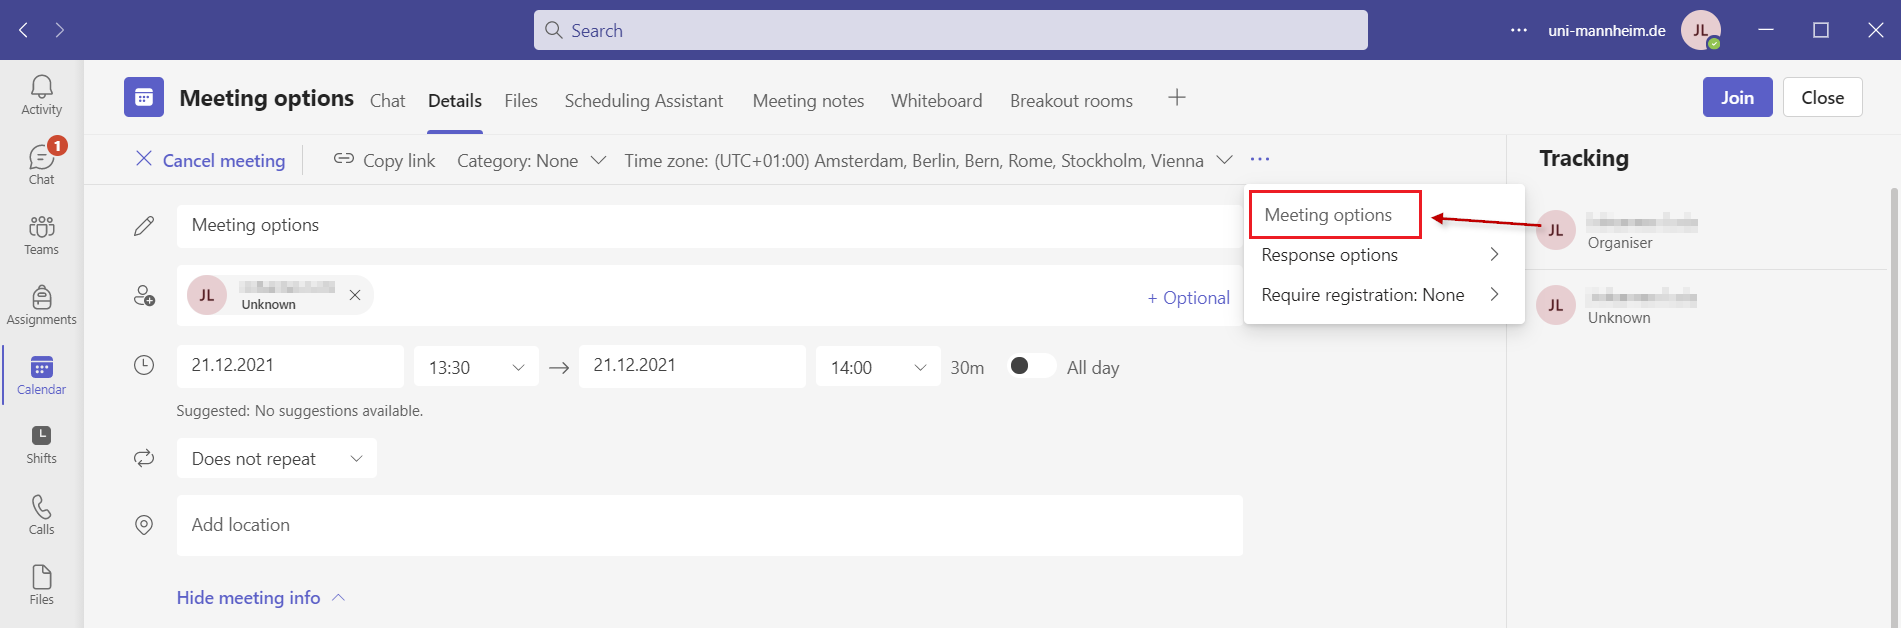
Click on the three dots “...” in the meeting details.

A drop down menu will open. In this menu, click on “meeting options”:
A browser window with the meeting options will open. You can determine how to deal with the waiting room, camera, presentation for the meeting. Update the settings and save these by clicking the “Save” button at the end of the page.
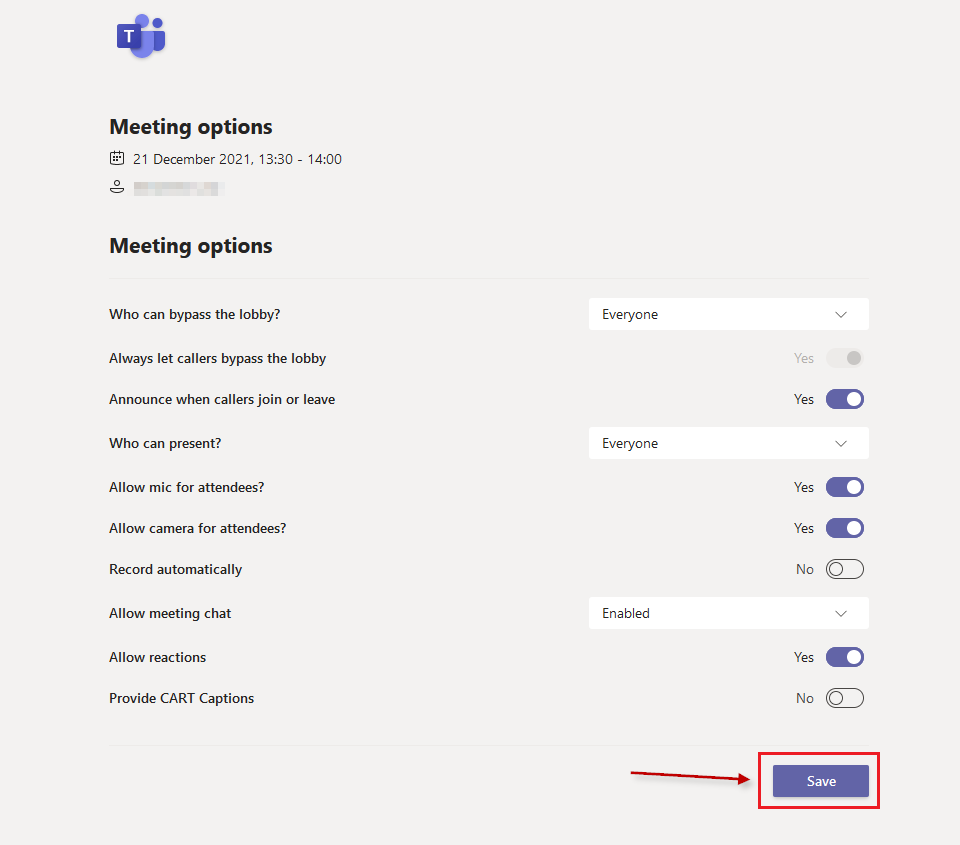
You can now close the browser window and meeting details.
Team chat or group chat
If you want to share files or jointly work on files, it is better to use a team since the files created in a team are not assigned to a person but the team. The files are not deleted if someone leaves the team or the university.
A team is also useful if you want to schedule regular meetings with the same persons. The members are then automatically added.
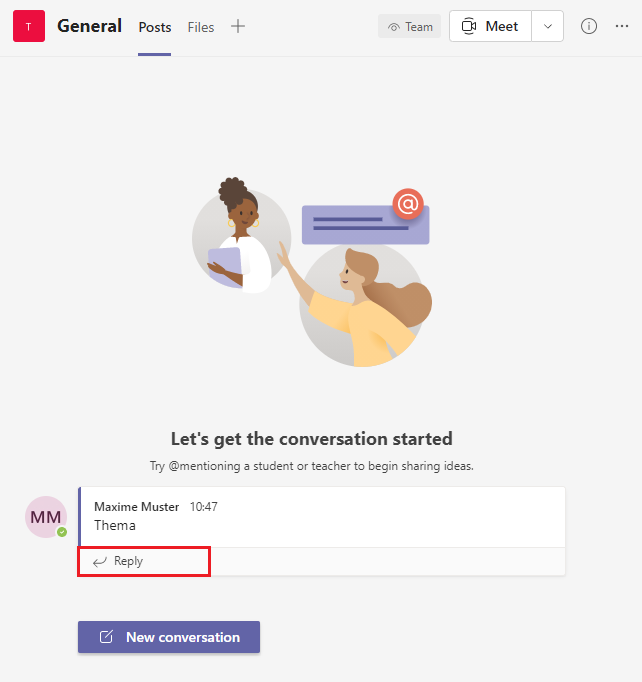
By clicking on the “New conversation” button, you can start a chat on a topic. If you want to reply to a conversation, click on “Reply” below the conversation. This is useful for discussions on a specific topic.
By creating channels, you can also bring more structure into the team. This facilitates jointly working on a specific topic, since all information can be stored in a channel.
A group chat is more like a messenger and is useful for general conversations or questions, for which you would otherwise have called the person.
Create group chats
- Go to “Chat” in the menu on the left-hand side.
- Click on the pencil icon.
- Enter the names of the person you want to add to your group chat in the window which opens. You can find persons by entering their name or their Uni-ID. Please confirm by clicking the enter key to create the chat.
Switching between several teams
If you want to switch between several teams, you can go back to the overview page for your teams by clicking on “Teams” in the upper left corner.
Teams Calendar
For more information on how to use the calendar feature in Teams, please refer to our instructions for the Teams calendar.
Files
Select “Files” on the left-hand side of Teams to quickly access all your files that are grouped in accordance with the following categories.
At the start page, you will see all files you have recently displayed or edited.
In “My files”, you will see all files and folders from your personal OneDrive.
In “Shared”, you will see all files and folders that have been shared with you or created by you.
“Favorites" shows all files you have edited to your favorite's list.
Use the “Quick access” to immediately see files that have been shared in certain Teams channels.
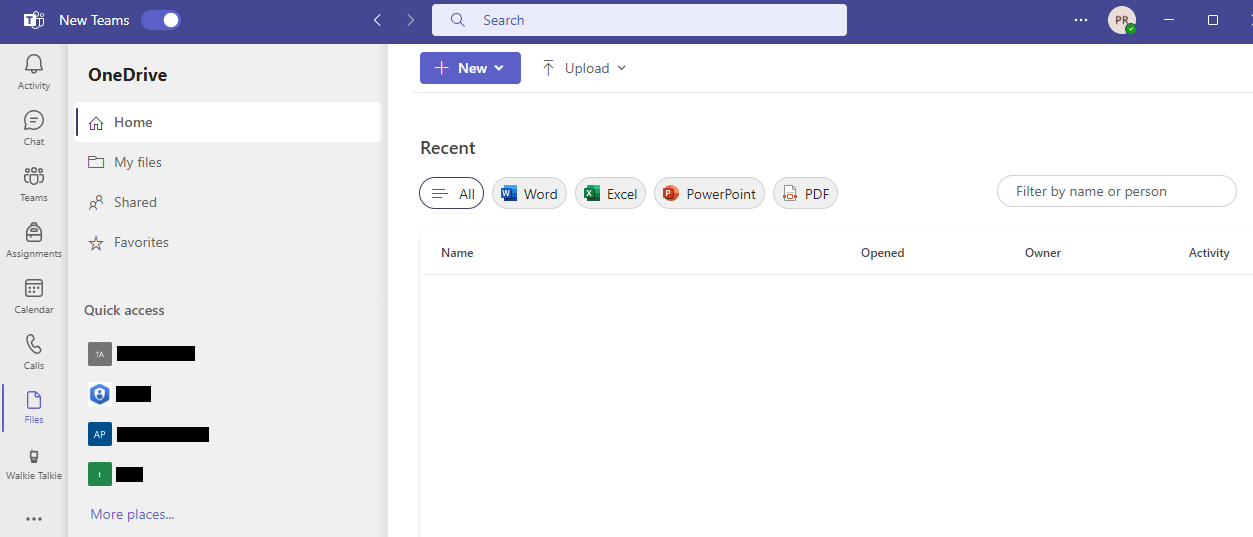
Here you may delete personal files that you have added to Teams, upload files, and create new files. Files that have been added to cloud storage are private unless you share them.
Please note that you are responsible for the files sent by you and please send only e-mails that you are allowed to send (data protection law, copyright law and so on).
For more information and a short explanation video, please refer to Microsoft.
Apps
Teams allows you to use various apps. Some of the apps, such as OneNote are Microsoft apps that are directly integrated in Teams. Other apps must be purchased from third-party providers.
Please note that not all apps are licensed by the University of Mannheim.
In Microsoft’s training videos on apps, you will find an overview about the various apps and their features.
Activity feed
Under “Activity”, you will find a summary of all communication activity, irrespective of the channel, this means all chats, calls, or reactions that do not directly relate to a discussion with one or several persons or one or several teams.
What is the activity feed and how can I use it?
In the “Activity” tab, you will find a summary of all activities related to your communication, irrespective of the channel. It is an overview of all chats, calls or reactions without specifying the chat or team these actions belong to.
If a red dot occurs next to the “Activity” button, you have received a notification. This means that you have been called while you were away or you have been mentioned in a message. The notification appear for a limited period of time, currently 14 days, in your feed.
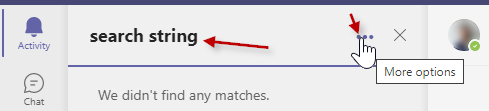
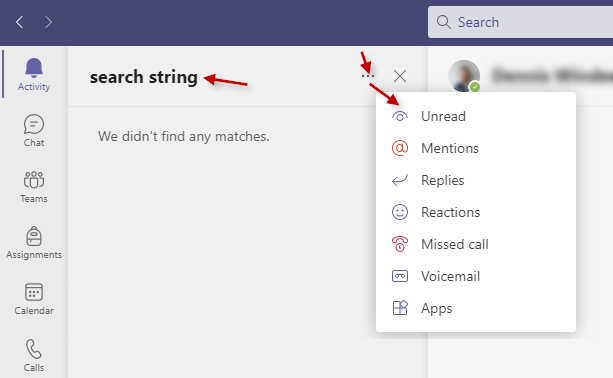
You can search your activity feed by clicking on the filter symbol on the right and entering a search term.

If you click on the filter symbol again, you can also filter for various types of activities, such as “Missed call”, “Voicemail” or “Reactions”.
On our page on the Microsoft activity feed, you will find an overview on all symbols that appear in the activity feed.

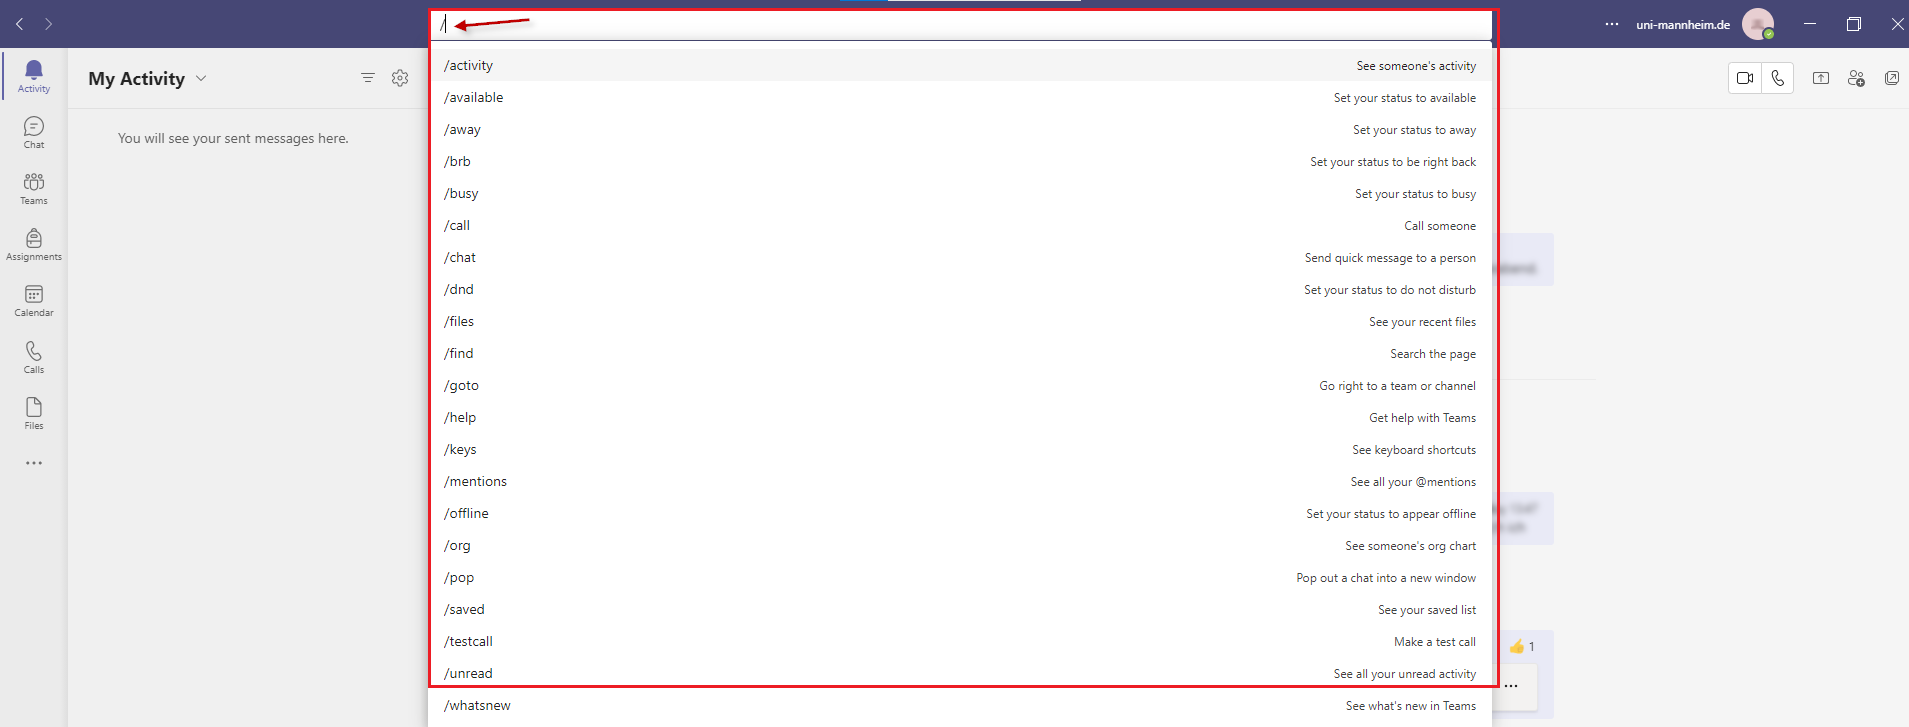
Tip: Do you want to quickly check your notifications or get an overview about possible shortcuts in Teams? Use the command line in the menu bar at the top and enter “/”.
End-to-end encryption for audio and video calls
End-to-end encryption (“E2EE”) is the encryption of transmitted data across all transmission stations. Only the sender and recipient can decrypt the message. No other party, including Microsoft, has access to the decrypted conversation.
How to enable end-to-end encryption in Teams
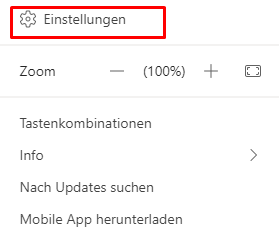
- Click on the three dots next to your profile picture and select “Settings”:
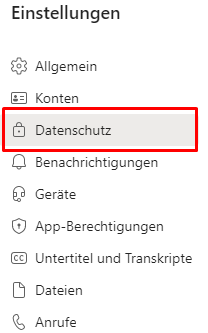
2. Then click on “Data protection”:
3. Then enable the “End-to-end encrypted calls”:
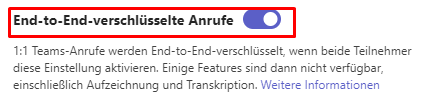
Please note that some features are restricted when using end-to-end encryption. The following features are not available wehn you are in a call:
- Adding other participants
- Live subtitles
- Forwarding calls
- Merging calls
- Putting calls on hold
- Announcing calls, then forwarding calls
- Call companion and forwarding to another device
- Recording
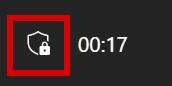
Encryption only works with two participants. If you are on a group call, encryption is automatically disabled. In order to make an encrypted call, both participants must have enabled the encryption feature in advance. If the encryption feature is active, this is shown by the lock symbol next to the duration of the call.