
Printers and Copiers for Employees


Ricoh Copier
Ricoh's multifunction devices are available to employees at the University of Mannheim. Here you will find various guides on this topic.
How do I use the Ricoh copier as a printer in Windows?
Please note: These instructions do not apply to the administration! Please contact IT Support directly (Hotline -2000, email itsupportuni-mannheim.de, MS Teams “UNIT Support”).
Important Note:
Please note that the copiers can only be accessed via the university Wi-Fi network “eduroam” if the device in question is logged into the Wi-Fi with a university ID that has the “staff” designation! This applies to all employee IDs.
For security reasons, student IDs (with the “student” designation) unfortunately cannot access the copiers directly.
Step 1:
Please find the IP address and model number of your Ricoh copier. You will need this information later during the printer setup process.Note: If you do not have the IP address on hand, please contact IT Support (Hotline -2000, email itsupportuni-mannheim.de, MS Teams “UNIT Support”). Please have the copier’s serial number ready when you contact them.
Step 2:
Please go to the following website: https://www.ricoh.de/support/ and enter your copier model in the search field, e.g., “IM C3010.”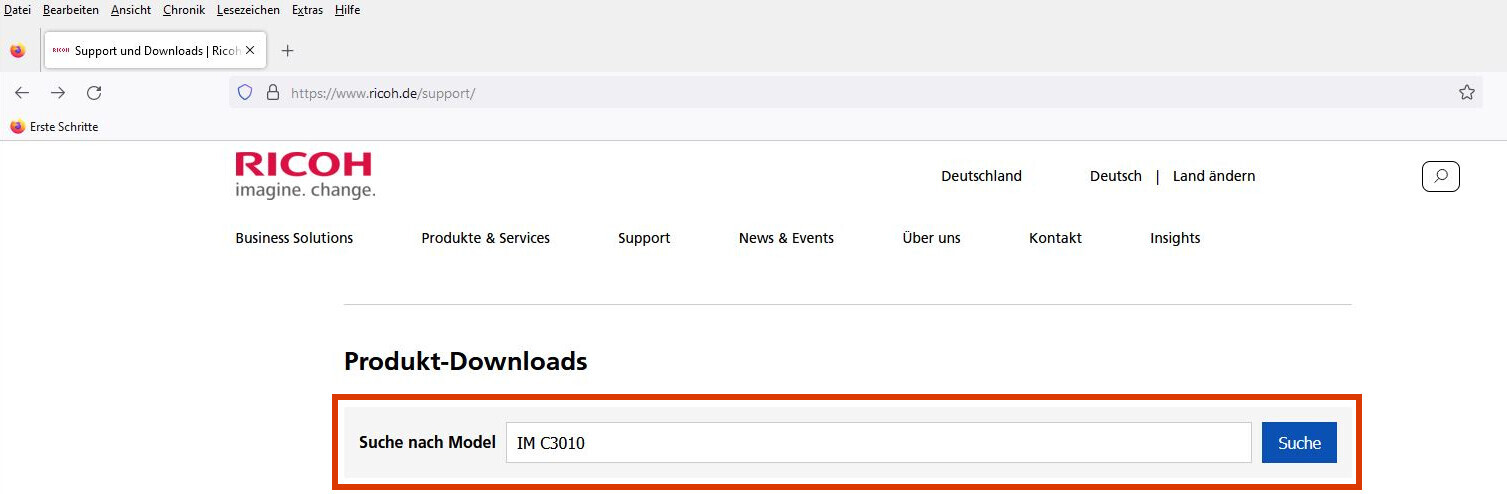
Select the appropriate model from the results list and expand the “Drivers and Software” section. Click the link that appears to go to the download page:

On the download page, select your operating system and then the desired driver. We recommend either the “PCL6 Driver for Universal Print” or the “PS Driver for Universal Print”:
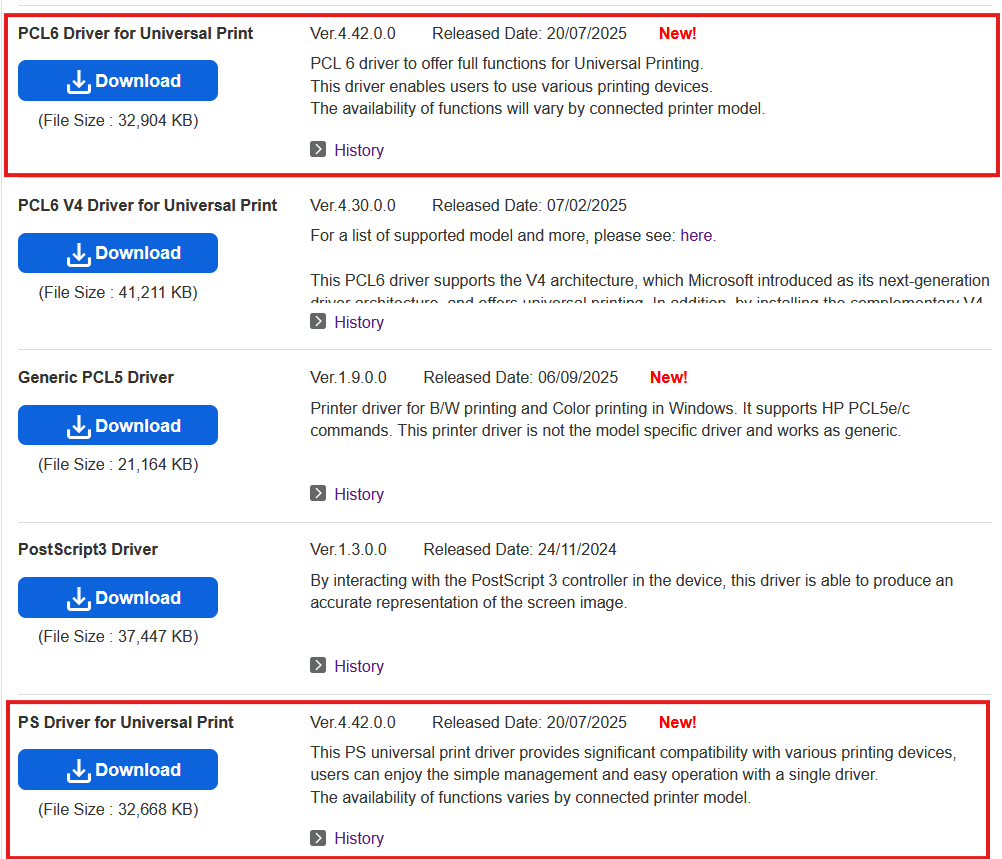
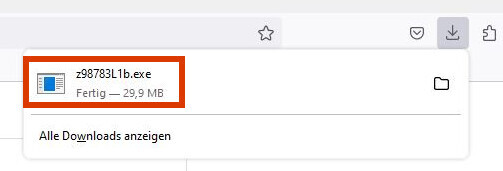
Click “Download” and save the file to your computer. Then open the file (in Firefox: click the download list in the upper-right corner and select the file from there):
If necessary, confirm that you want to run the file. The printer driver extraction program will launch:
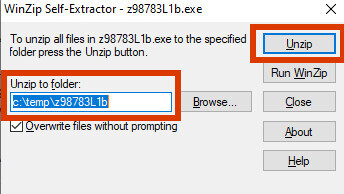
Please make a note of the path where the driver will be extracted; by default, a folder under C:\Temp is suggested, as shown in the screenshot. Click the “Unzip” button to start the extraction process. Wait until it is complete:
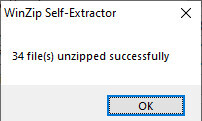
Close the unzip program by clicking either the “X” or the “Close” button.
Step 3:
Now add the copier as a printer on your system. The following is an example of how to do this in Windows 10.Click Start → Settings (gear icon) → Bluetooth & devices → “Printers & scanners.”
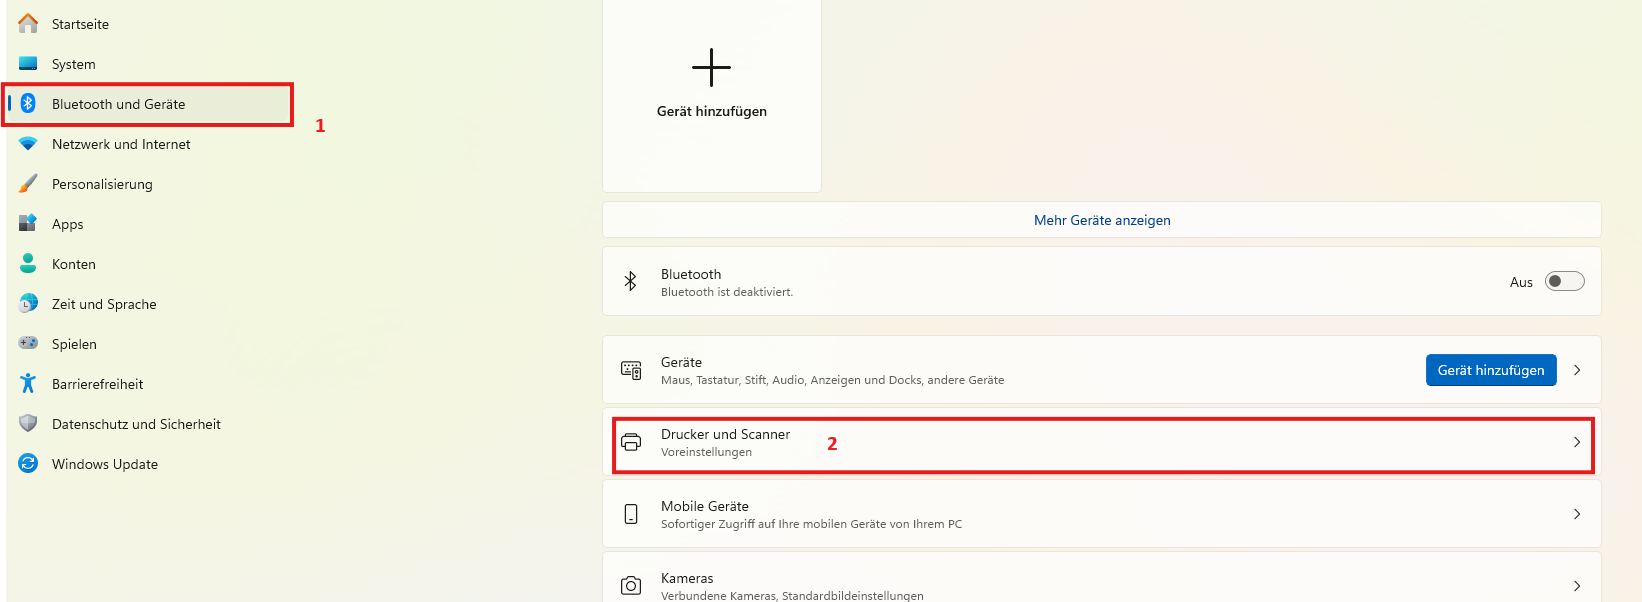
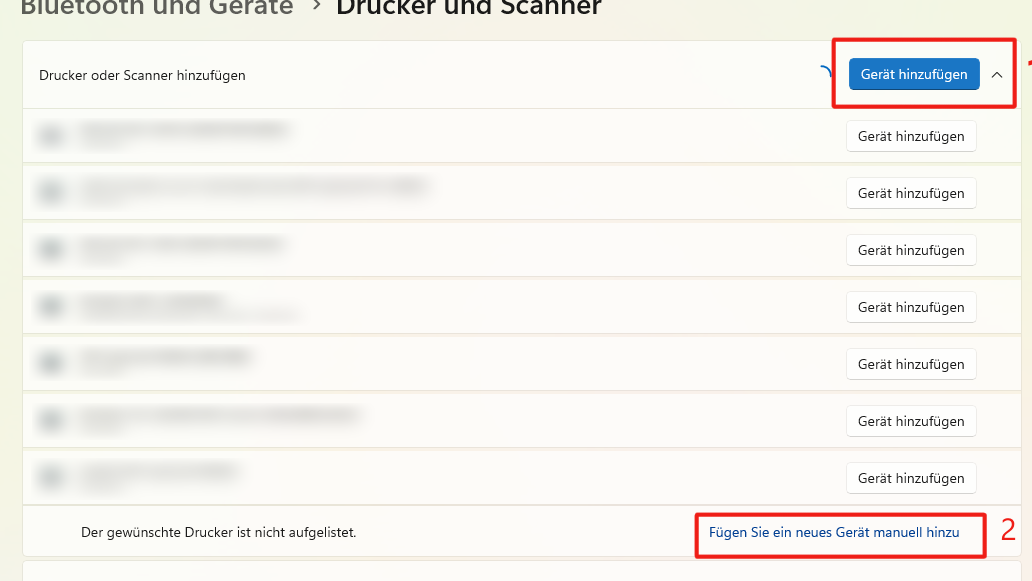
Next, click “Add Device” at the top.
The system will now search for available printers. Wait a moment until the message “The printer you want is not listed” appears, then click “Add a new device manually.”
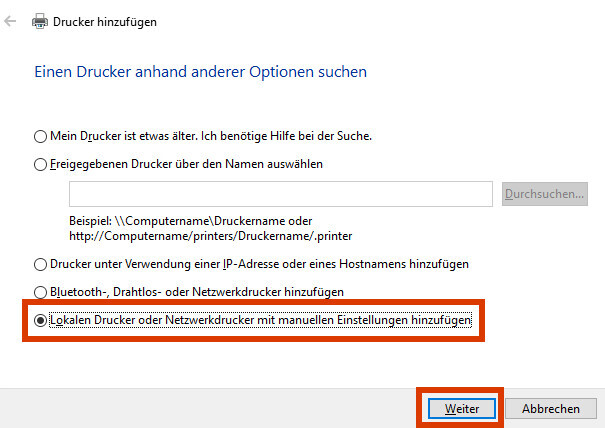
In the following dialog box, select the bottom option, “Add a local or network printer using manual settings,” and click “Next”:
On the next page, select the “Create New Connection” option and choose “Standard TCP/
IP Port” as the “Connection Type”: 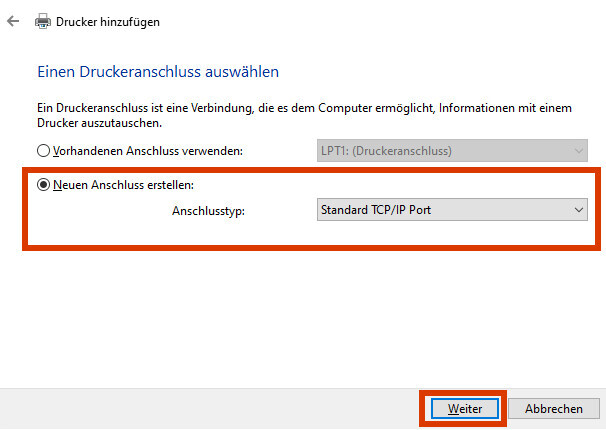
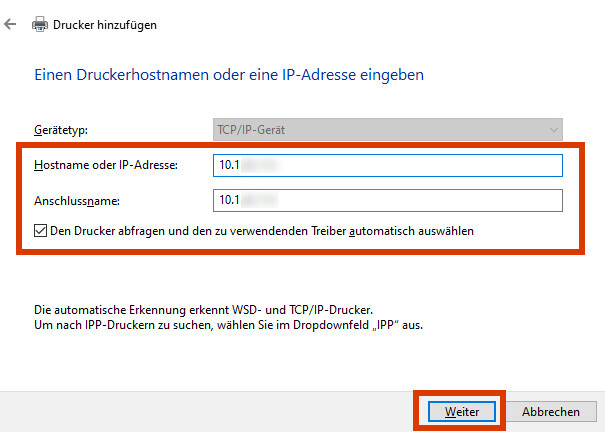
In the “Hostname or IP Address” field, please enter the IP address assigned to your Ricoh copier. The “Port Name” field will also be automatically filled in with the IP address—please keep this and any other preselected settings as they are and click “Next”:
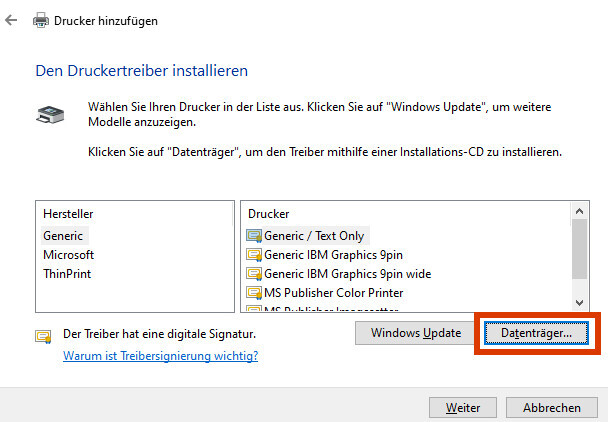
In the following dialog box, first click “Disk”:
In the dialog box that appears, click “Browse.”
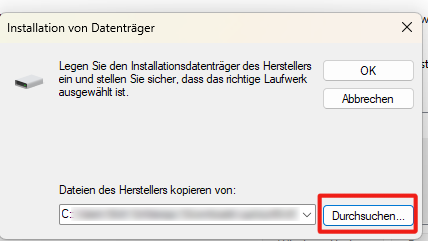
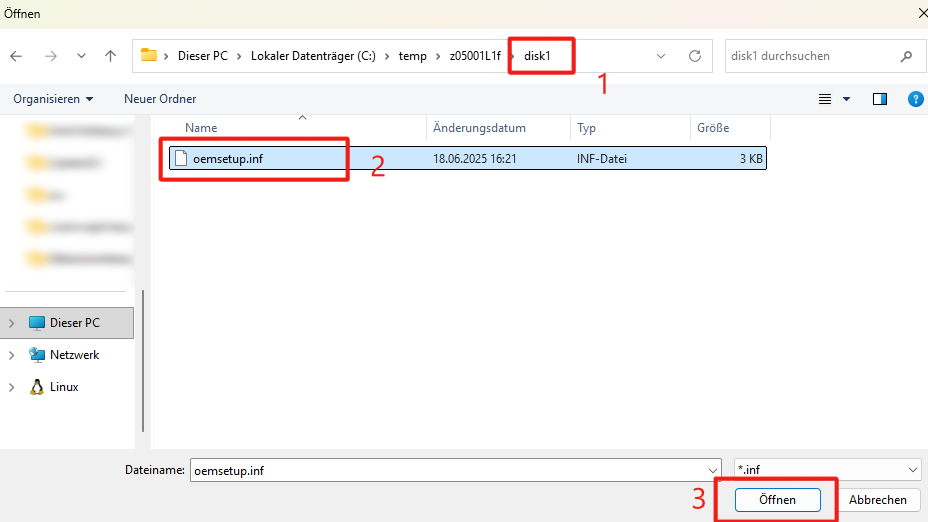
Now please select the location where you previously extracted the printer driver. By default, this is located at C:\Temp. Navigate through the subfolders to the “disk1” folder and select the “oemsetup.inf” file.
Then click “OK” in the original dialog box.
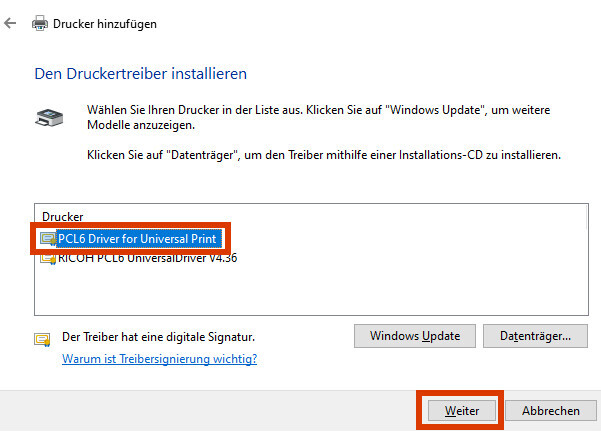
Select the “PCL6 Driver for Universal Print” driver and click “Next”:
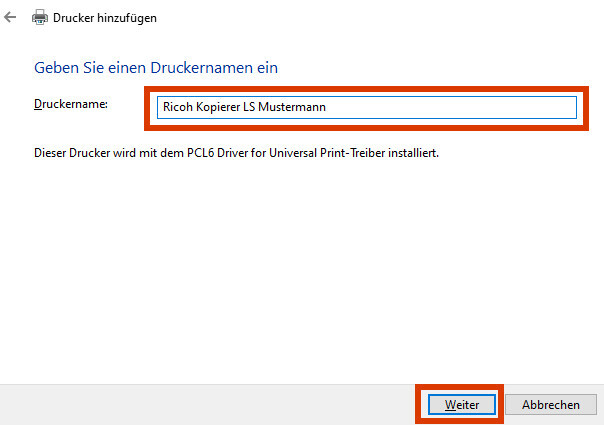
Enter a name for the printer and click “Next:
Please wait while the printer is being installed. This may take a few minutes.
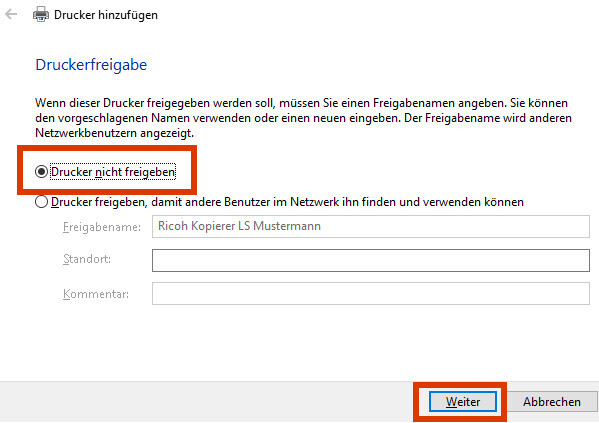
On the next page, select the “Do not share this printer” option and click “Next”:
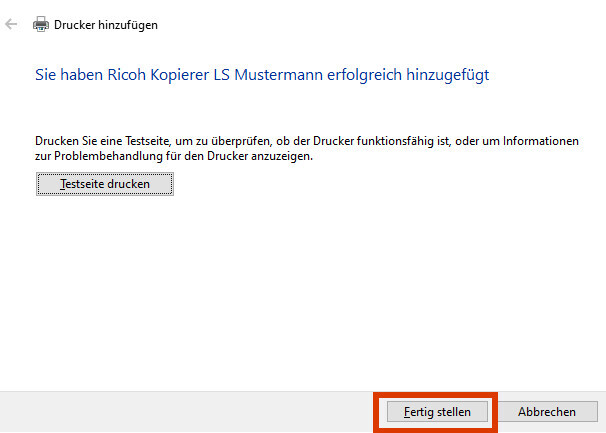
Complete the printer installation wizard by clicking “Finish”:
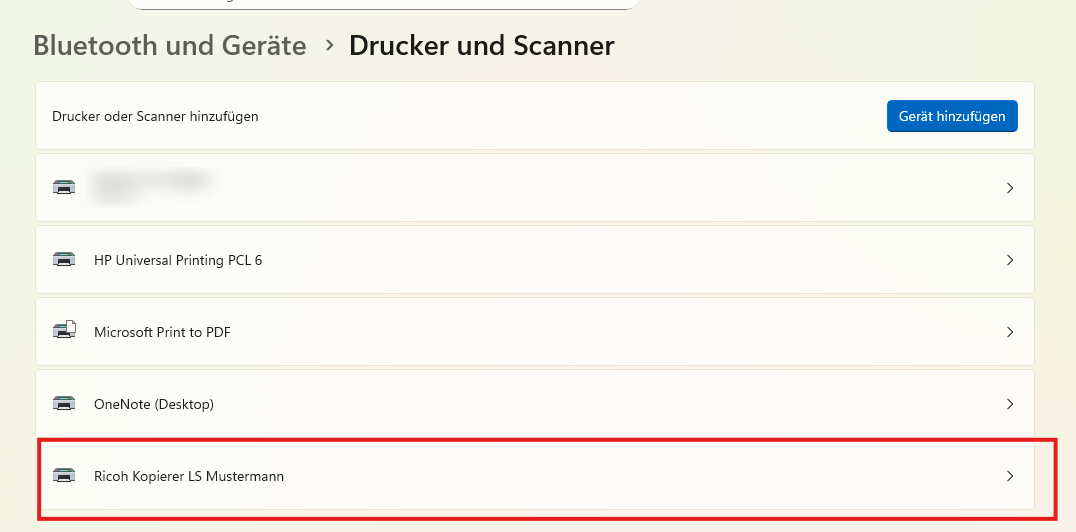
Now select the printer from the list.
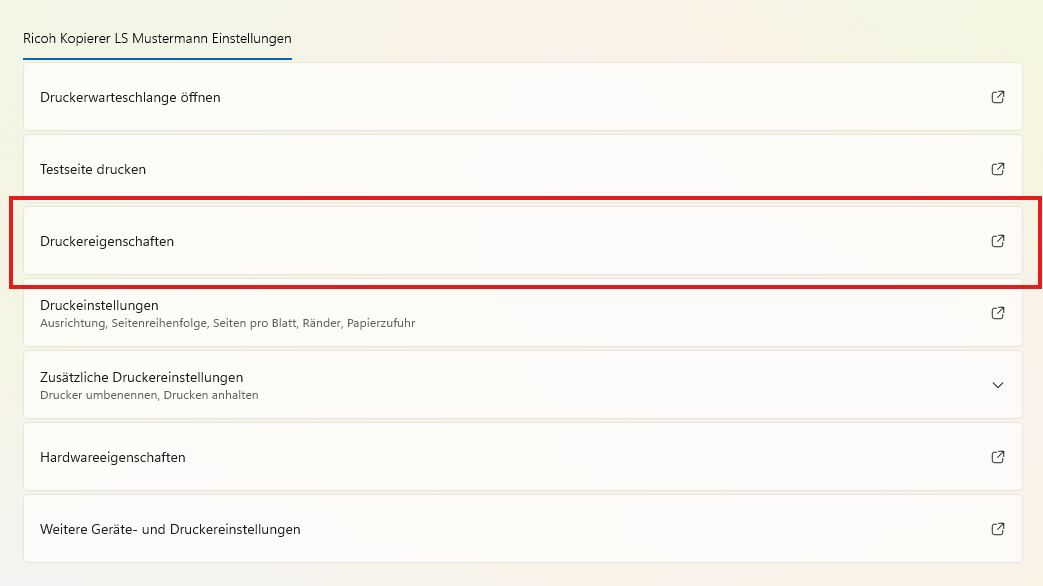
Select “Printer Properties”:
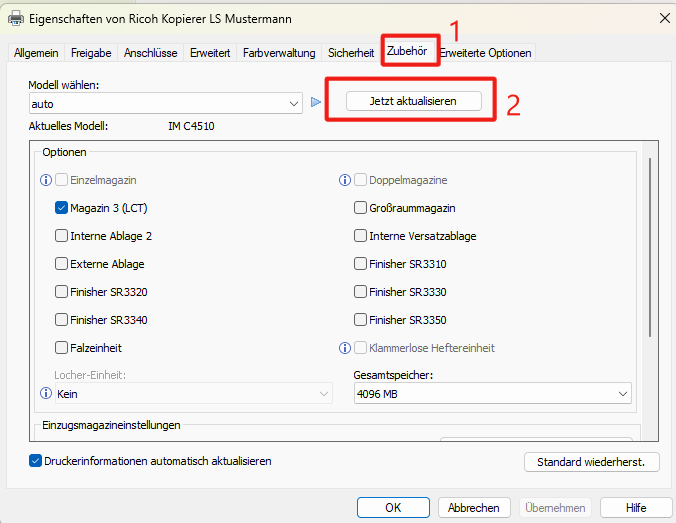
On the “Accessories” tab, click the “Update Now” button. The copier will now be queried; the model and any installed options (e.g., finisher) will be saved in the driver:
Please close all settings windows now. The printer setup is now complete, and you can use the copier as a printer.
How do I use the Ricoh copier as a printer on macOS?
Please note: These instructions do not apply to the administration! Please contact IT Support directly (Hotline -2000, email itsupportuni-mannheim.de, MS Teams “UNIT Support”).
Important Note:
Please note that the copiers can only be accessed via the university Wi-Fi network “eduroam” if the device in question is logged into the Wi-Fi with a university ID that has the “staff” designation! This applies to all employee IDs.
For security reasons, student IDs (with the “student” designation) unfortunately cannot access the copiers directly.
Step 1:
Please find the IP address and model number of your Ricoh copier. You will need this information later during the printer setup process.Note: If you do not have the IP address on hand, please contact IT Support (Hotline -2000, email itsupportuni-mannheim.de, MS Teams “UNIT Support”). Please have the copier’s serial number ready when you contact them.
Step 2:
Please go to the following website: https://www.ricoh.de/support/ and enter your copier model in the search field, e.g., “IM C3010.”Select the appropriate model from the results list and expand the “Drivers and Software” section. Click the link that appears to go to the download page:
On the download page, select your operating system and then the desired driver. We recommend either the “PCL6 Driver for Universal Print” or the “PS Driver for Universal Print”:
Click “Download” and save the file to your computer. Then open the file (in Firefox: click the download list in the upper-right corner and select the file from there):
If necessary, confirm that you want to run the file. The printer driver extraction program will launch:
Please make a note of the path where the driver will be extracted; by default, a folder under C:\Temp is suggested—see screenshot. Click the “Unzip” button to start the extraction process. Wait until it is complete:
Close the unzip program by clicking either the “X” or the “Close” button.
Step 3:
Now add the copier as a printer on your system. The following is an example of how to do this in Windows 10.Click Start → Settings (gear icon) → Bluetooth & devices → “Printers & scanners.”
Next, click “Add Device” at the top.
The system will now search for available printers. Wait a moment until the message “The printer you want is not listed” appears, then click “Add a new device manually.”
In the following dialog box, select the bottom option, “Add a local or network printer using manual settings,” and click “Next”:
On the next page, select the “Create New Connection” option and choose “Standard TCP/
IP Port” as the “Connection Type”: In the “Hostname or IP Address” field, please enter the IP address assigned to your Ricoh copier. The “Port Name” field will also be automatically filled in with the IP address—please keep this and any other preselected settings as is and click “Next”:
In the following dialog box, first click “Disk”:
In the dialog box that appears, click “Browse.”
Now please select the location where you previously extracted the printer driver. By default, this is located at C:\Temp. Navigate through the subfolders to the “disk1” folder and select the “oemsetup.inf” file.
Then click “OK” in the original dialog box.
Select the “PCL6 Driver for Universal Print” driver and click “Next”:
Enter a name for the printer and click “Next”:
Please wait while the printer is being installed. This may take a few minutes.
On the next page, select the “Do not share this printer” option and click “Next”:
Complete the printer installation wizard by clicking “Finish”:
Now select the printer from the list.
Select “Printer Properties”:
On the “Accessories” tab, click the “Update Now” button. The copier will now be queried; the model and any installed options (e.g., finisher) will be saved in the driver:
Please close all settings windows now. The printer setup is now complete, and you can use the copier as a printer.
How do I set up the “Confidential Printing” feature on the Ricoh copier?
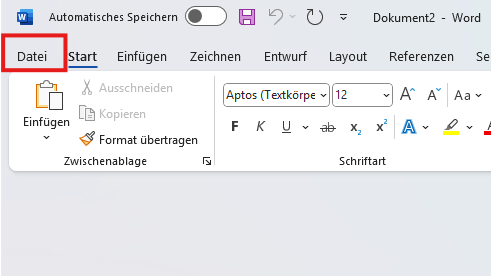
1. Open the print dialog as usual (described below using Word as an example—“File” / “Print”):
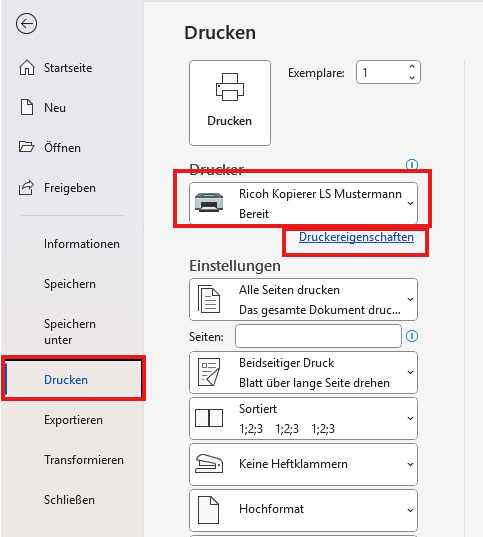
2. Select the copier as the printer and click the “Printer Properties” button:
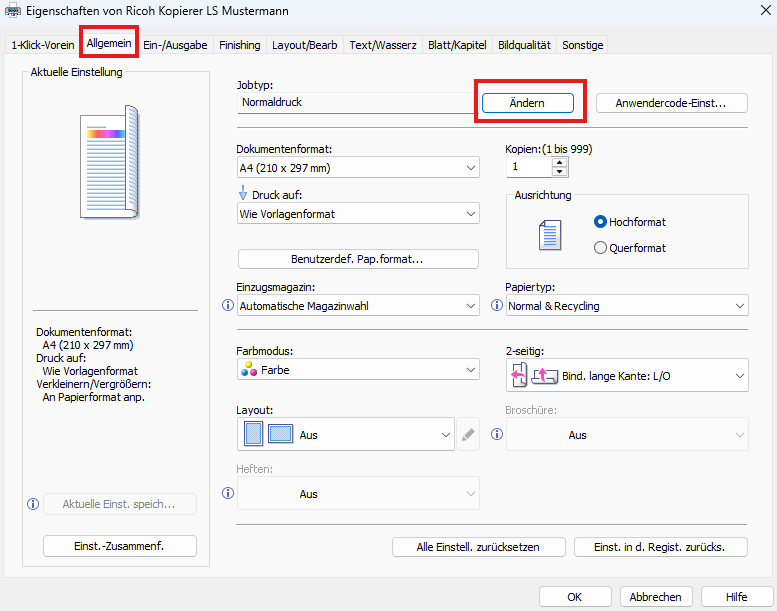
3. On the “General” tab, under “Job Type,” click the “Change” button:
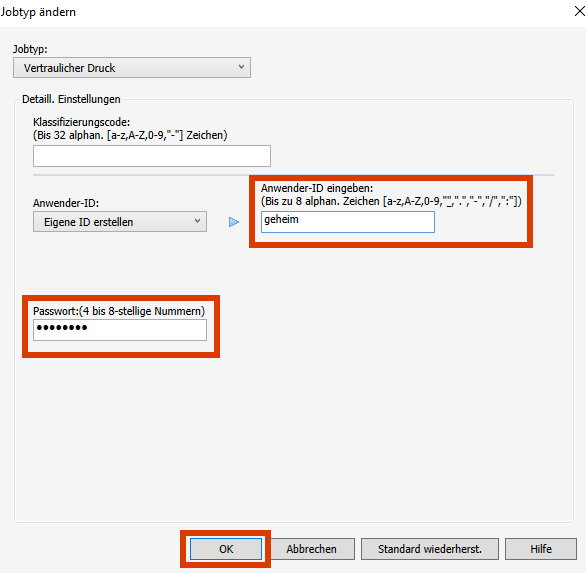
4. In the next window, under “Job Type,” select “Confidential Print”:
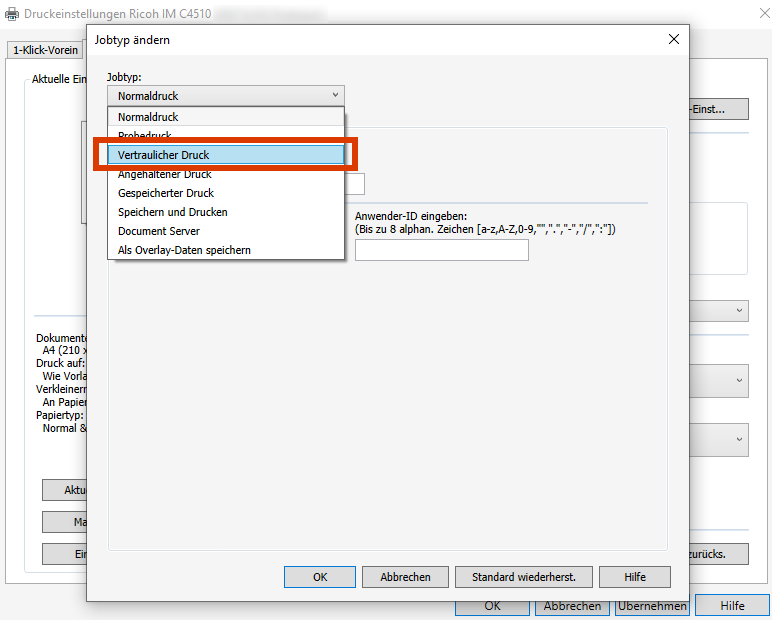
5. You must now fill in two fields:
- “Enter User ID”: The username you want to use to log in to the copier. Applies only to the current print job.
In this example: geheim - “Password”: The password or code you must enter on the copier along with your username. Applies only to the current print job.
In this example: 12345678
Confirm your entries by clicking “OK”:
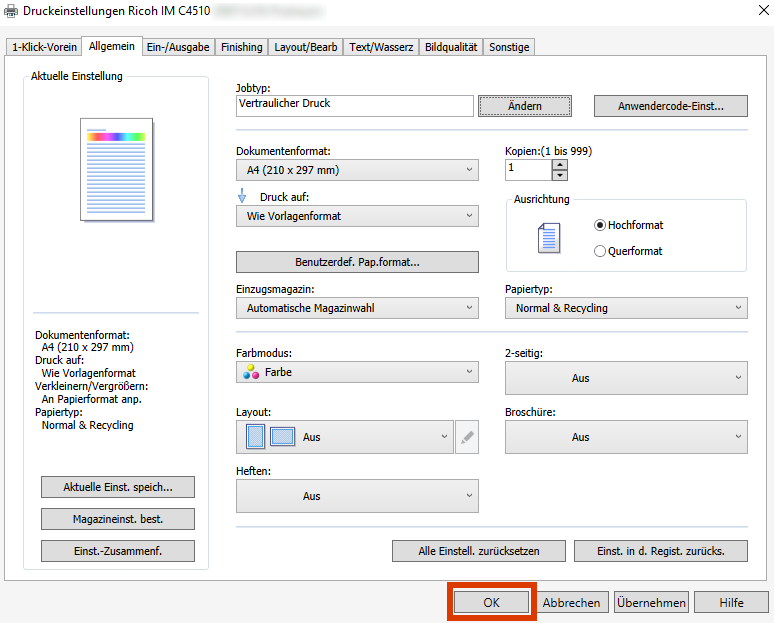
6. Click “OK” to close the settings in the next window:
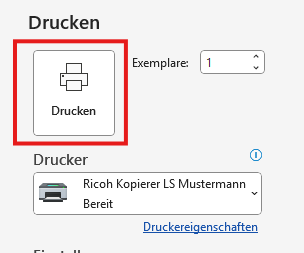
7. Send the print job to the copier by clicking the “Print” button. The print job will be held there until you release it on the device in the next step:
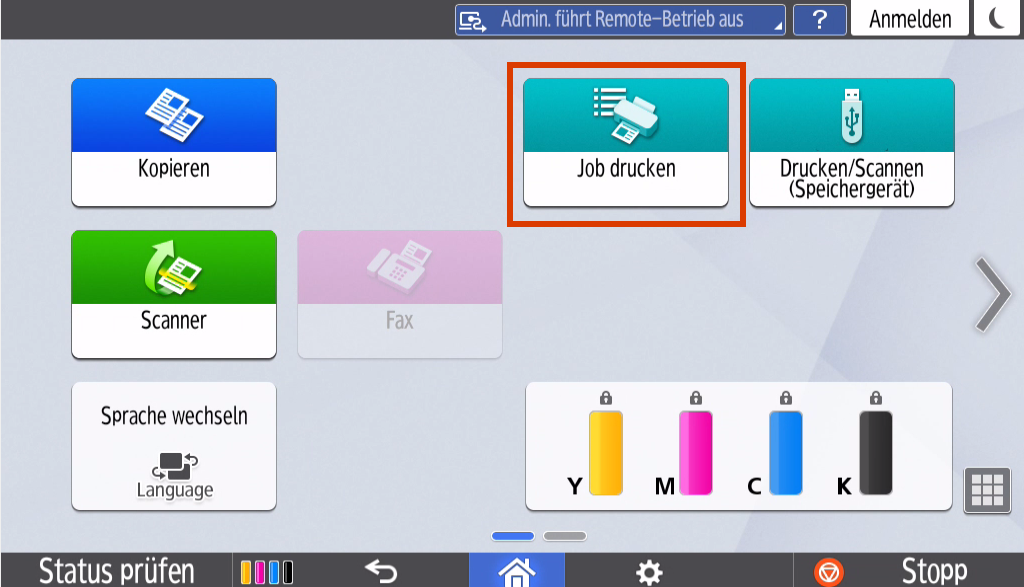
8. Release the print job on the copier by tapping “Print Job” on the home screen:
9. On the next page, select your print job using the “User ID” you assigned earlier (in this example: geheim):
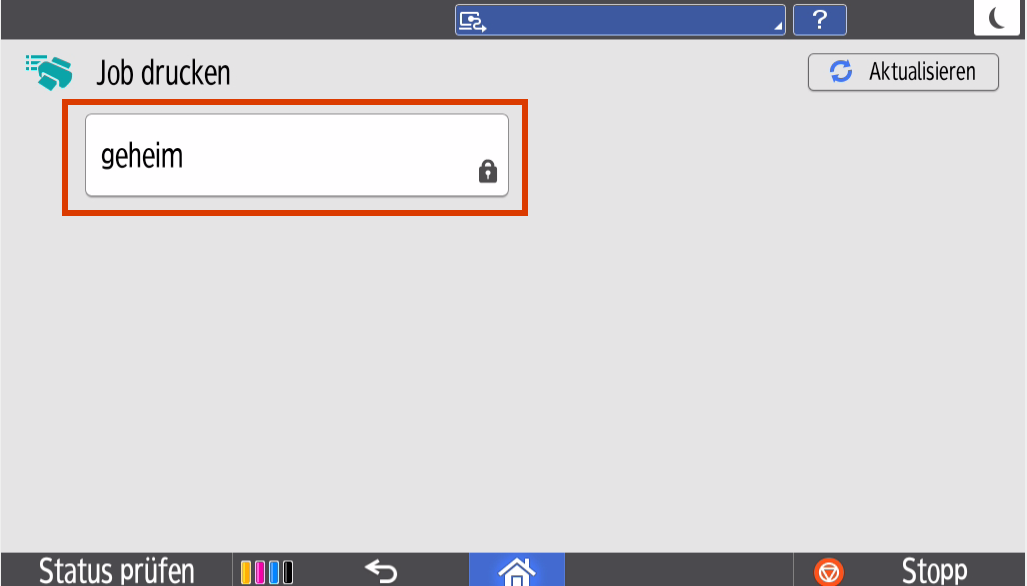
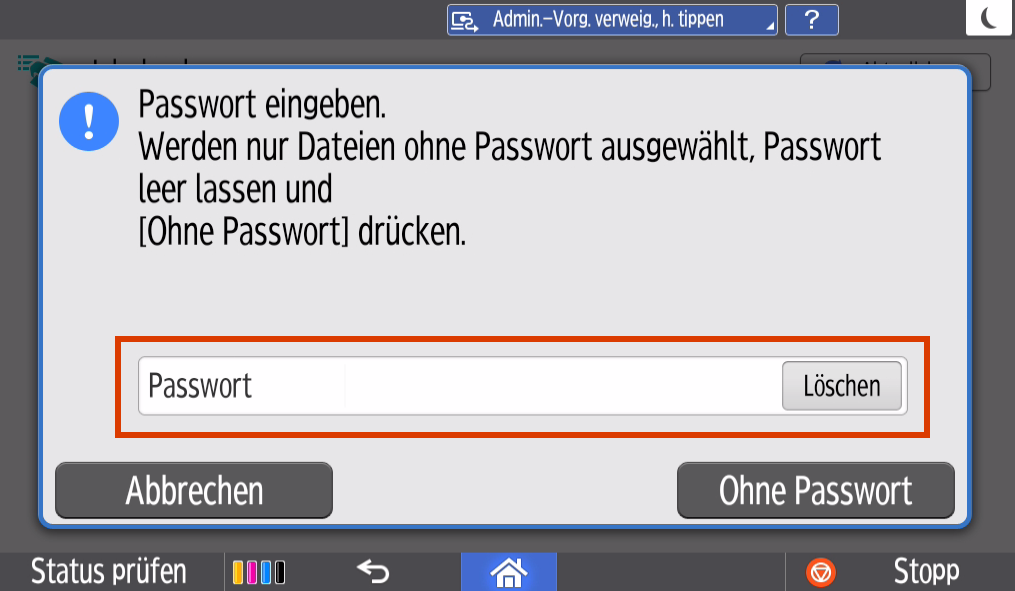
10. In the next step, you will be prompted to enter the password you created. To do so, tap the “Password” field:
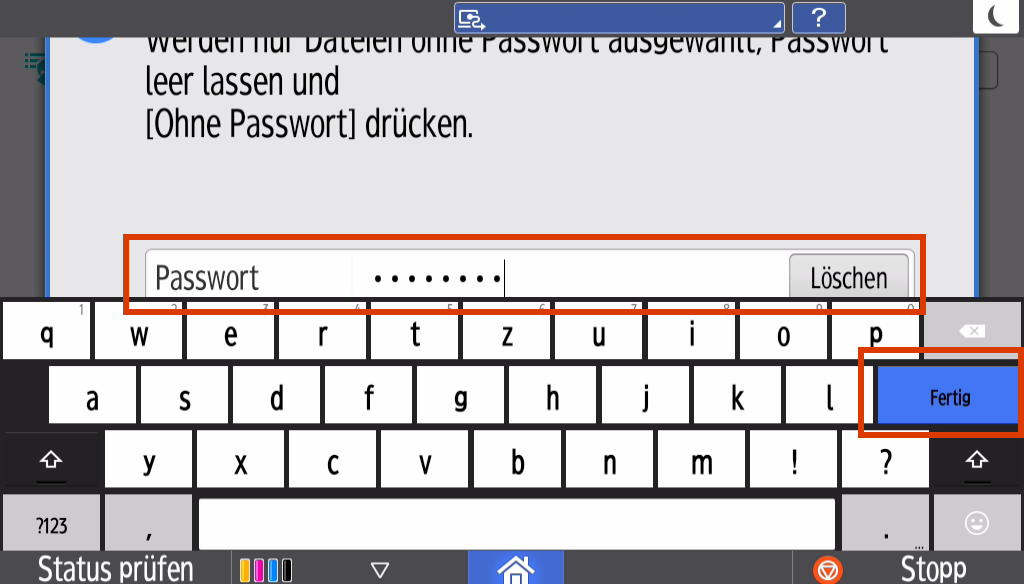
11. Enter the password you chose using the on-screen keyboard (in this example: 13245678), and then tap “Done”:
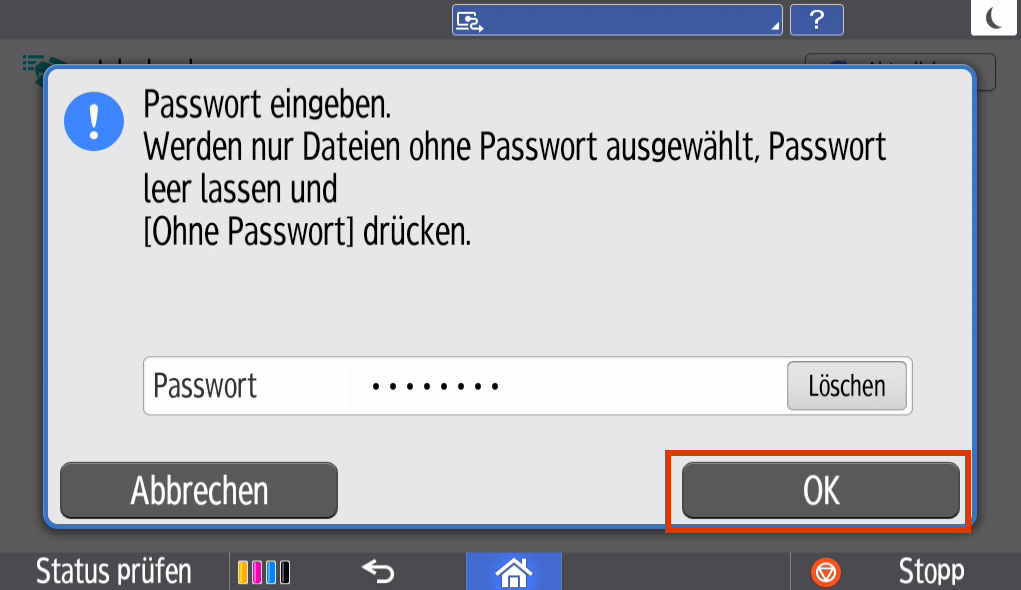
12. Confirm your entries by clicking “OK”:
13. On the next screen, tap the document you want to print (in this example: Confidential Document.docx) to select it, and then tap the “Print” button on the right:
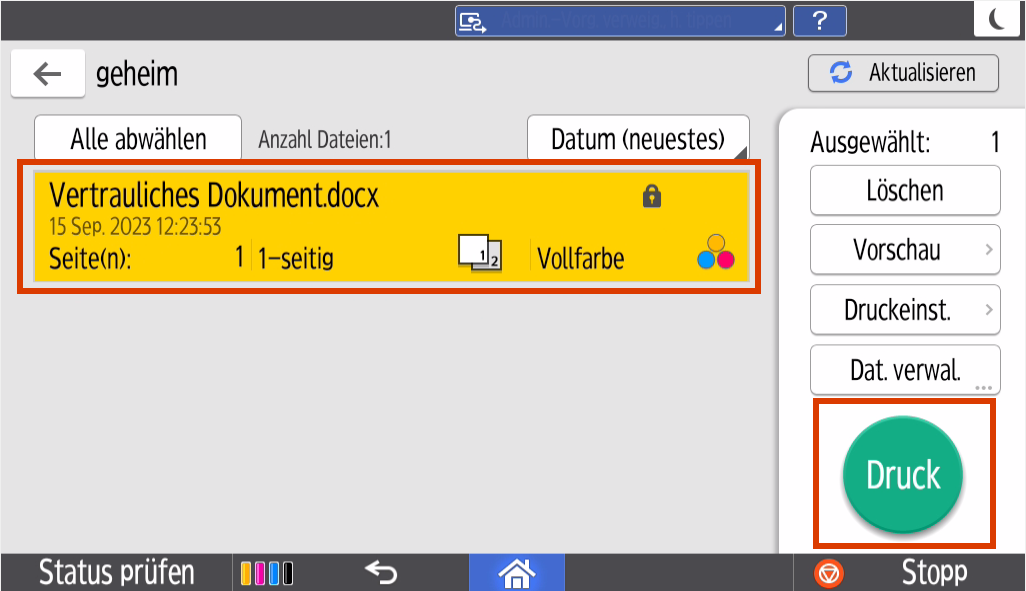
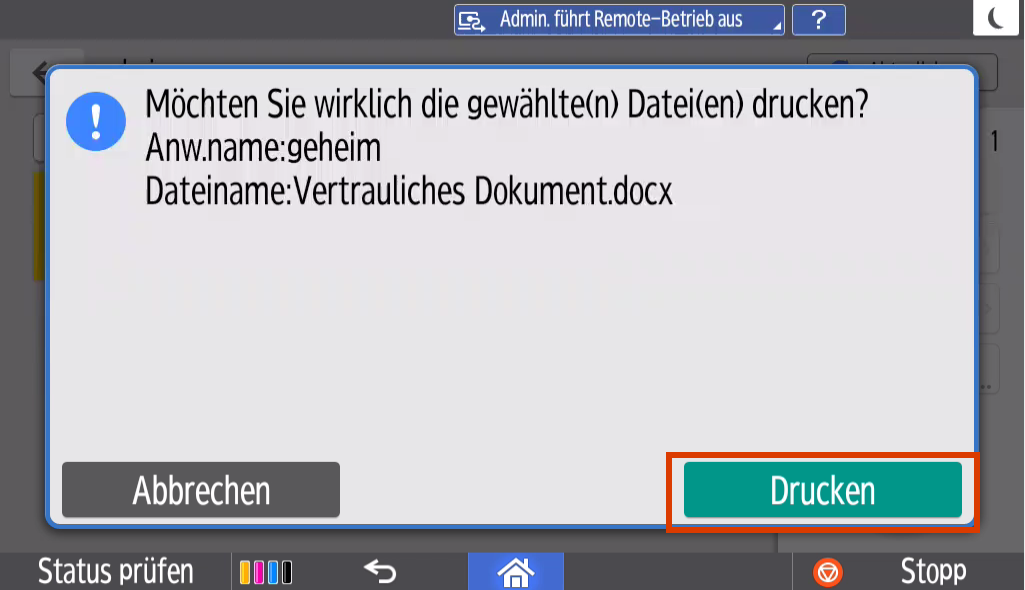
14. Finally, click “Print” to confirm that you want to print the document:
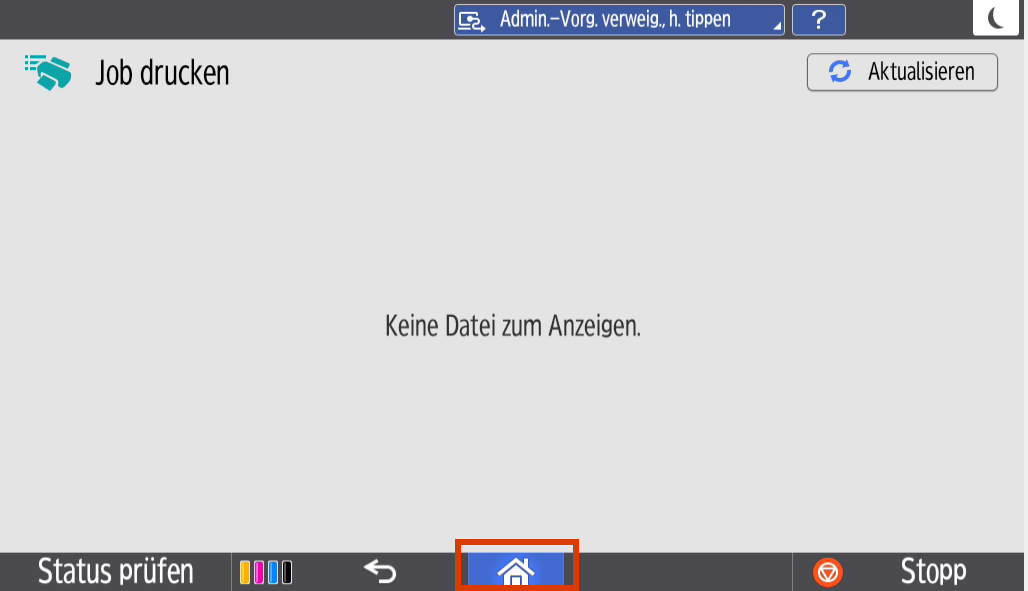
15. The document begins printing. Once printing is complete, you can return to the copier's main menu by pressing the “Home” button at the bottom of the screen:
- “Enter User ID”: The username you want to use to log in to the copier. Applies only to the current print job.
How do I set up cost centers on the Ricoh copier?
1. Open the web interface of your Ricoh copier in your browser by entering the IP address in the address bar as follows:
“https://IP-Adresse of your copier” (example: 10.1.63.99)
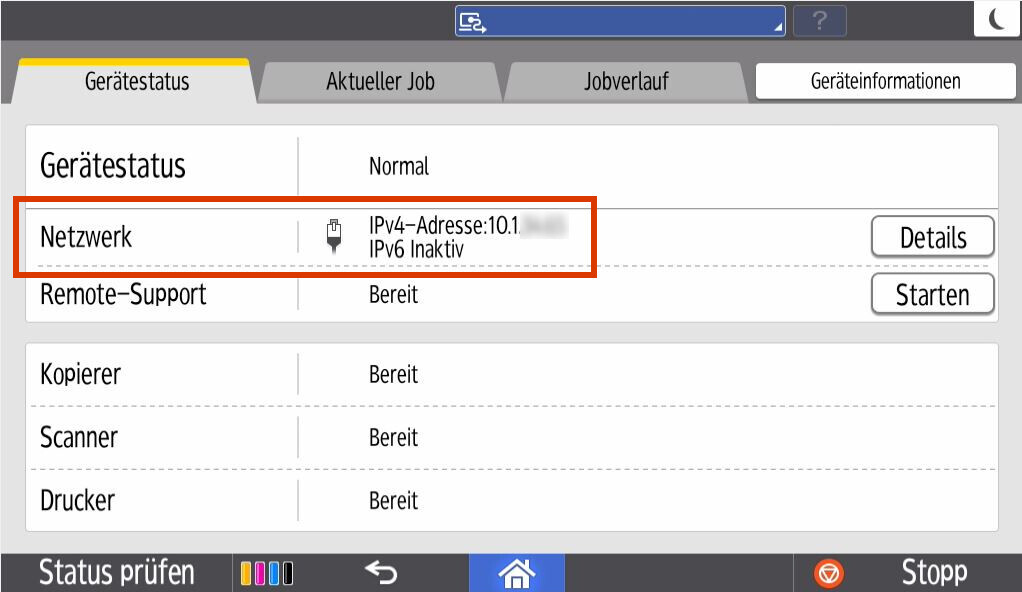
Note: You received the IP address during the initial setup of the device, or you can find it on the copier’s display. To do this, tap “Check Status” in the lower-left corner of the main screen → The IP address is displayed under “Device Status” / “Network”: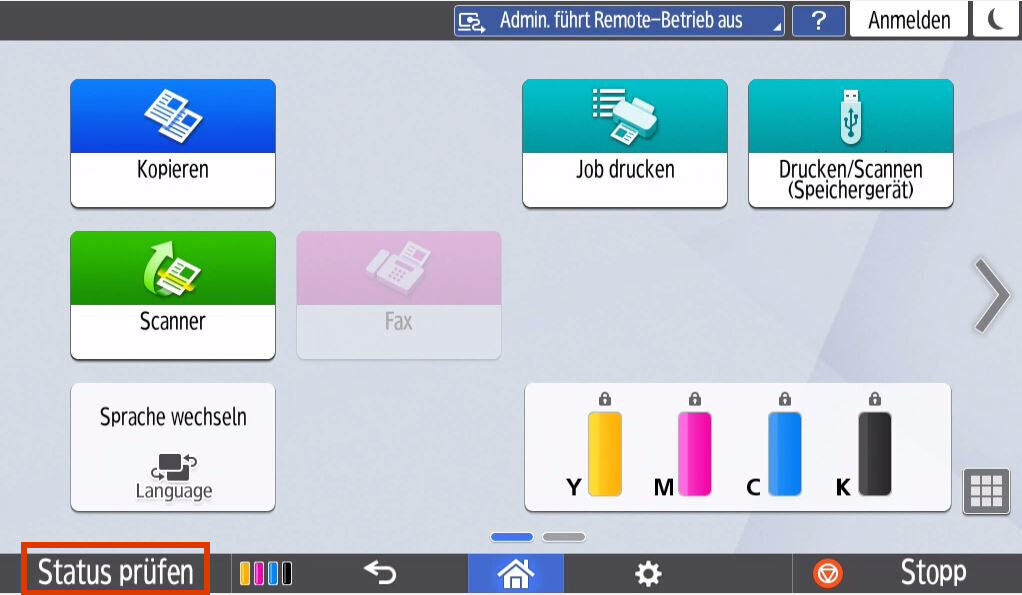
2. As a one-time exception, please confirm the following warning message by first clicking “Advanced” and then “Accept the risk and continue.”
Background: This message appears because, although the connection to the copier is encrypted (HTTPS), the copier uses a so-called self-signed certificate that your browser cannot independently verify. Please do not use this procedure in other situations—only in this exceptional case!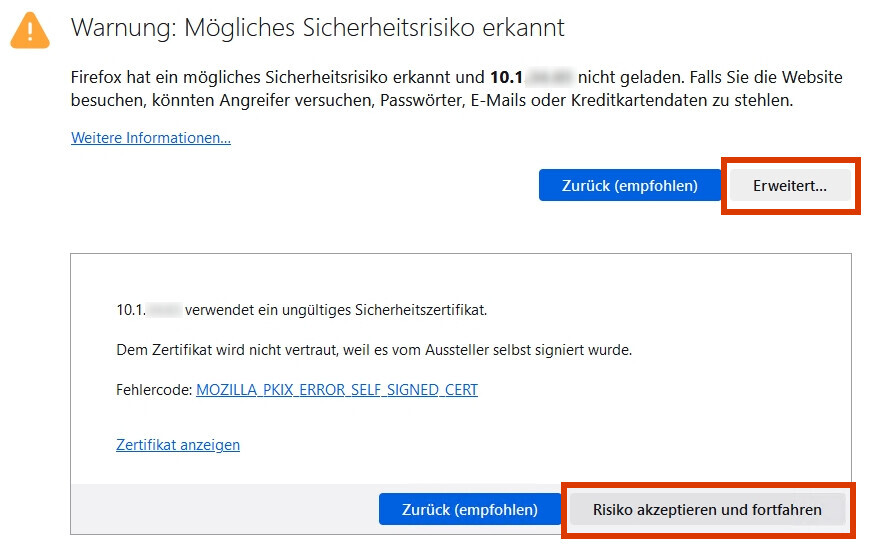
3. Important: If you have an ad blocker enabled in your browser, please disable it for the copier’s web interface! Otherwise, the display may not function correctly, and some menu items may not appear at all or may be displayed incorrectly.
Here is an example using “Adblock Plus”: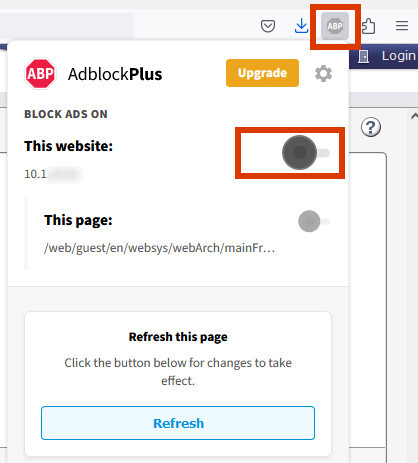
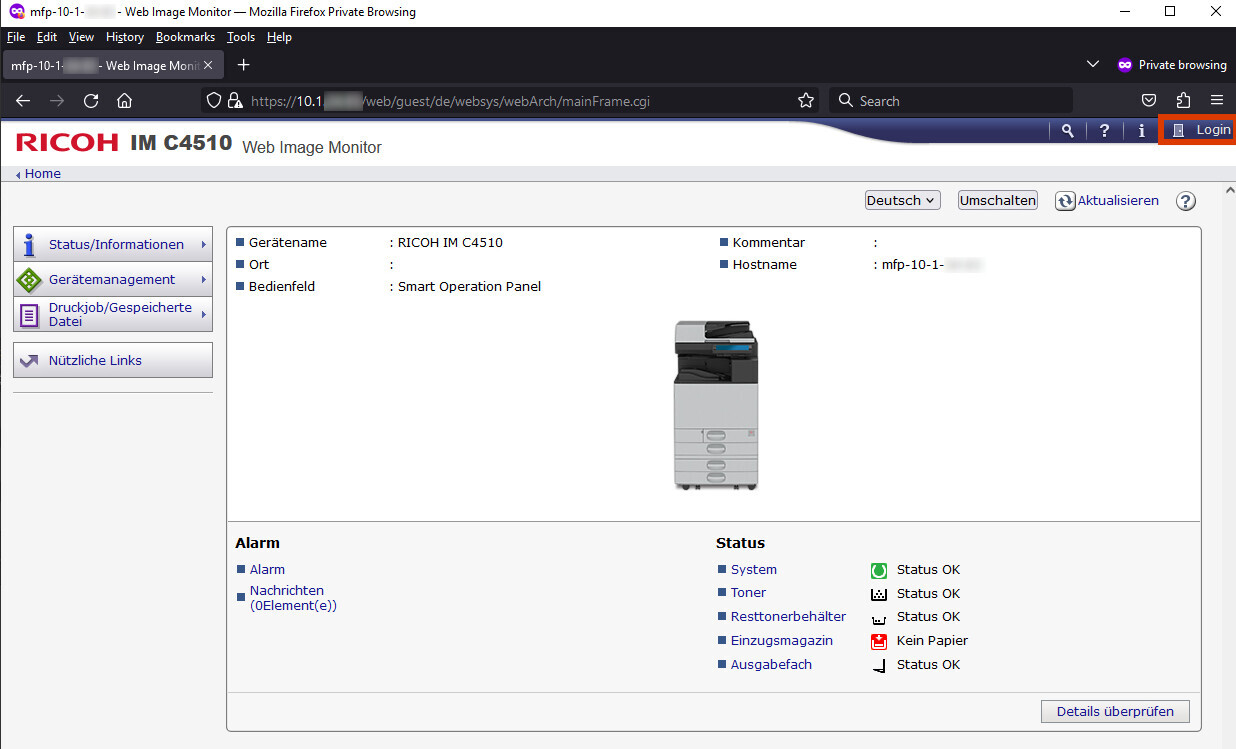
4. Once the copier's web interface has loaded, click “Login” in the upper-right corner:
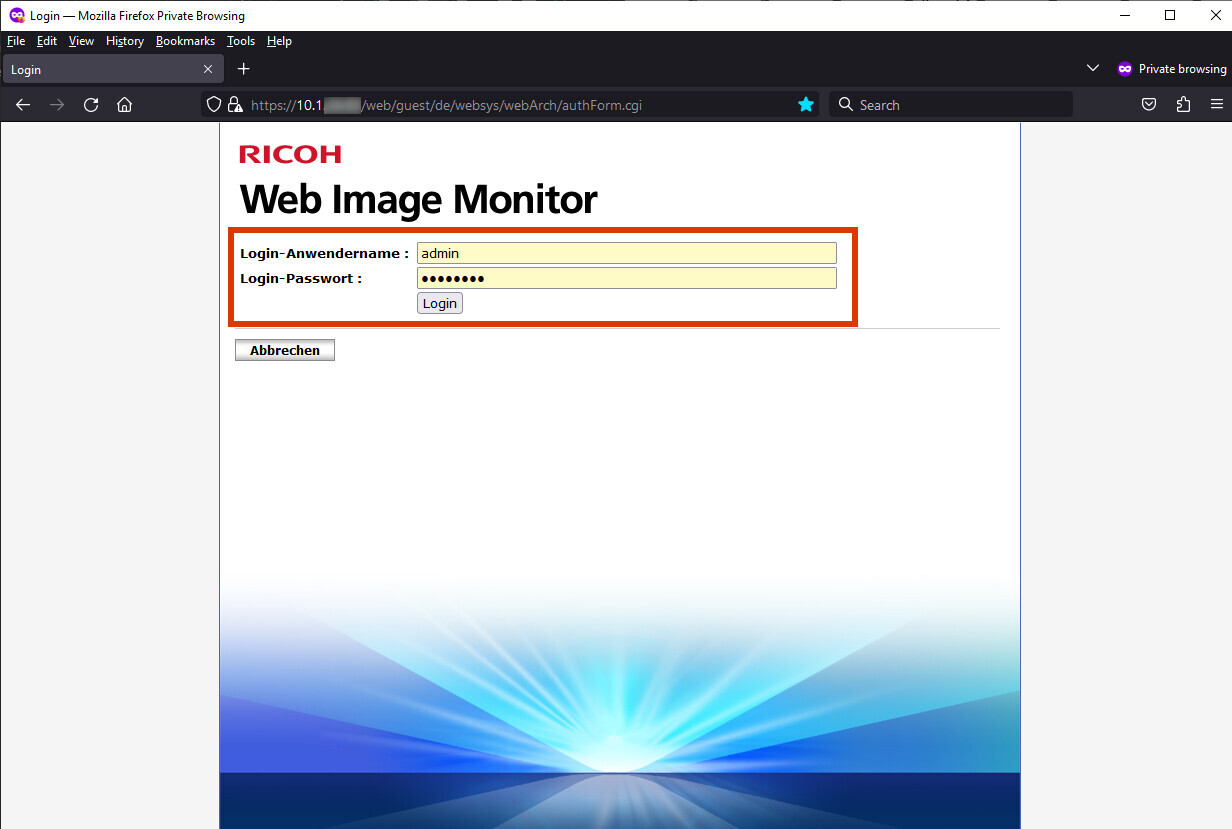
5. Log in using the username “admin” and the password you received during initial setup (or, if you have already changed the password, use that one).
Note: If you do not have the password (or have forgotten it), please contact IT Support by calling the hotline at -2000, by email at itsupportuni-mannheim.de, or via Teams under “UNIT Support.” Please have the serial number of your copier ready (see the sticker on the copier).
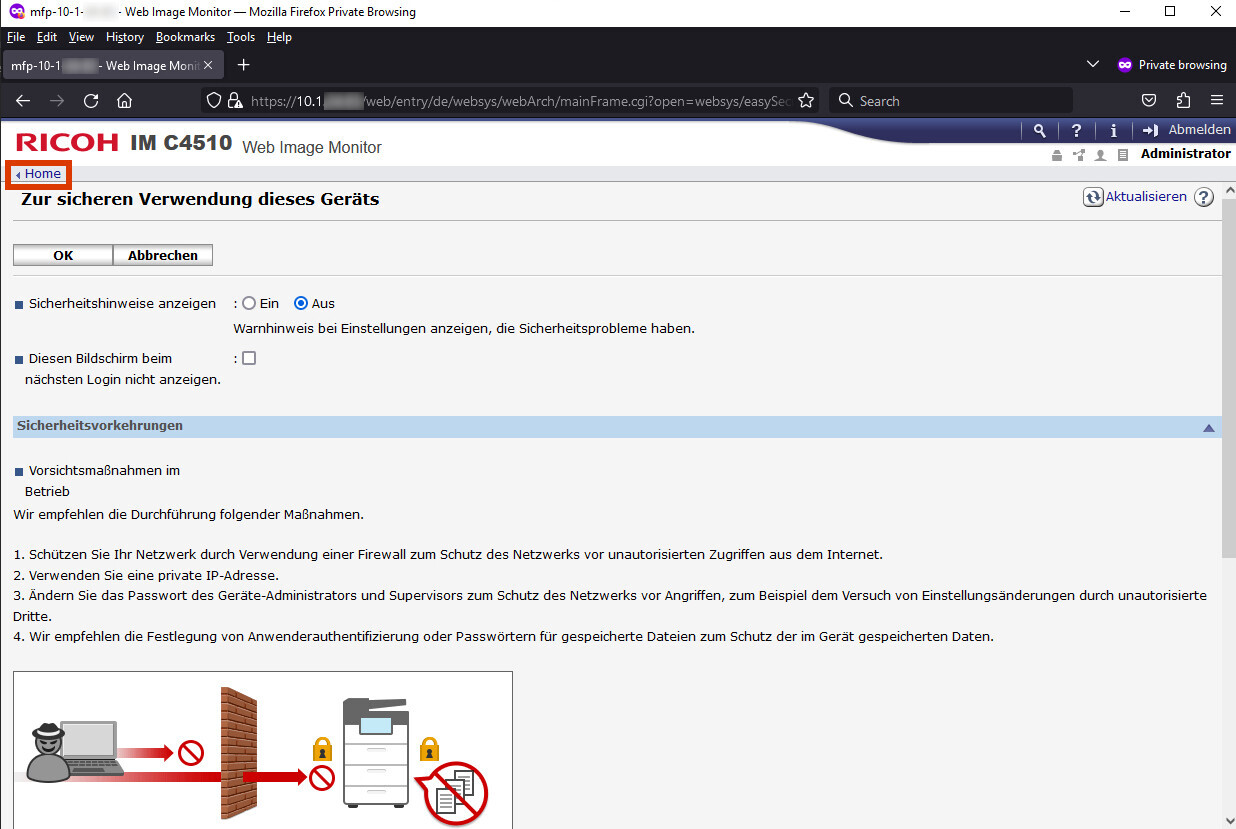
6. If the following screen appears after you log in, please click “Home” in the upper-left corner; otherwise, please proceed to the next step.
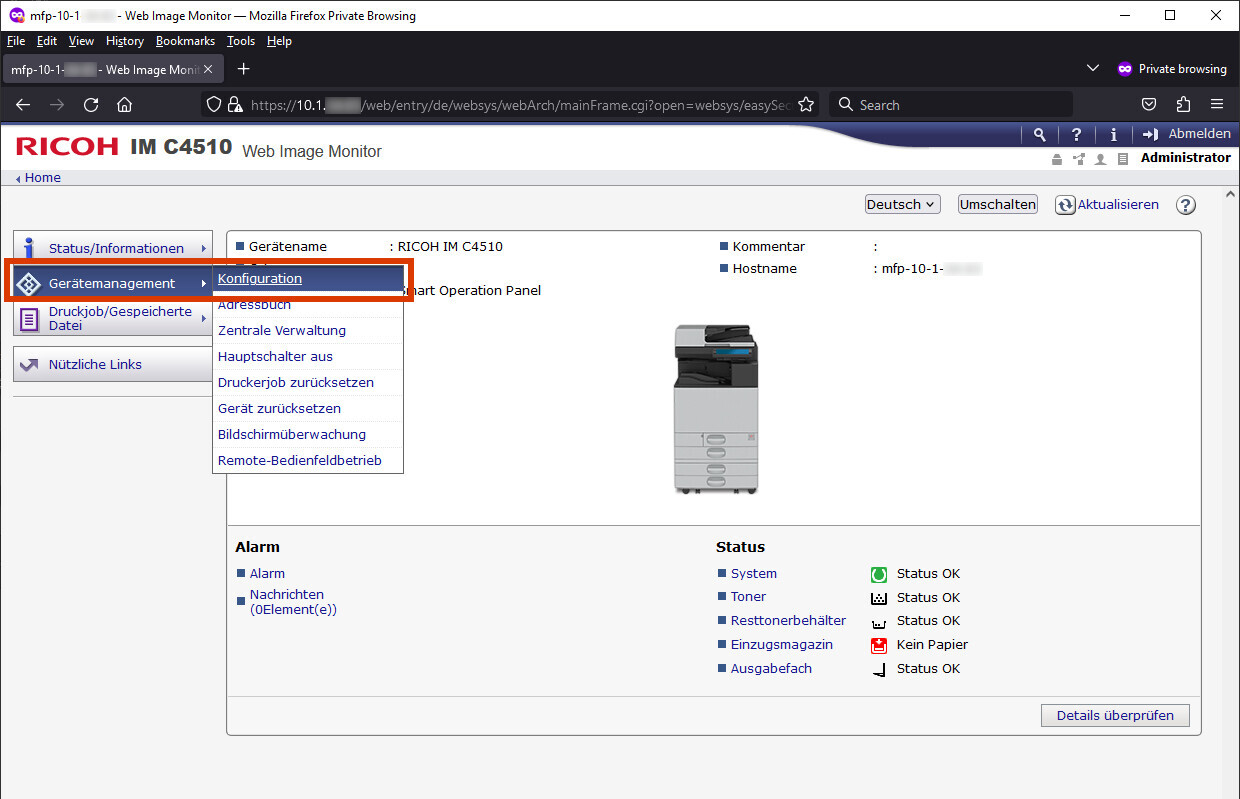
7. Hover your mouse over the “Device Management” menu item and click “Configuration”:
8. Next, under “Device Settings,” click “User Authentication Management”:

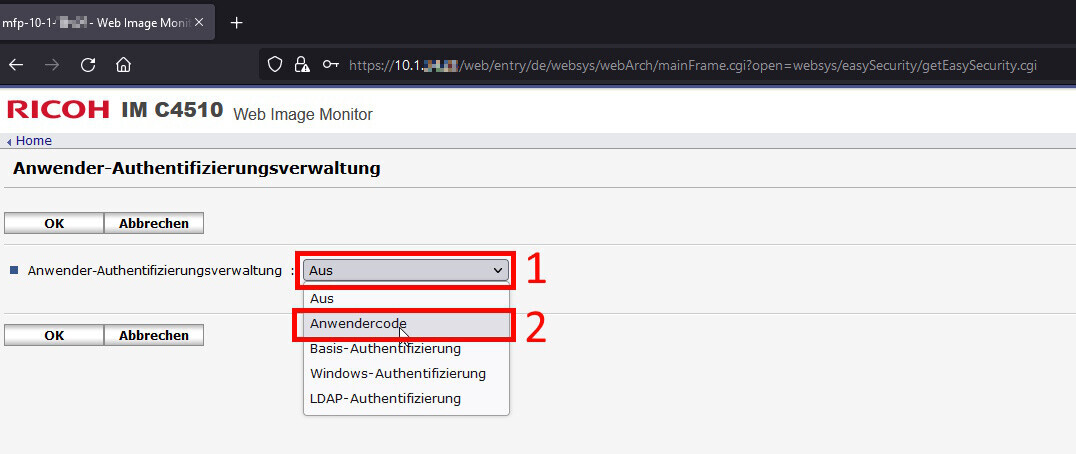
9. Under “User Authentication Management,” change the default setting from “Off” (1) to “User Code” (2):
10. In the advanced settings that now appear, under “Printer Job Authentication,” select “All” (1).
(Note: You may not be able to change this option.
)
Under “User Code Authentication Settings” further down the page, in the “Functions to Restrict” section, check all options except “PC Control,” “Document Server,” and “Fax” (2). Finally, click “OK” (3):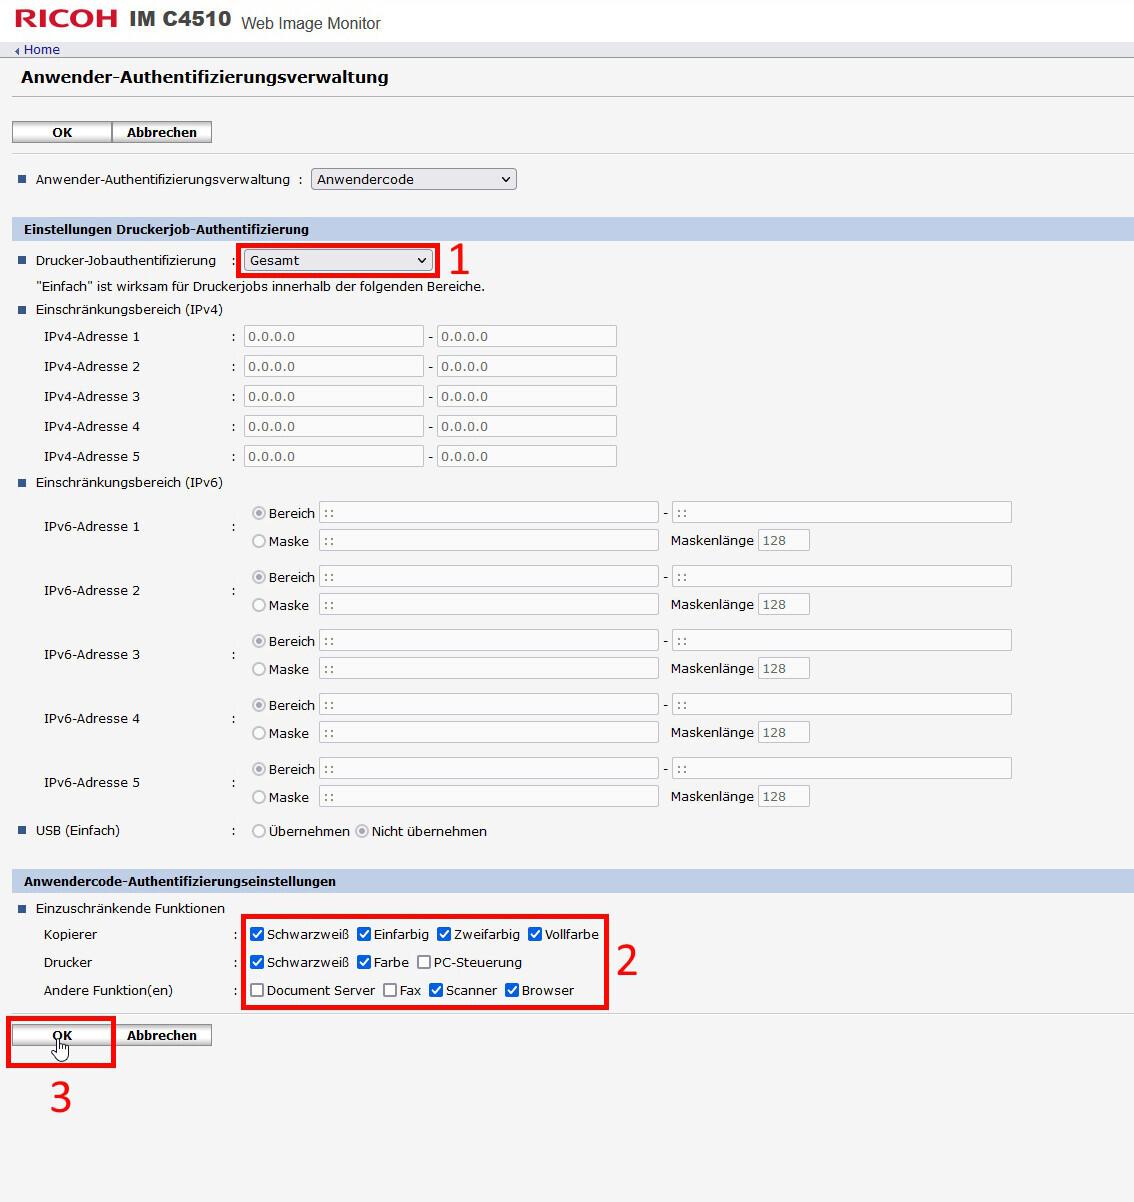
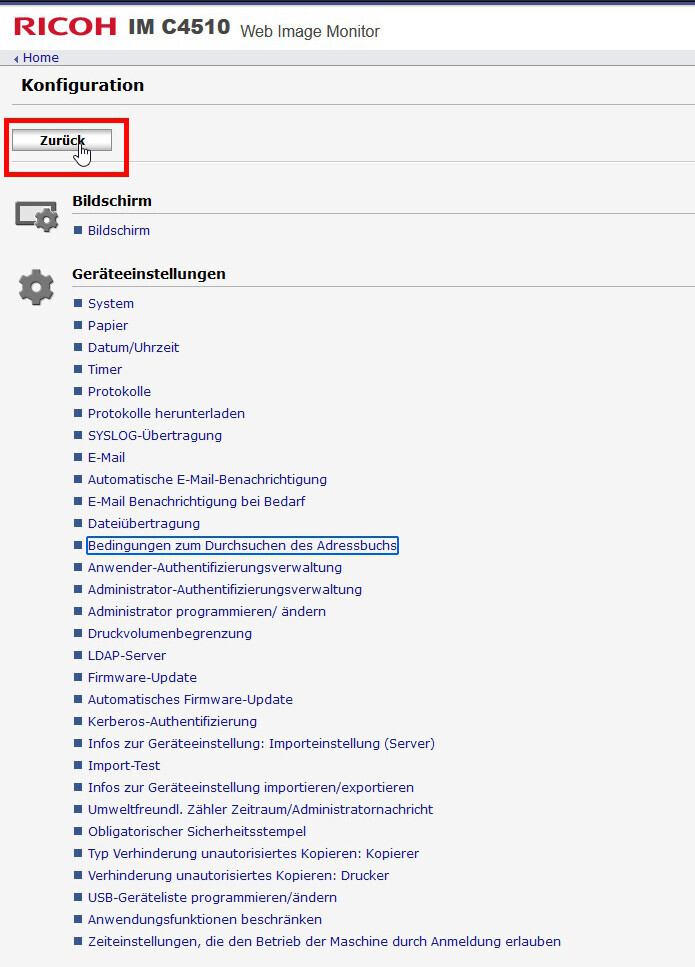
11. You will now be automatically redirected back to the “Configuration” page. Click “Back” in the upper-left corner:
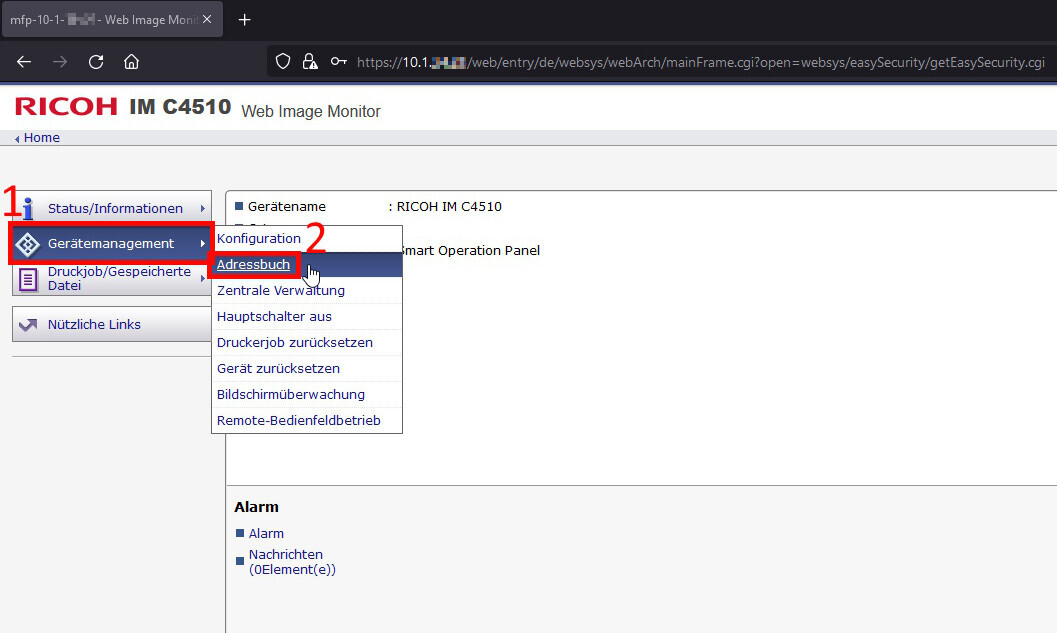
12. Hover your mouse over the “Device Management” menu item (1) and click “Address Book” (2):
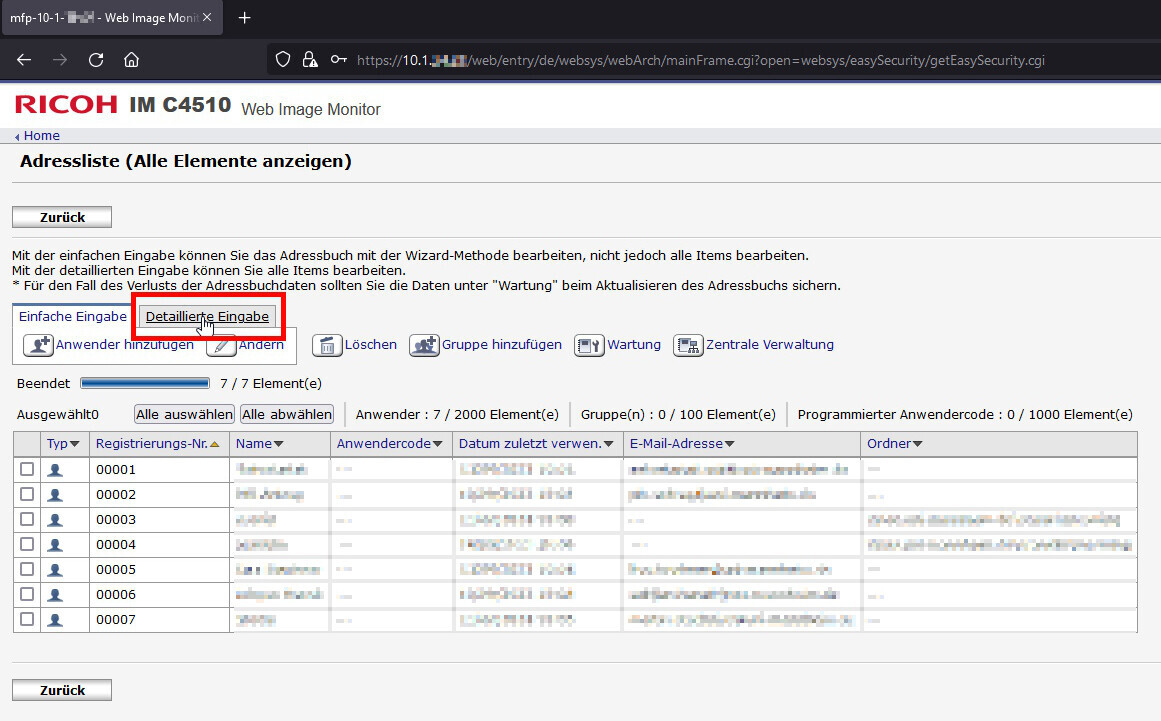
13. Click the “Detailed Input” tab:
14. Now click “Add User”:
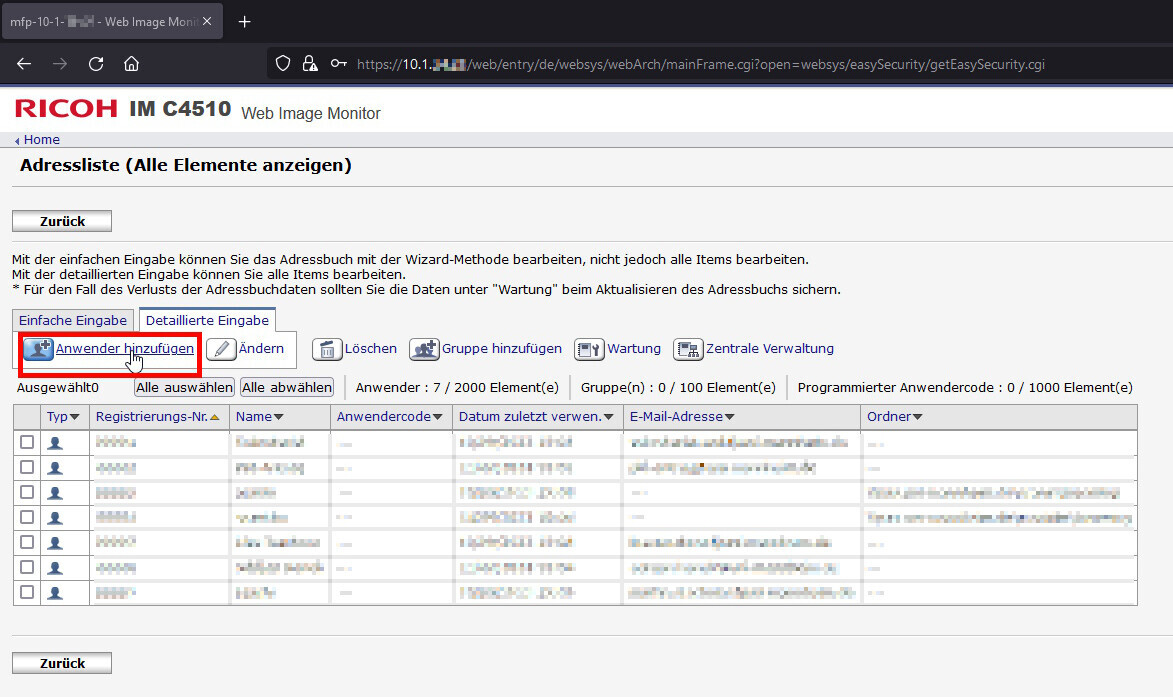
15. Configure the following settings:
- Under “Name,” enter the desired name for the cost center (1).
- Under “Title 1,” select “None,”
- under “Title 2,” select “1,”
- under “Title 3,” select “None,”
- and under “Add to ‘Frequently’,” select “Off” (2).
- Under “Authentication Information,” enter the desired code for the cost center in the “User Code” field (3).
- Under “Available Functions,” check all boxes except “Document Server,” “Fax,” and “Browser,” and select “Full Color / Automatic Color Selection” (4).
- Confirm the settings by clicking “OK” (5).
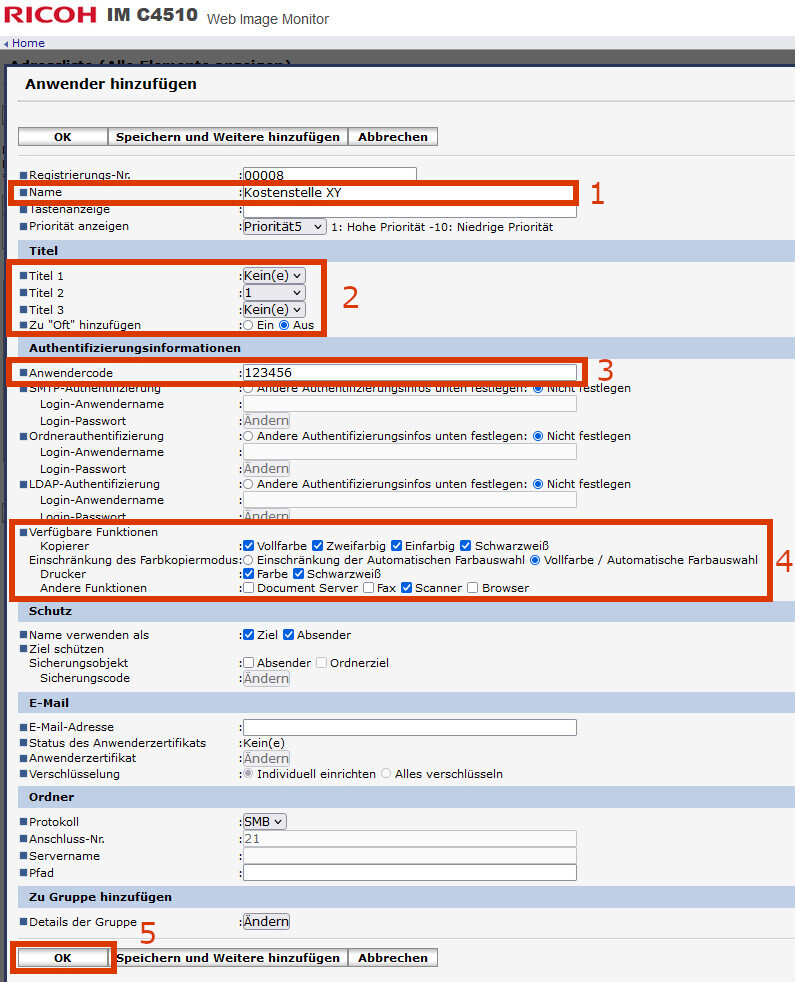
16. You will be redirected back to the address list. Click “Back” in the upper-left corner:
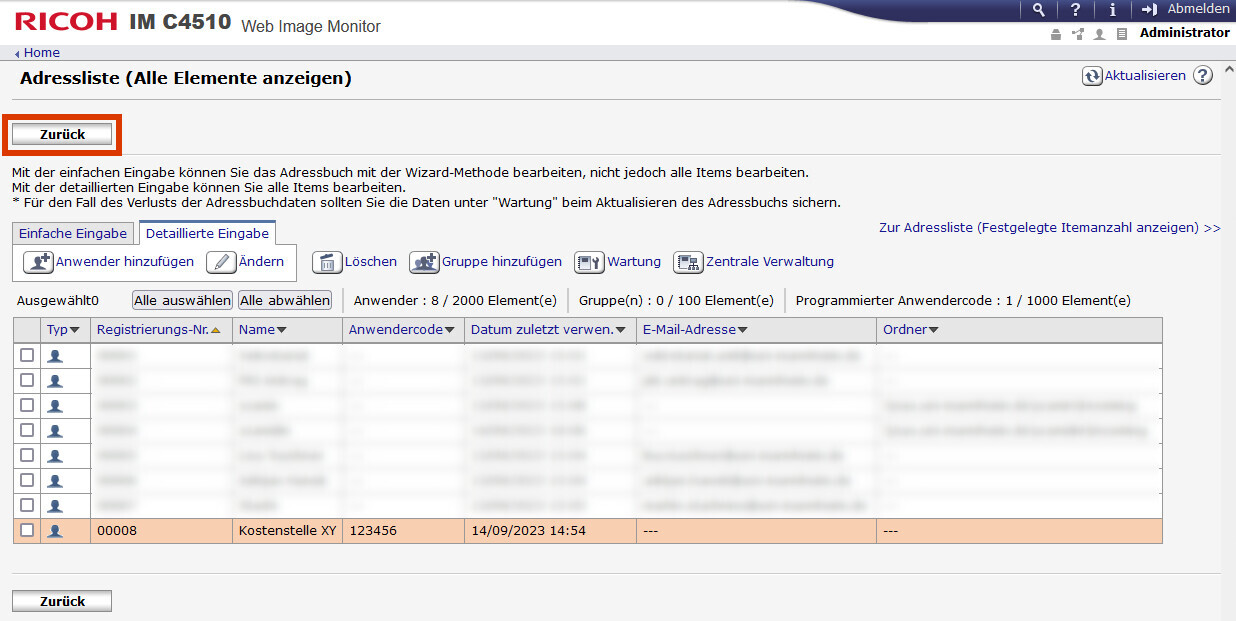
17. Hover your mouse over “Device Management” again and click “Configuration”:
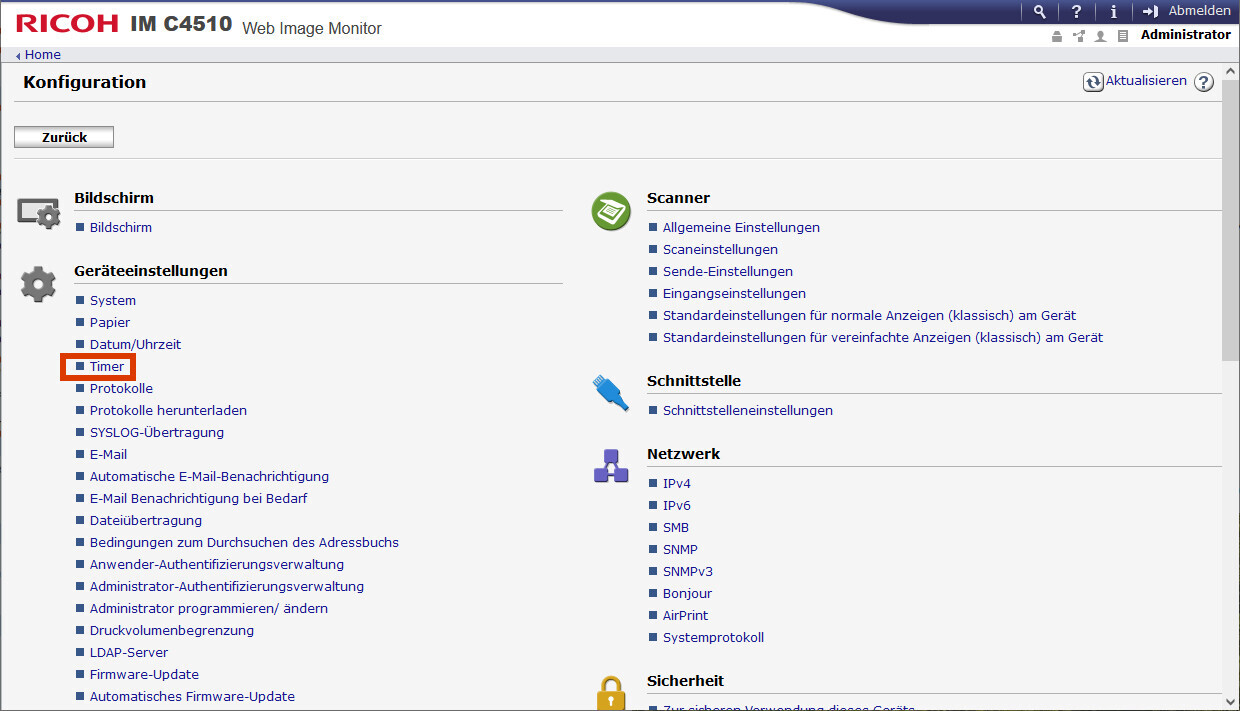
18. Under “Device Settings,” click “Timer”:
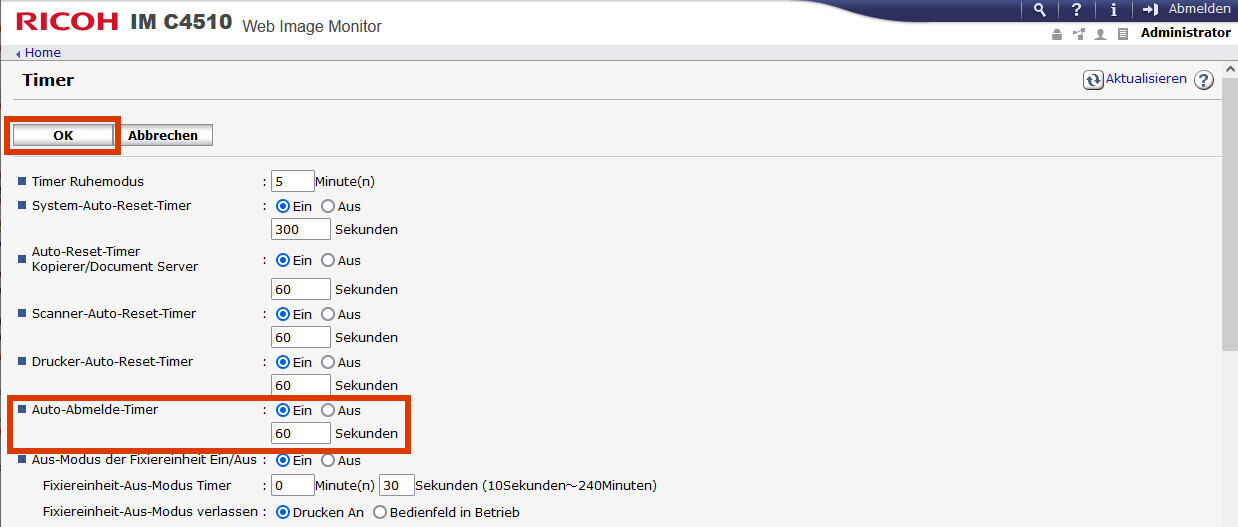
19. Set the “Auto-Logout Timer” to “On” and enter the number 60 in the “Seconds” field. Then click “OK” in the upper-left corner to save your settings:
20. The cost center configuration is now complete. If you would like to set up additional cost centers, please repeat the previous steps; otherwise, please log out of the copier web interface by clicking the “Log Out” button in the upper-right corner.
How do I set up cost centers in the printer driver?
Step 1
Press the Windows key and “i” at the same time to open
Settings.Step 2
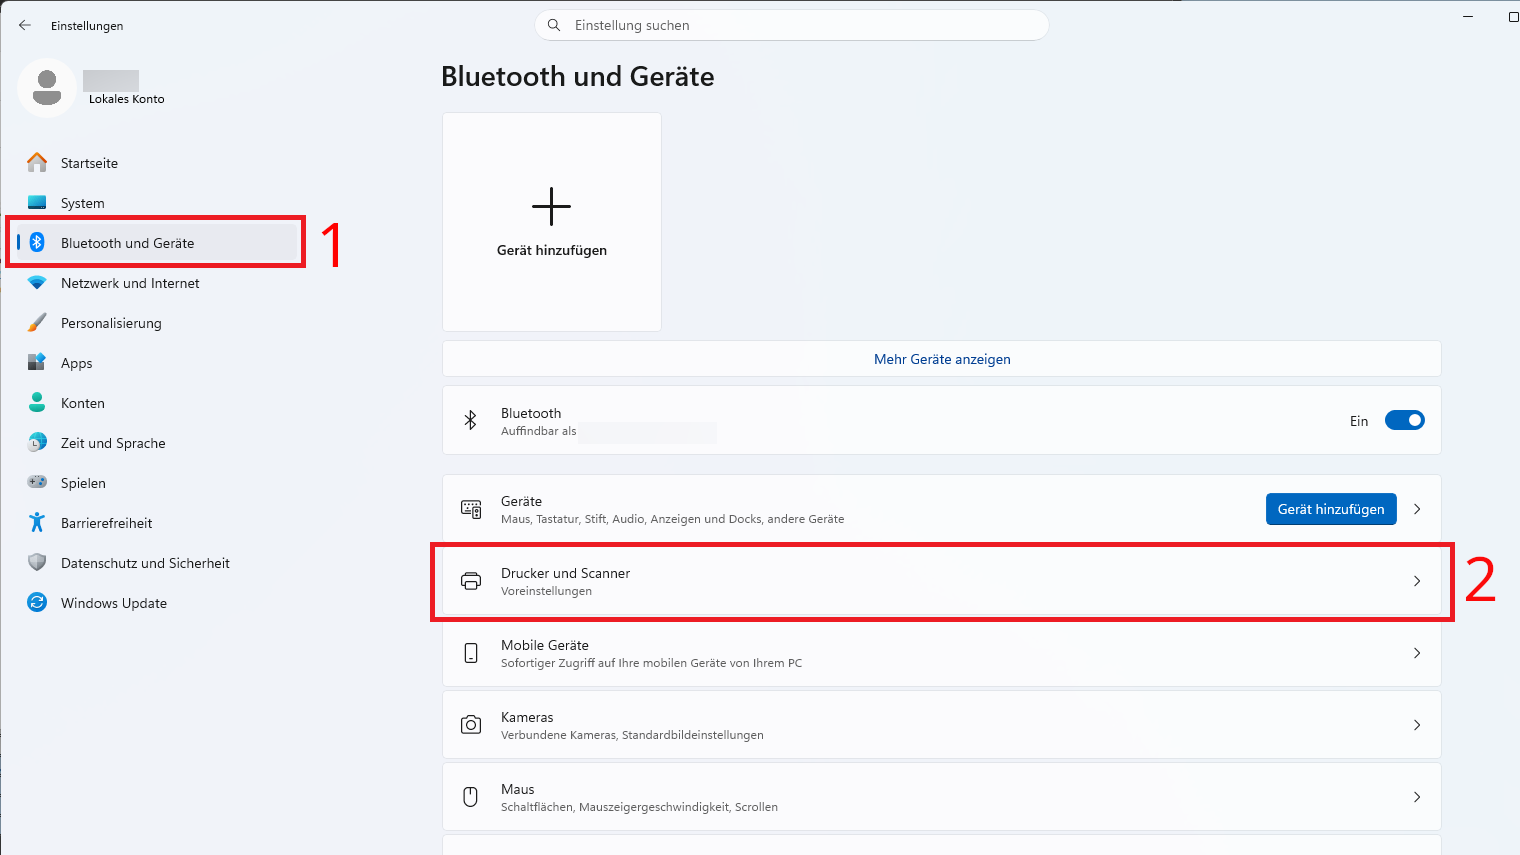
In the sidebar, select “Bluetooth and Devices” (1). Then click “Printers and Scanners” (2).
Step 3
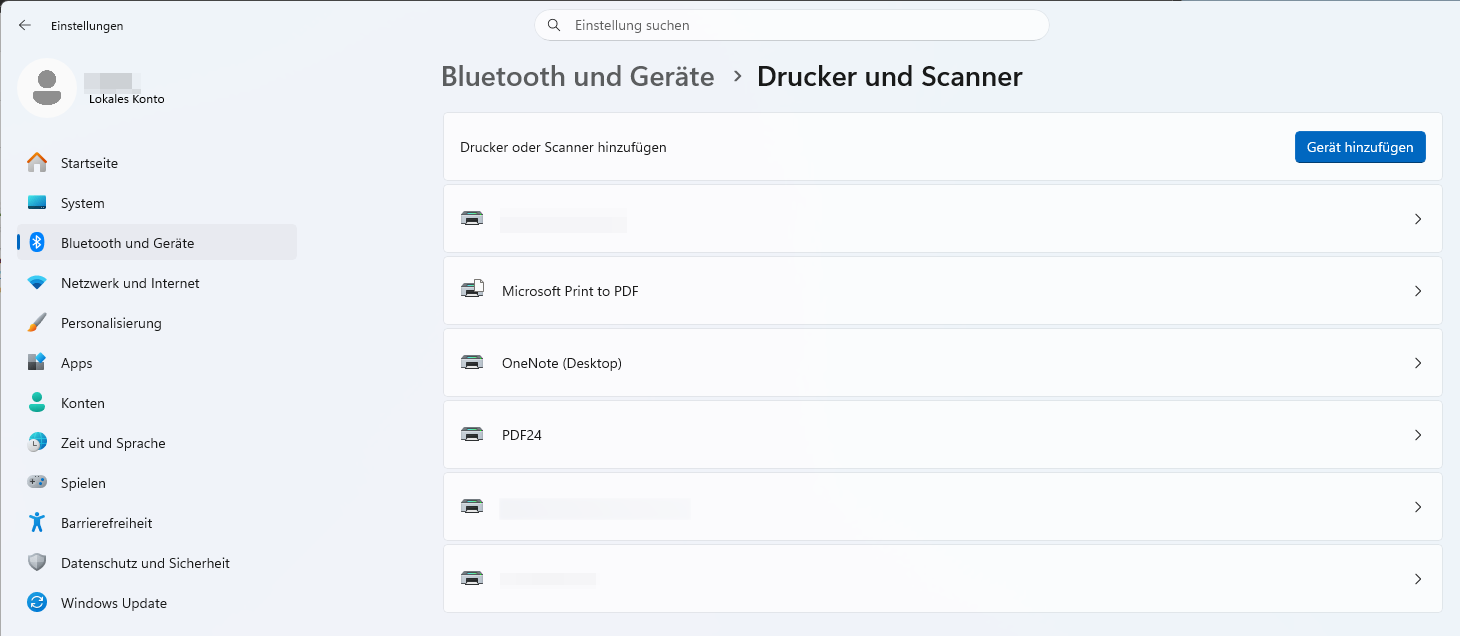
Now select the appropriate printer from the list of connected printers.
Step 4
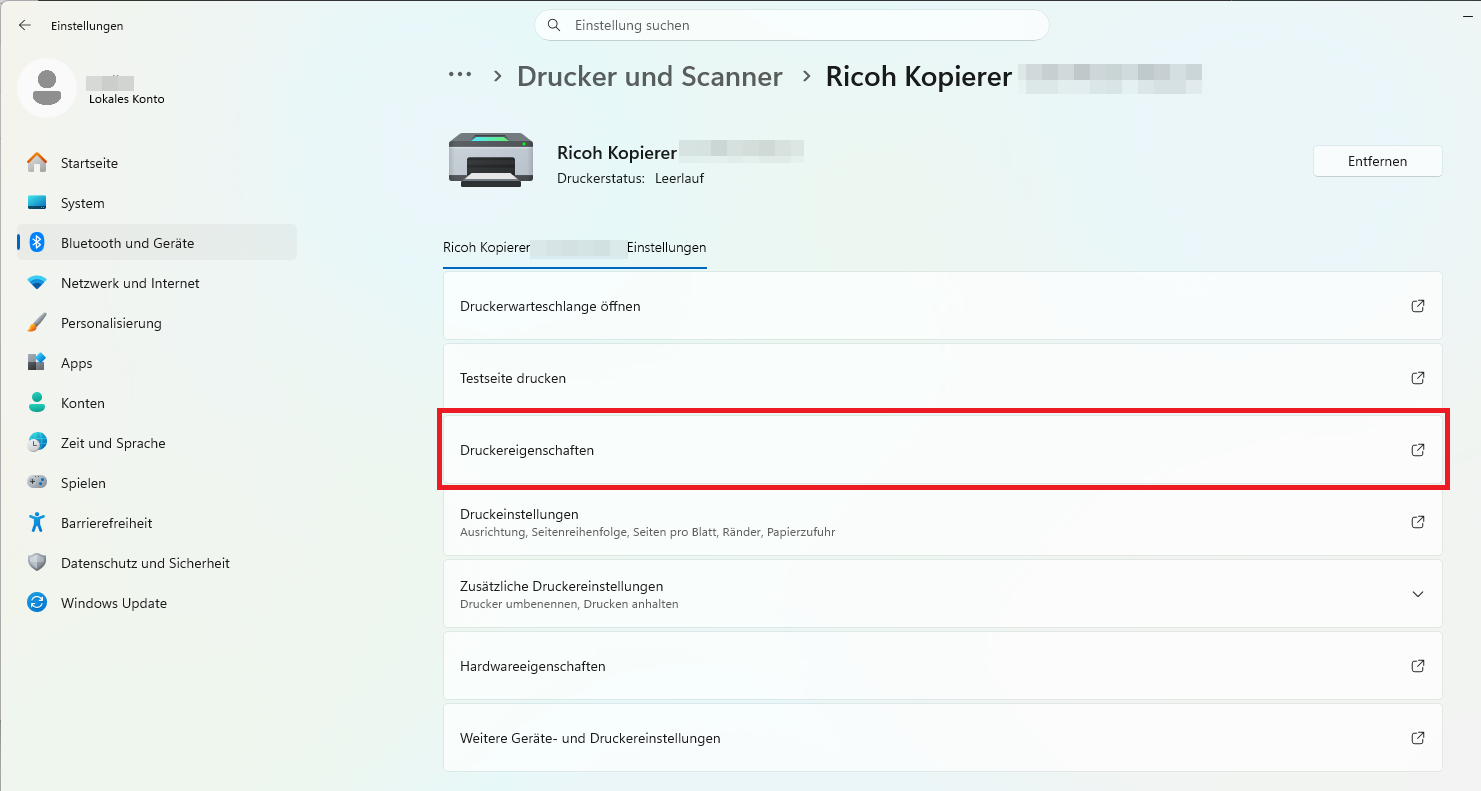
Now click on "Printer Properties.”
Step 5
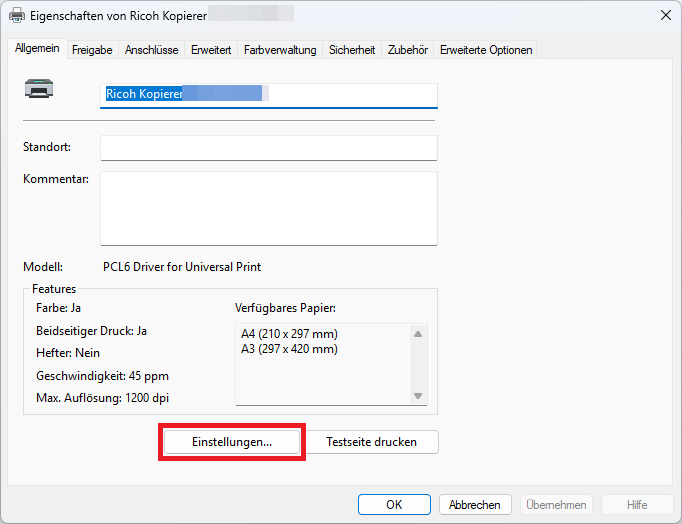
Next, select Settings….
Step 6
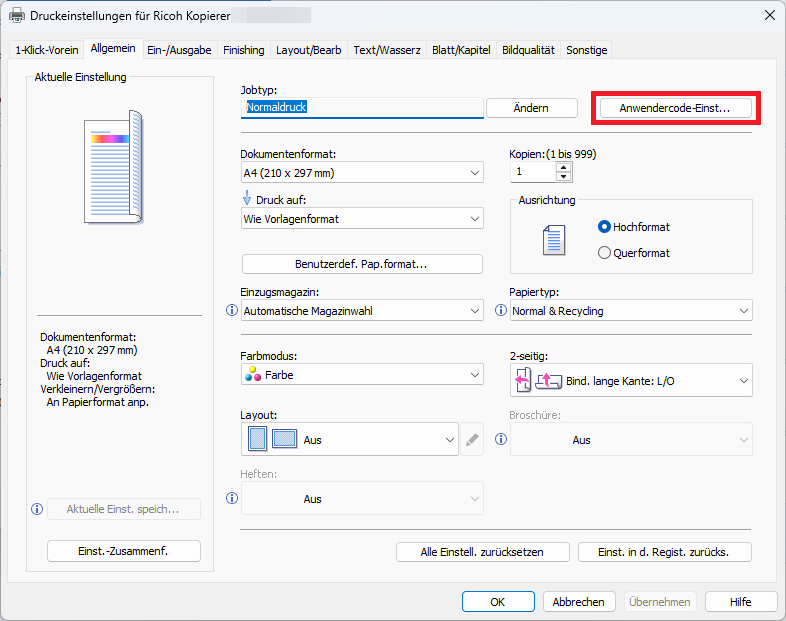
Now click on “Set User Code...” .
Step 7
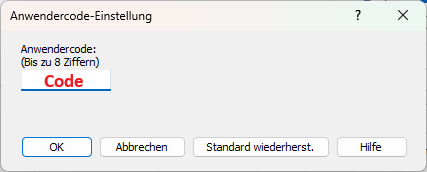
Now enter your copy code.
How do I maintain the Scan-to-Mail address book on the Ricoh copier?
1. Open the web interface of your Ricoh copier in your browser by entering the IP address in the address bar as follows:
“https://IP-Adresse of your copier” (example: 10.1.63.99)
Note: You received the IP address during the initial setup of the device, or you can find it on the copier’s display. To do this, tap “Check Status” in the lower-left corner of the main screen → The IP address is displayed under “Device Status” / “Network”:2. As a one-time exception, please confirm the following warning message by first clicking “Advanced” and then “Accept the risk and continue.”
Background: This message appears because, although the connection to the copier is encrypted (HTTPS), the copier uses a so-called self-signed certificate that your browser cannot independently verify. Please do not use this procedure in other situations—only in this exceptional case!3. Important: If you have an ad blocker enabled in your browser, please disable it for the copier’s web interface! Otherwise, the display may not function correctly, and some menu items may not appear at all or may be displayed incorrectly.
Here is an example using “Adblock Plus”:4. Once the copier's web interface has loaded, click “Login” in the upper-right corner:
5. Log in using the username “admin” and the password you received during initial setup (or, if you have already changed the password, use that one).
Note: If you do not have the password (or have forgotten it), please contact IT Support by calling the hotline at -2000, by email at itsupportuni-mannheim.de, or via Teams under “UNIT Support.” Please have the serial number of your copier ready (see the sticker on the copier).
6. If the following screen appears after you log in, please click “Home” in the upper-left corner; otherwise, please proceed to the next step.
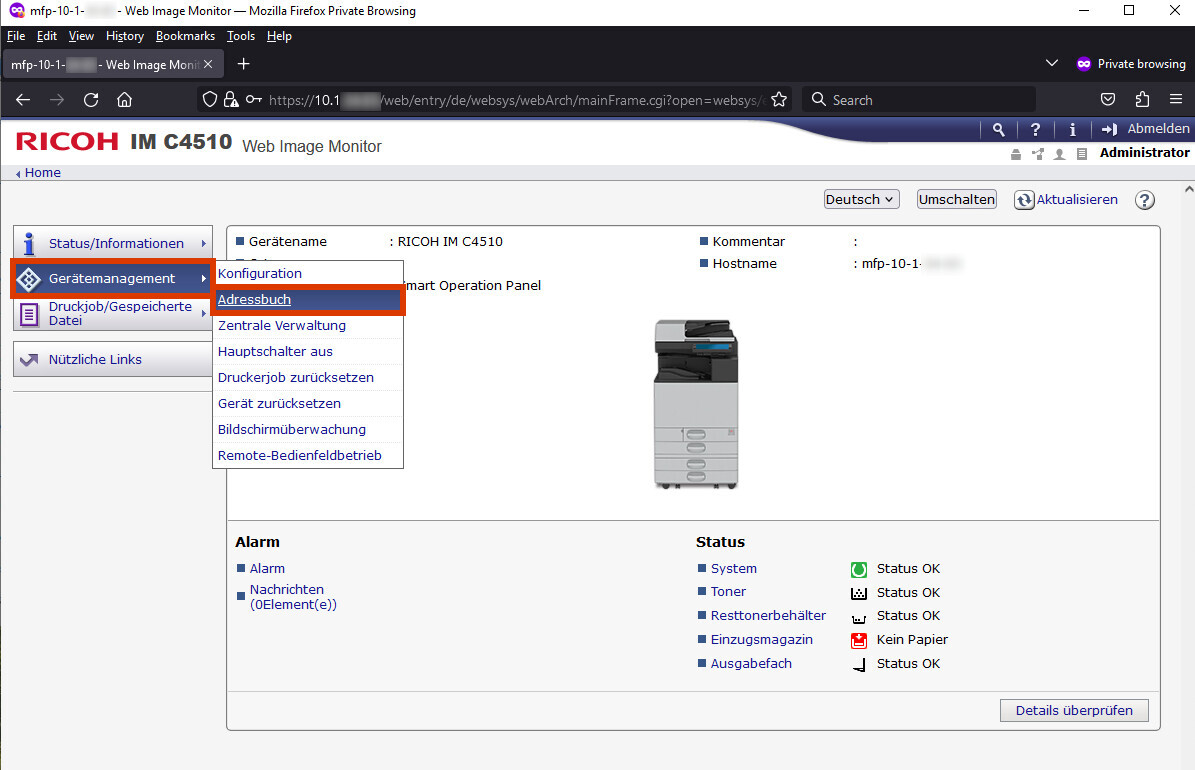
7. Hover your mouse over the “Device Management” menu item and click “Address Book”:
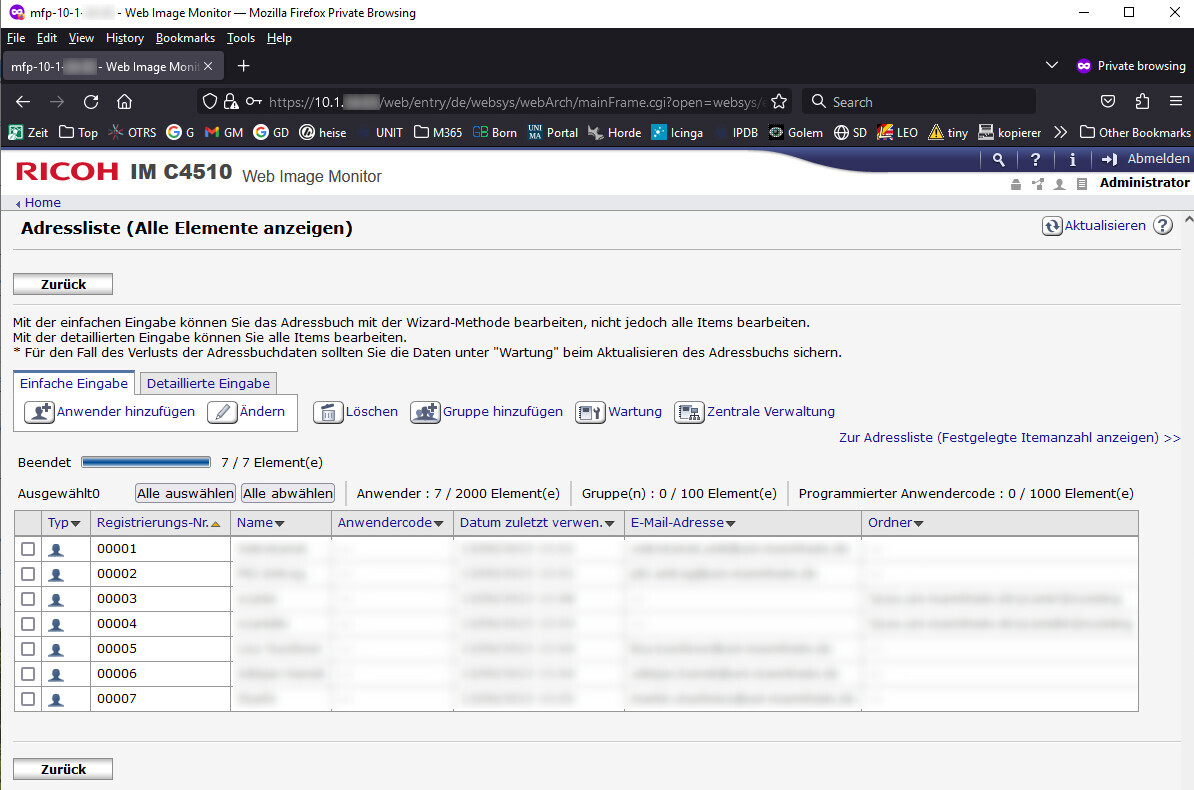
8. Under “Easy Entry,” click “Add User”:
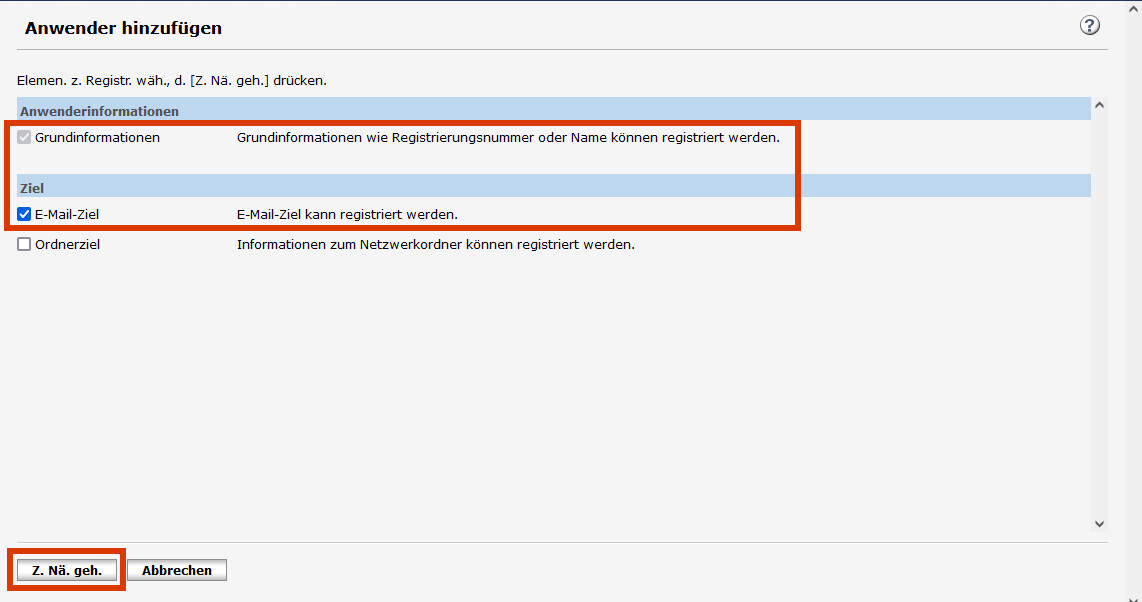
9. The “Basic Information” option is already selected. Also select “Email Destination” and click “Next” in the lower-left corner:
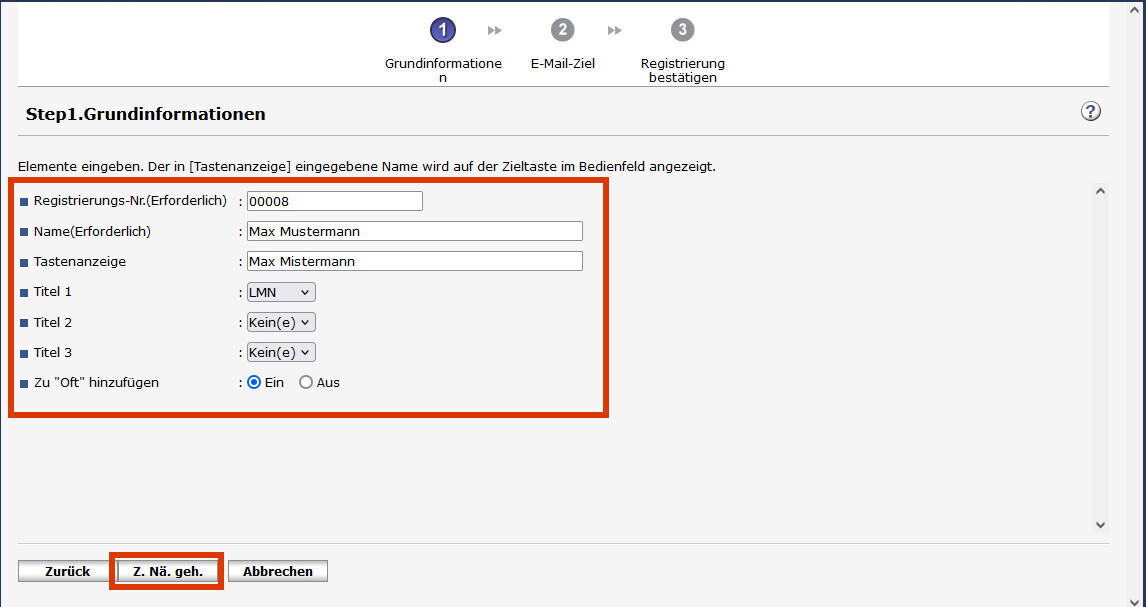
10. On the next page, enter the following information:
- Registration No. (Required): The system automatically suggests the next available entry here; generally, you can leave this preselected.
- Name (Required): Name of the email contact; here: Max Mustermann
- Button Label:The text displayed on the “button” in the address book; recommendation: set this to the same value as “Name,” in this case: Max Mustermann
- Title 1: Select the alphabetical index under which the entry should appear; here: LMN
- Title 2 and Title 3: optional
- Add to “Frequent”: Determines whether the entry appears on the main page (“Frequent”) of the address book or not.
Then click “Go to Next” in the lower-left corner:
11. Enter the recipient's email address (in this case: max.mustermann@uni-mannheim.de). Please do NOT check the box next to the option “Register as recipient and sender.”
Then click “Go to Next” in the lower-left corner: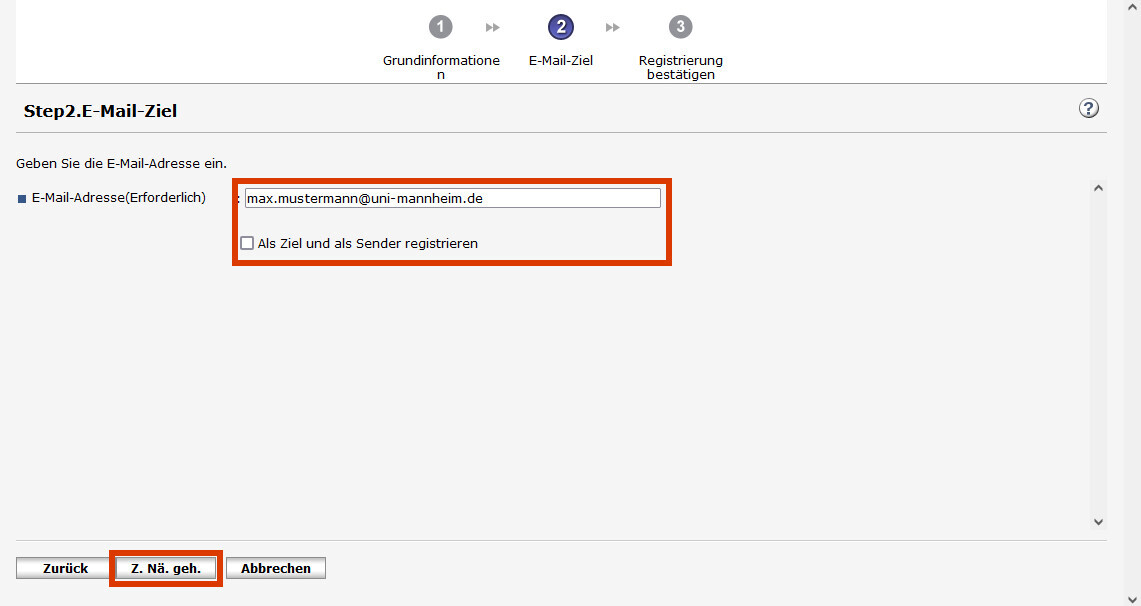
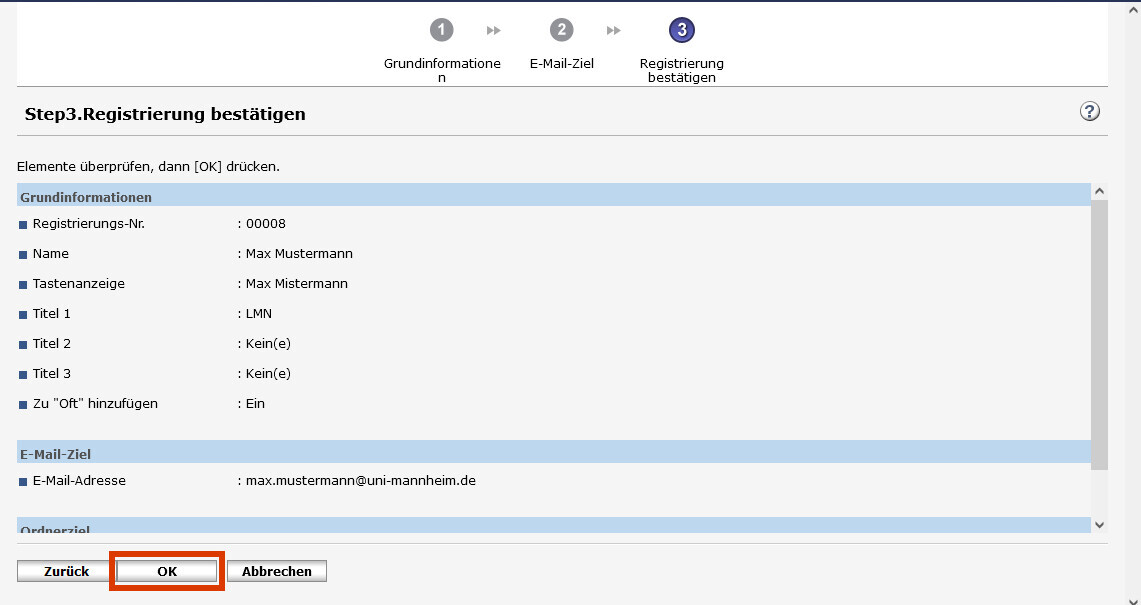
12. On the next page, check to make sure all the information is correct, and confirm by clicking “OK.” Otherwise, you can click “Back” to return to the previous configuration settings and make changes:
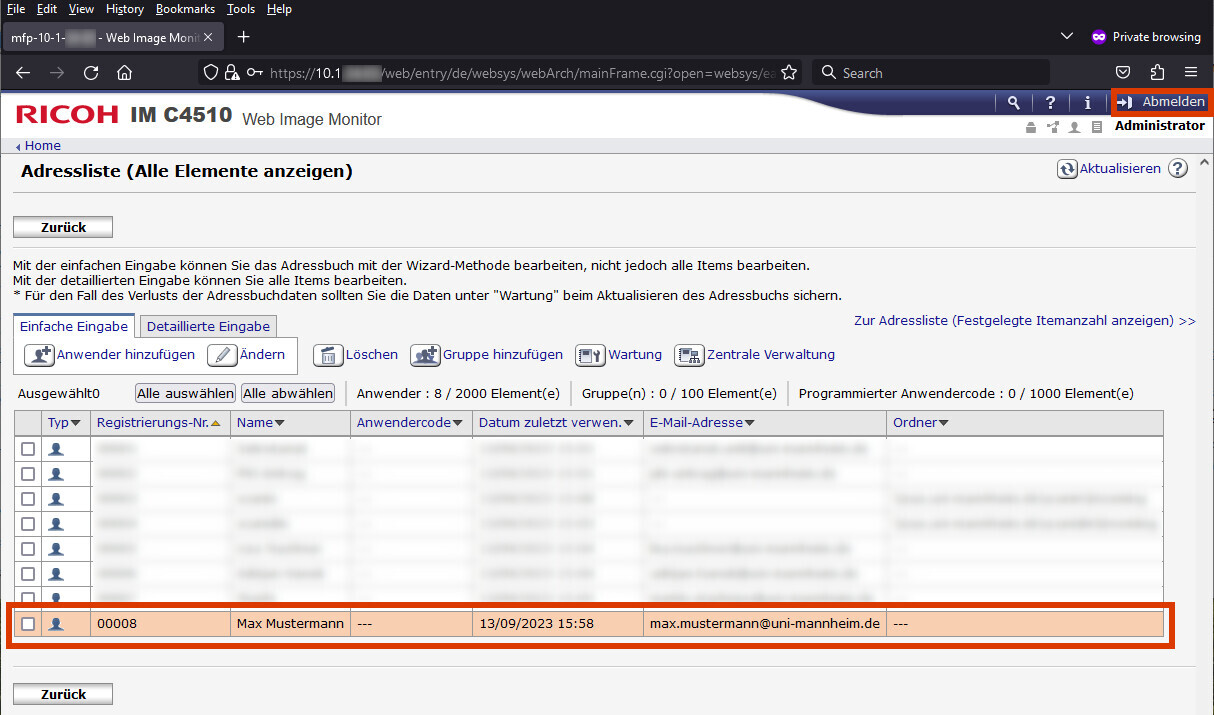
13. The address book entry will be added and will then appear in the overview. If you want to add more addresses, click “Add User” again and repeat the previous steps. Otherwise, please click “Log Out” in the upper-right corner:
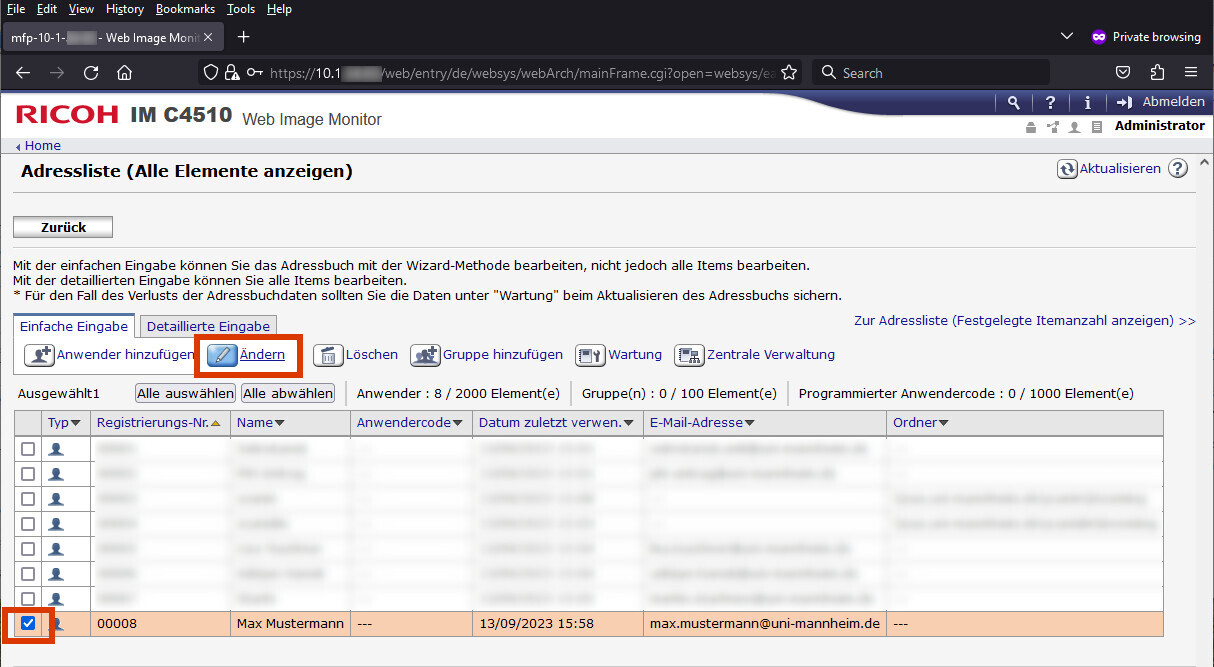
14. To edit an existing address book entry, please select it at the beginning of the line and click “Edit” under “Simple Entry”:
15. Make sure that “Basic Information” and “Email Destination” are selected, and click “Next” in the lower-left corner:
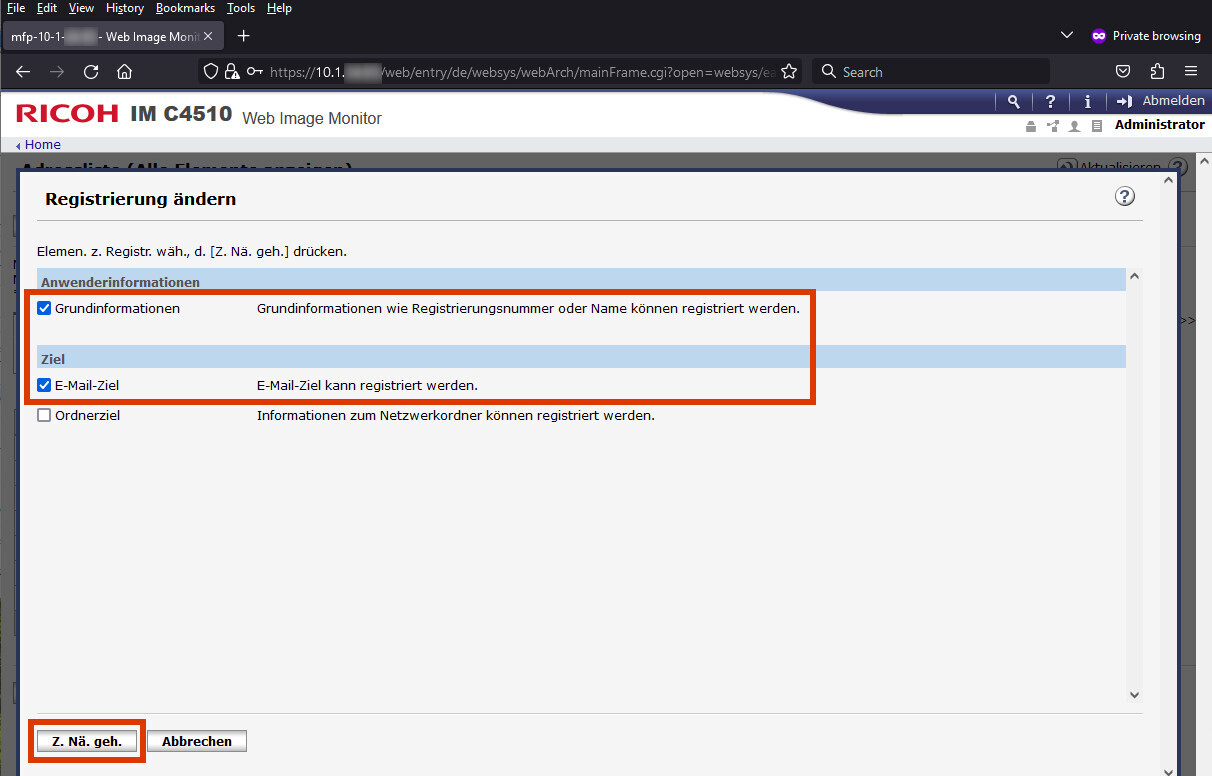
16. Make the desired changes, such as to “Name” or “Email Address.” Click “Go to Settings” to open the respective settings pages. Finally, click “OK” to save the entry (see previous steps).
17. To delete an entry, please select it and click the “Delete” button above the complete address list:
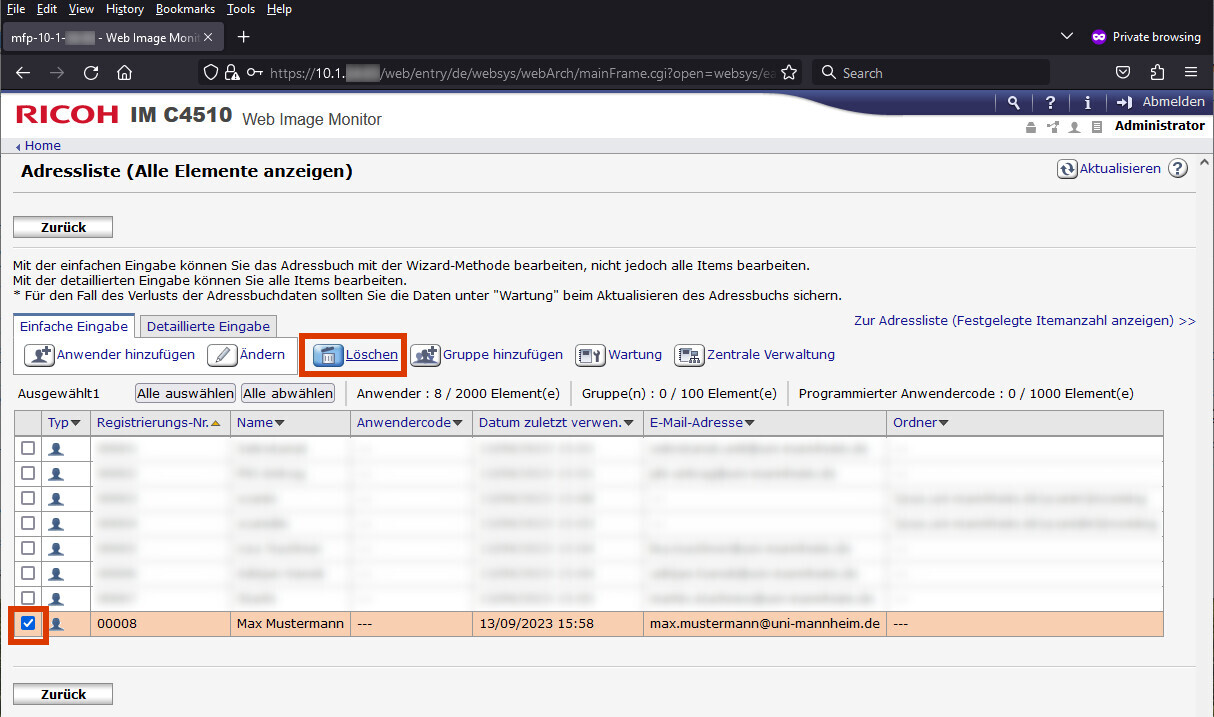
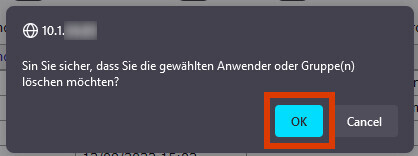
18. Click “OK” to confirm that you want to delete the entry:
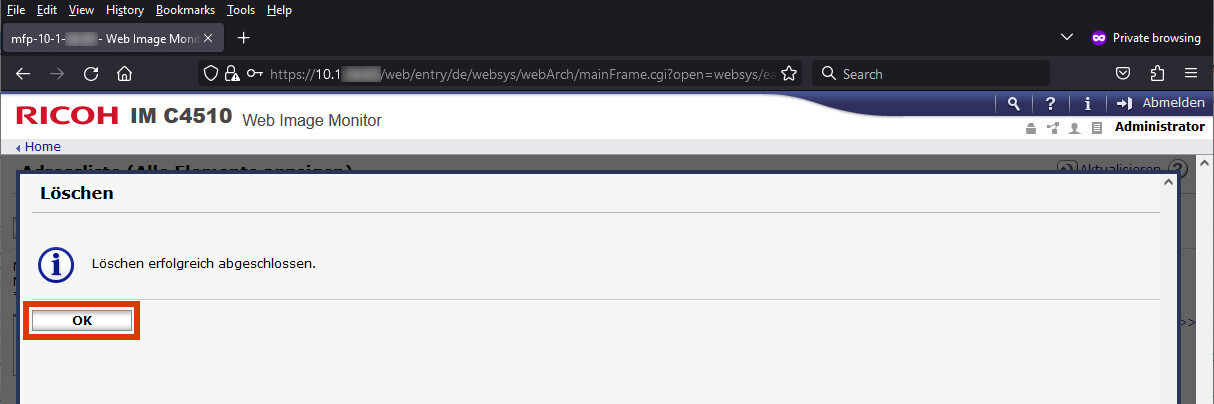
19. Then click “OK”:
20. You can now log out of the copier's web interface by clicking the “Log Out” button in the upper-right corner.
How do I allow the Ricoh copier to access USB storage devices (scan/print)?
Note: The USB flash drive must be formatted as FAT32; otherwise, the system will not recognize it! For instructions on how to do this, see “Formatting a Ricoh MFP USB Flash Drive as FAT32.”
1. Open the web interface of your Ricoh copier in your browser by entering the IP address in the address bar as follows:
“https://IP-Adresse of your copier”
Example:
10.1.63.99 Note
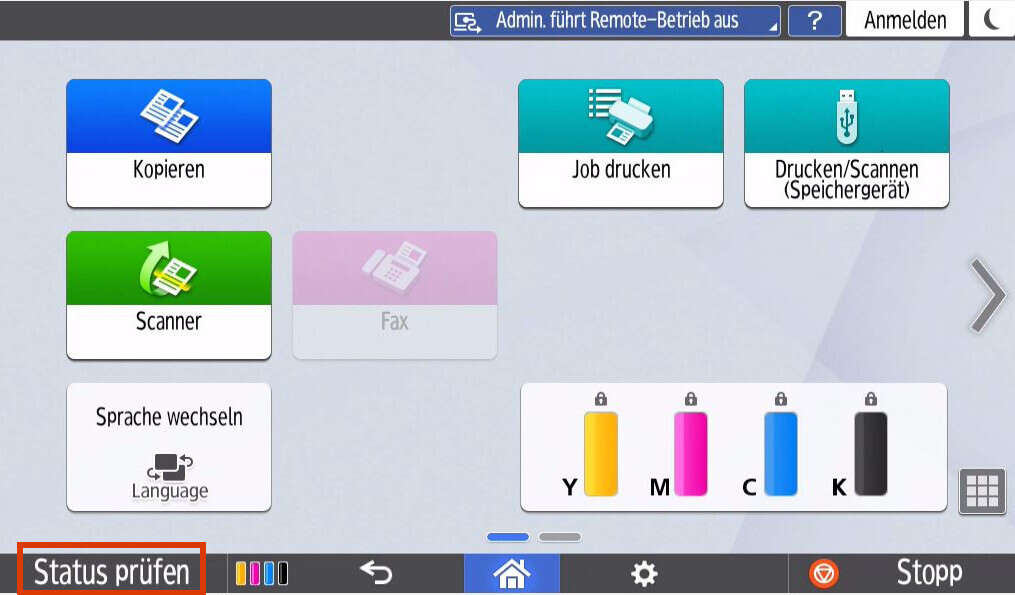
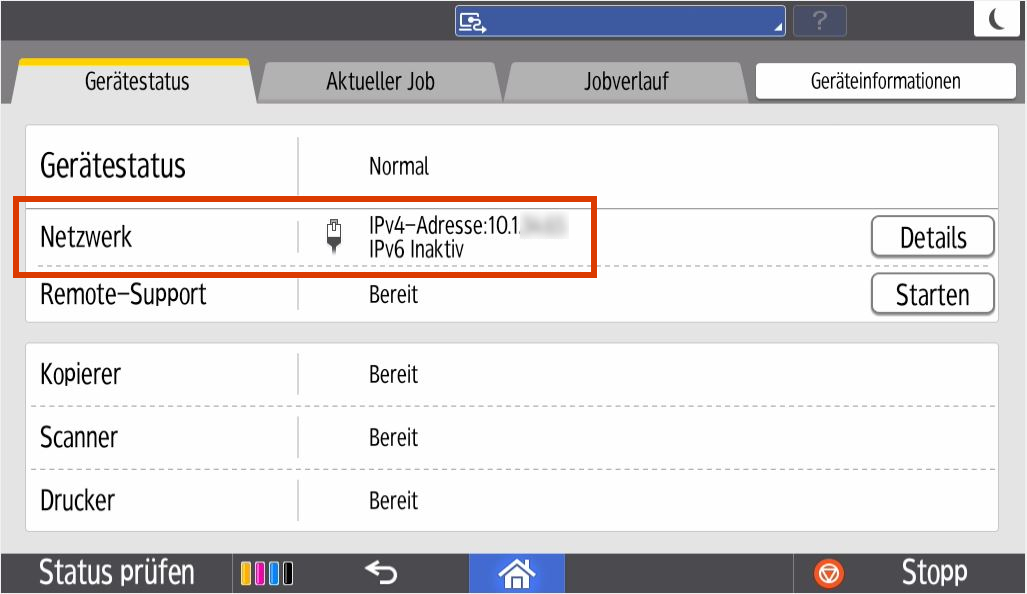
: You received the IP address during the initial setup of the device, or you can find it on the copier’s display. To do this, tap “Check Status” in the lower-left corner of the main screen → The IP address is displayed under “Device Status” / “Network”:
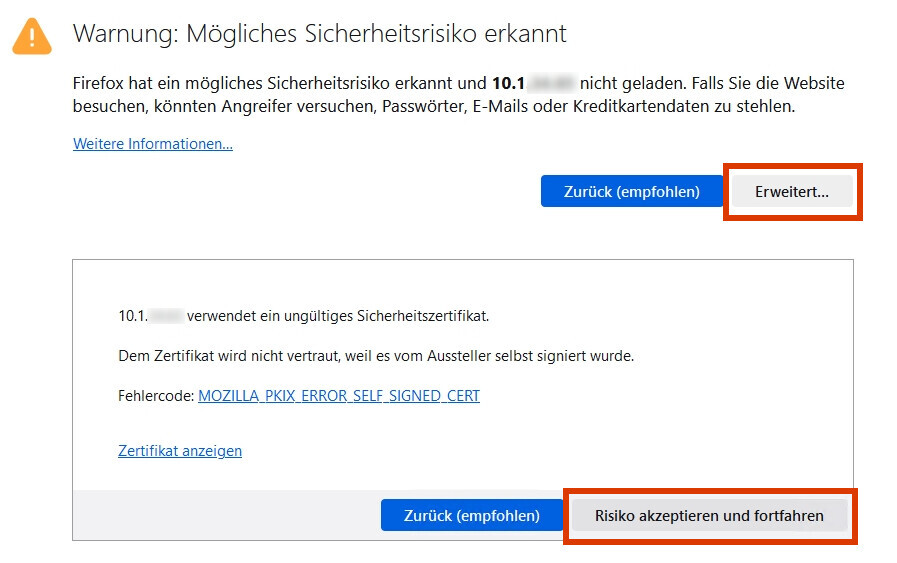
2. As a one-time exception, please confirm the following warning message by first clicking “Advanced” and then “Accept the risk and continue.”
Background
: This message appears because, although the connection to the copier is encrypted (HTTPS), the copier uses a so-called self-signed certificate that Firefox cannot independently verify. Please do not use this procedure in other situations—only in this exceptional case!
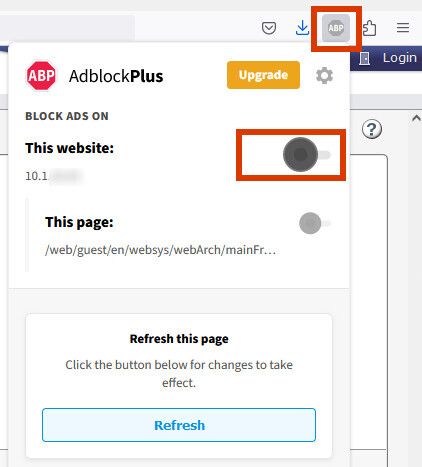
3. Important: If you have an ad blocker enabled in your browser, please disable it for the copier’s web interface! Otherwise, the display may not function correctly, and some menu items may not appear at all or may be displayed incorrectly.
Here is an example using “Adblock Plus”:
4. Once the copier's web interface has loaded, click “Login” in the upper-right corner:
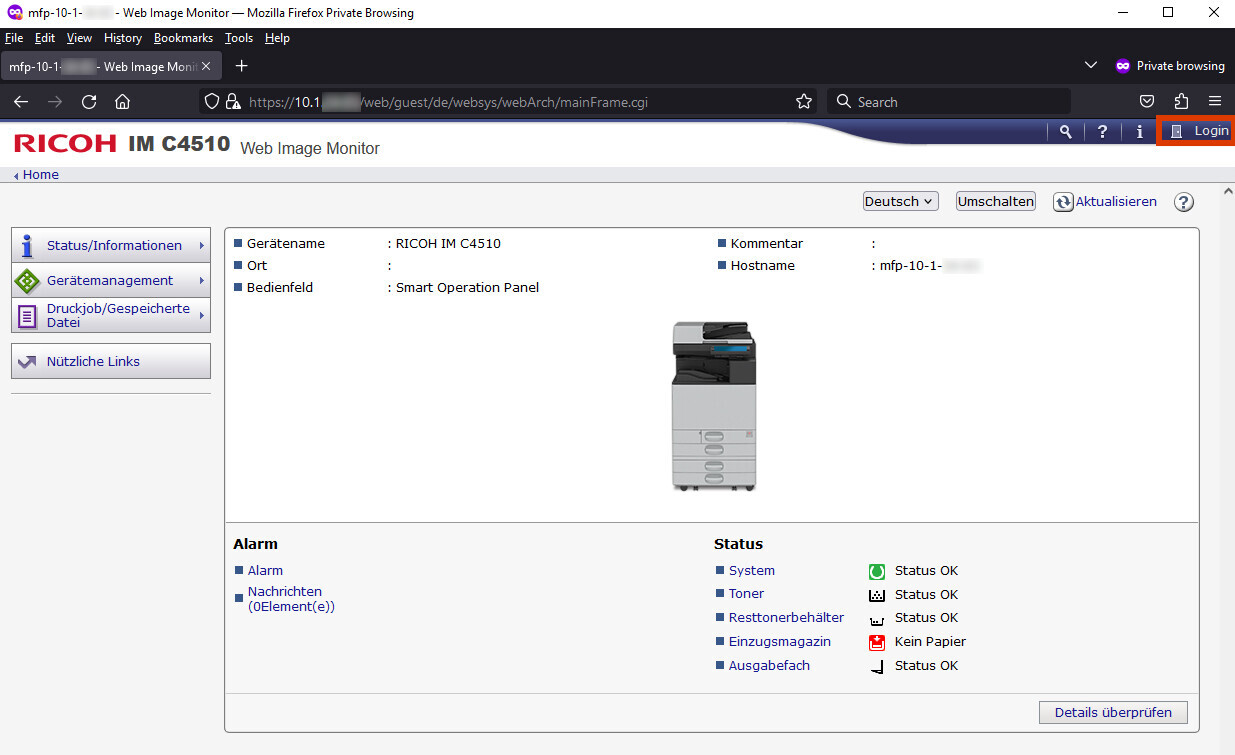
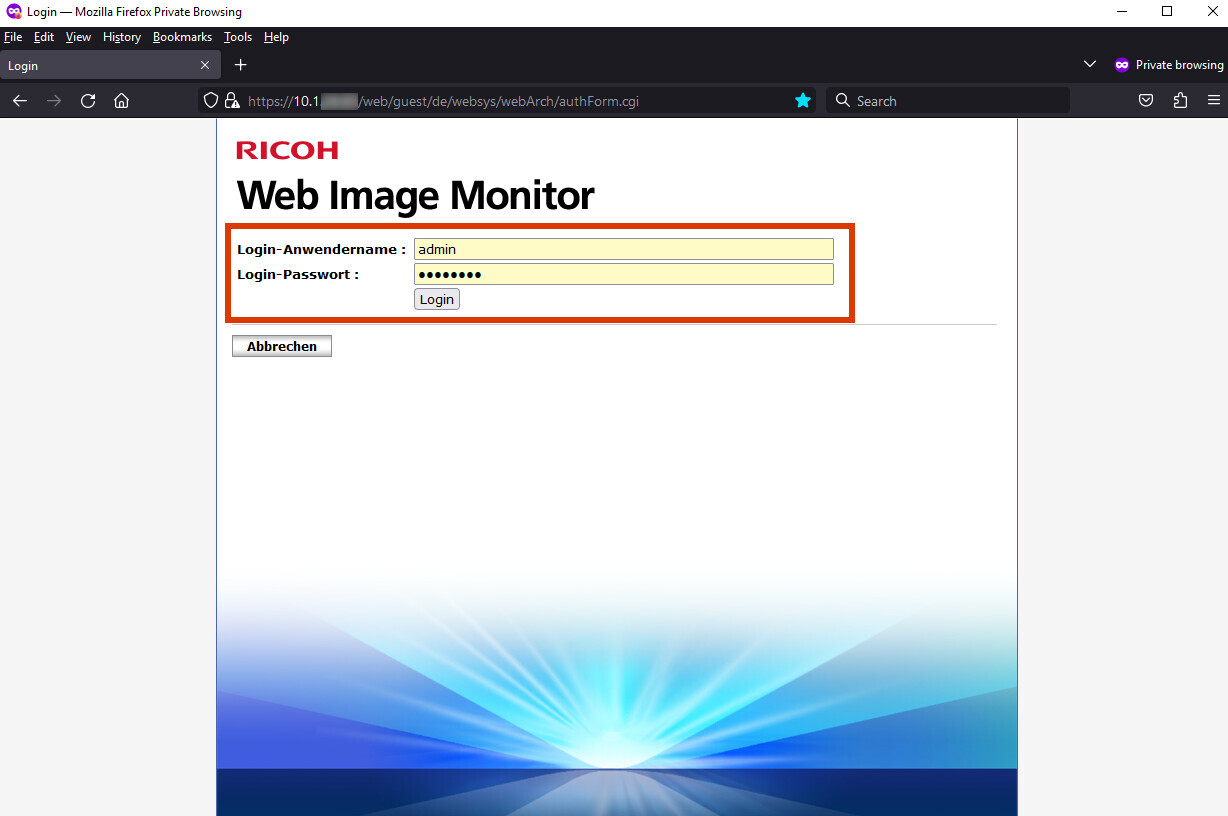
5. Log in using the username “admin” and the password you received during initial setup (or, if you have already changed the password, use that one).
Note: If you do not have the password (or no longer have it), please contact IT Support via the hotline at -2000, by email at itsupportuni-mannheim.de, or via Teams under “UNIT Support.” Please have the serial number of your copier ready (see the sticker on the copier).
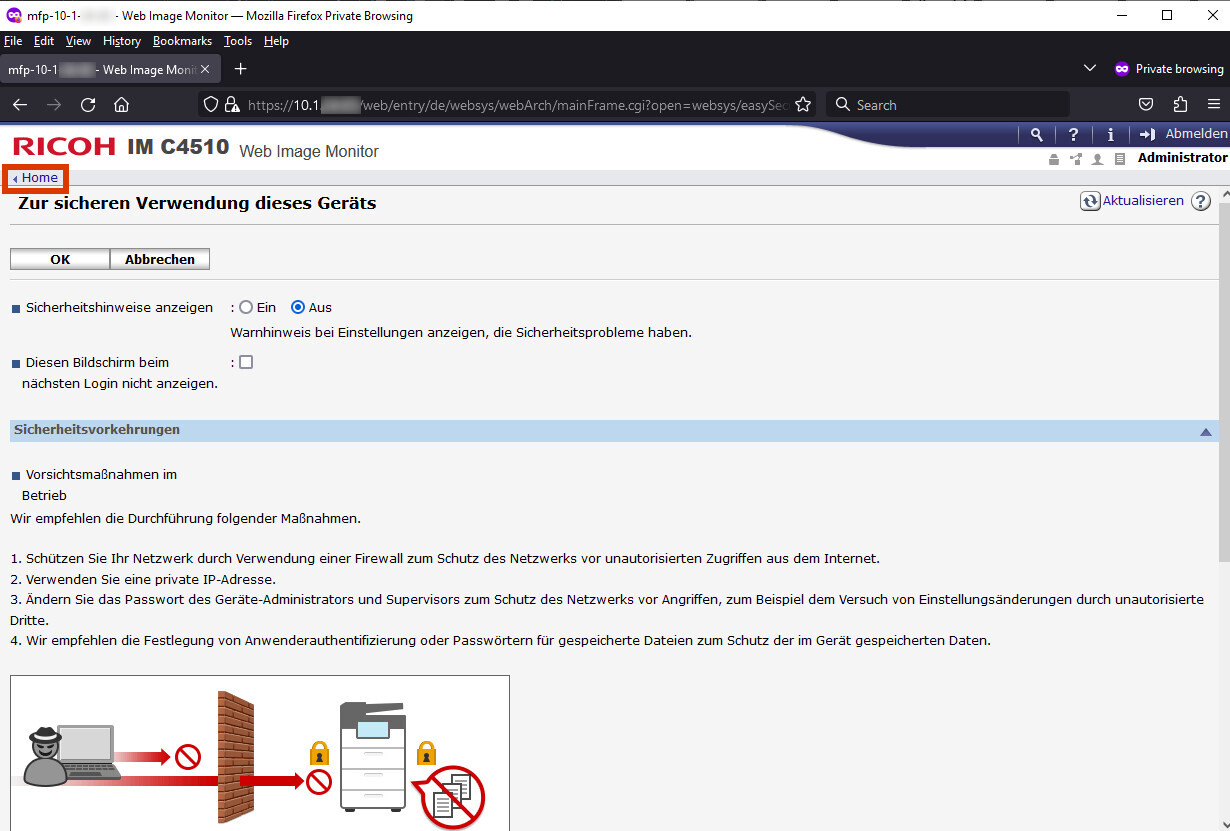
6. If the following screen appears after you log in, please click “Home” in the upper-left corner. Otherwise, please proceed to the next step.
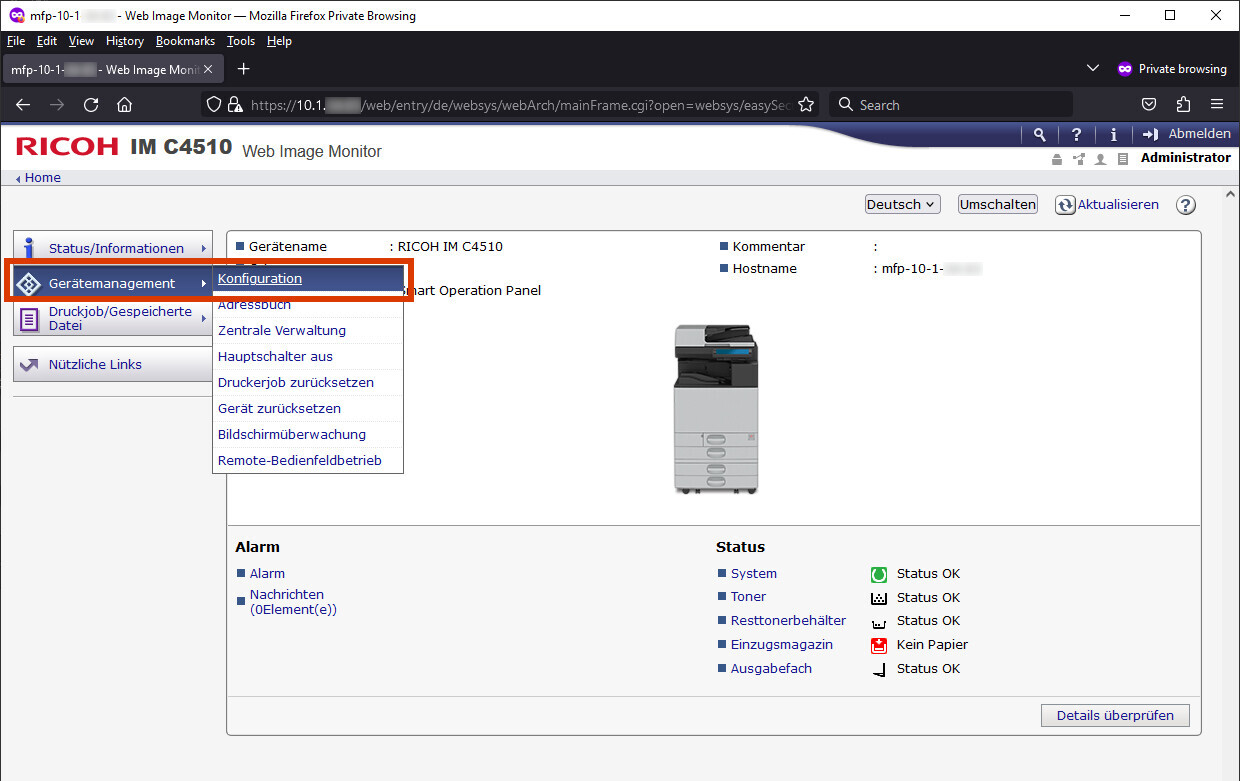
7. Hover your mouse over the “Device Management” menu item and click “Configuration”:
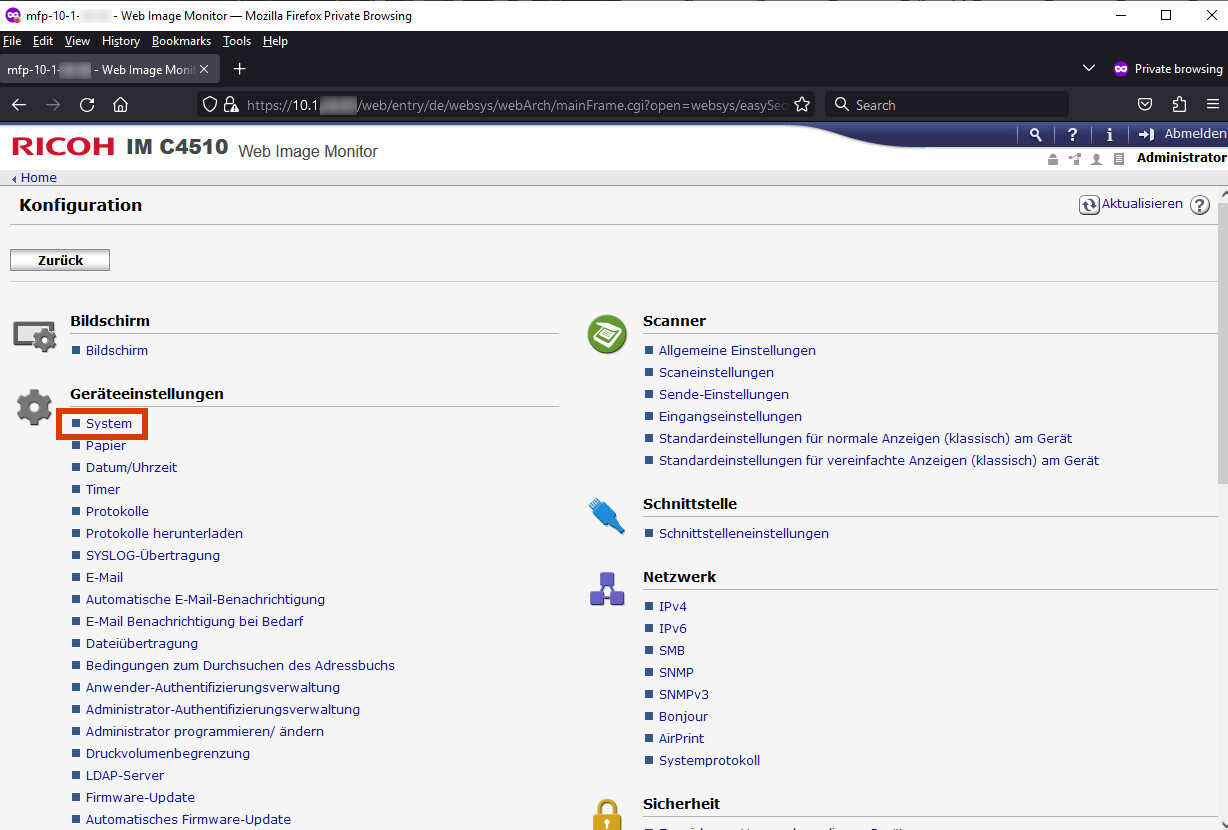
8. Next, under “Device Settings,” click “System:"
9. Under “General Settings,” in the “Media Slot Usage” section, select “Allow” for both of the following options:
“Save to storage device” and “Print from storage device.
" Then click “OK” in the upper-left corner: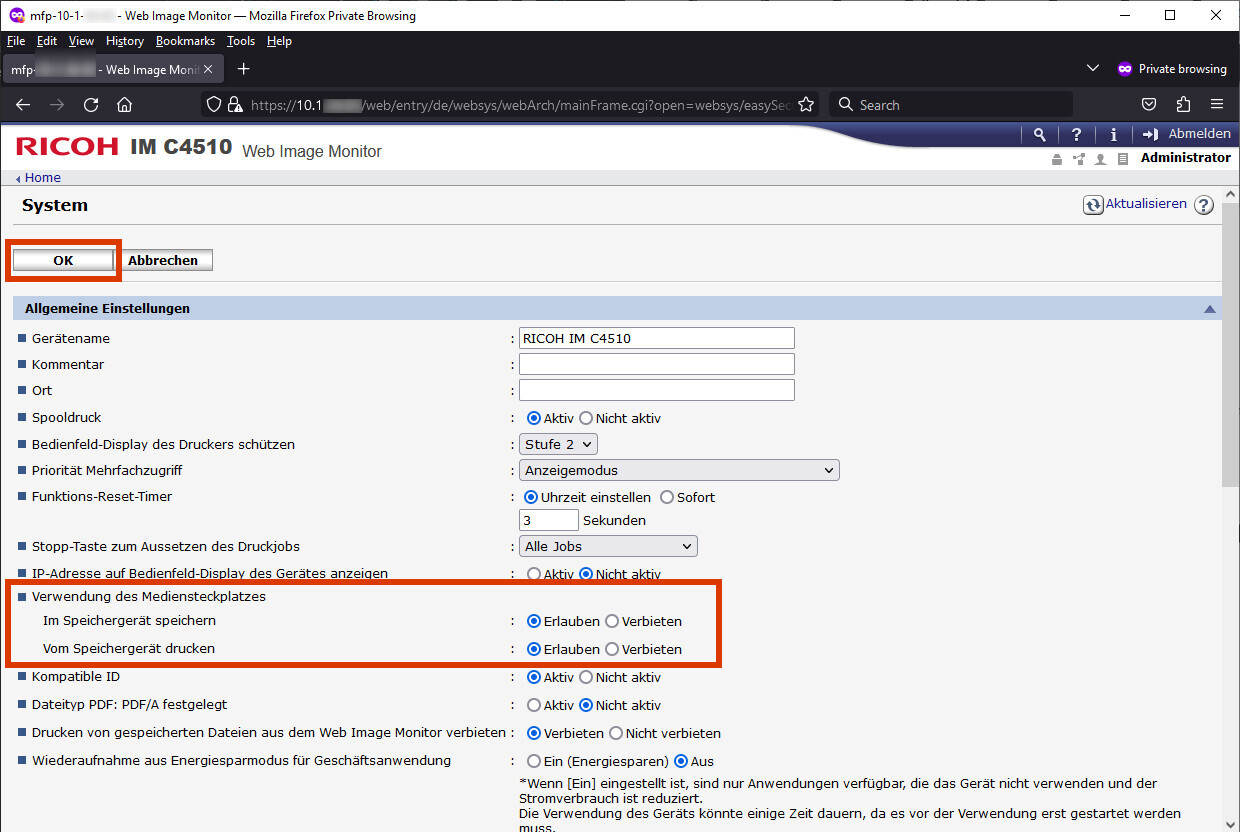
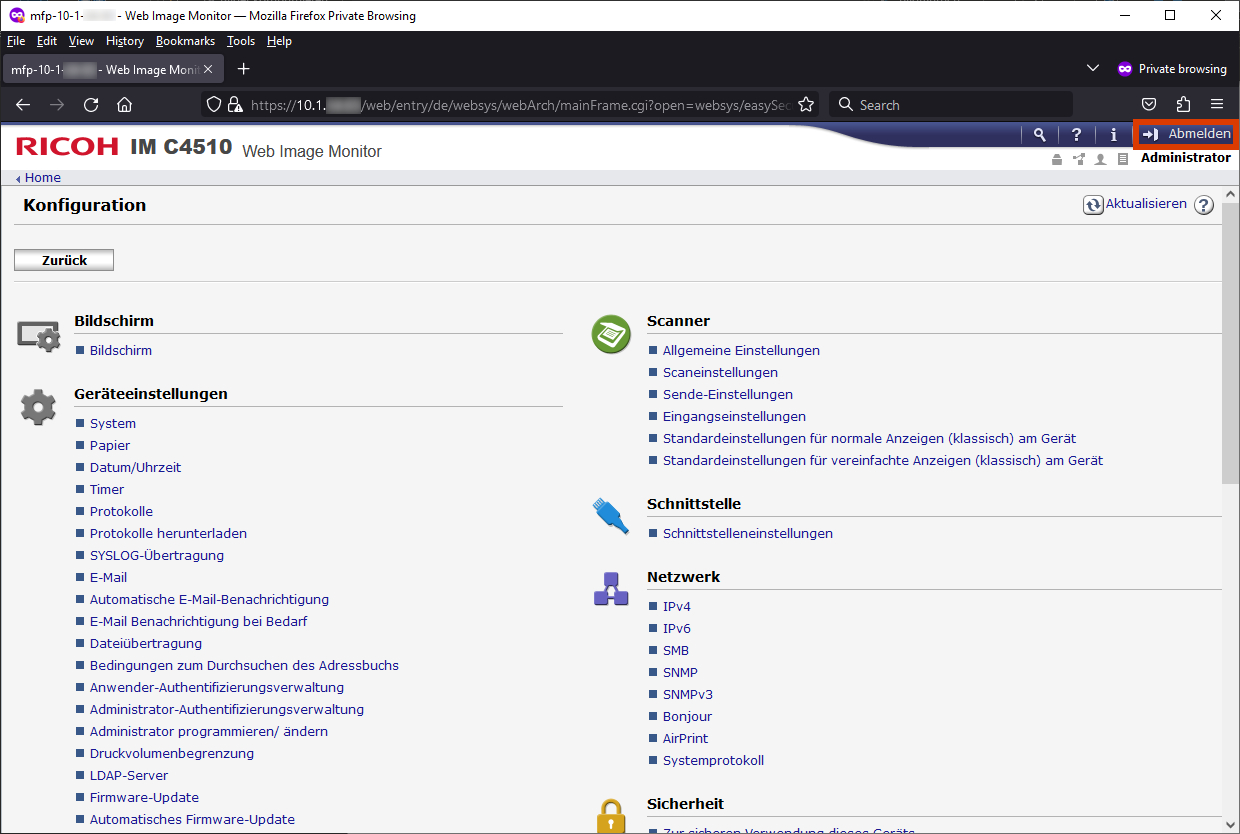
10. Click “Sign Out” in the upper-right corner:
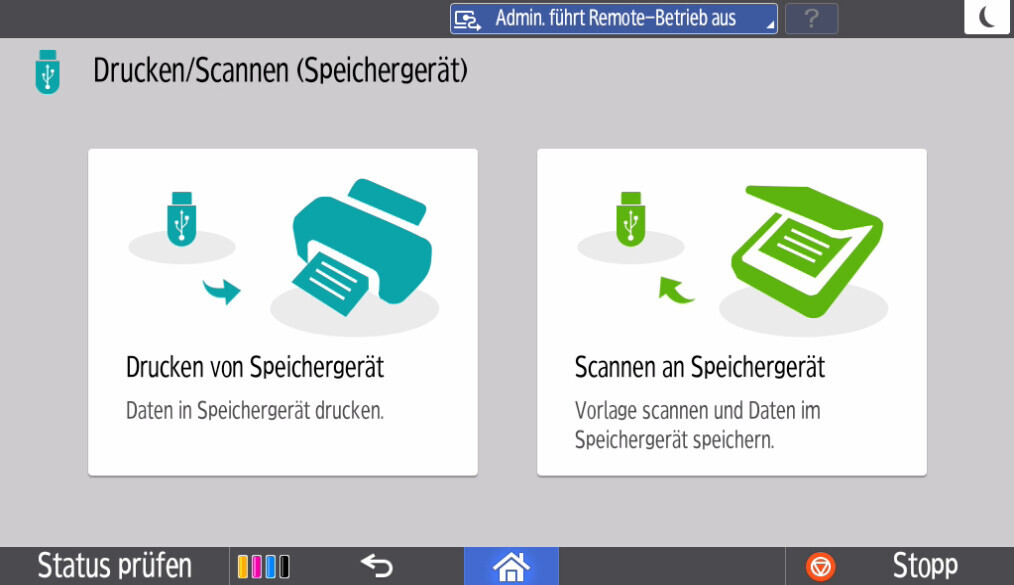
11. This completes the setup. You can now use your Ricoh copier to both scan to a USB flash drive and print documents stored on the USB flash drive:
12. Important—please note:
- The USB flash drive must be formatted as FAT32; otherwise, the system will not recognize it! You can find instructions for this under “Formatting a Ricoh MFP USB Flash Drive as FAT32.”
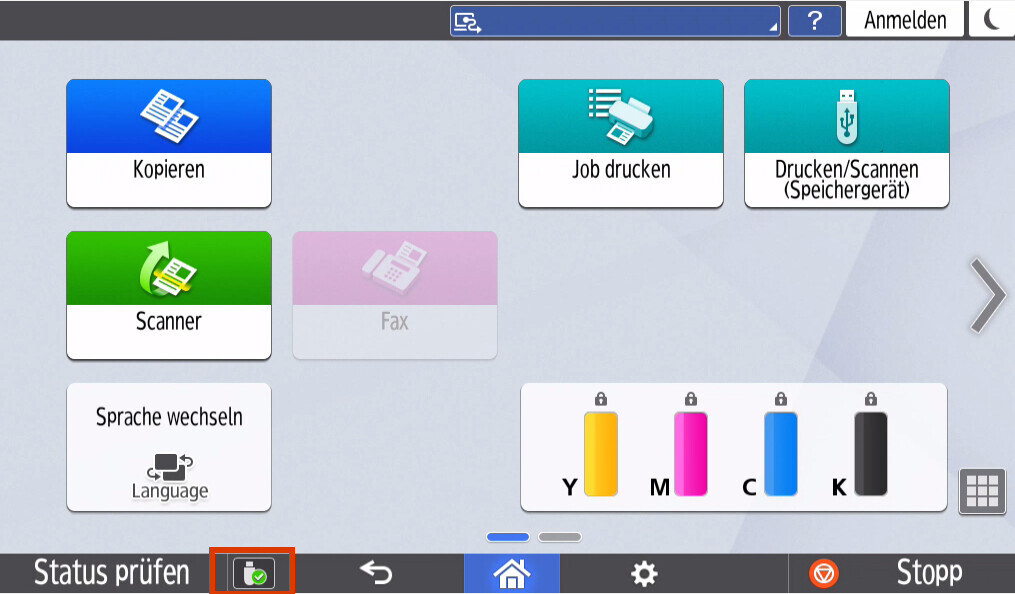
- Please do not “just” pull the USB flash drive out of the copier! Instead, tap the USB icon in the lower-left corner of the main screen and select “Eject.” You can then safely remove the flash drive from the copier:
How do I format a USB flash drive using FAT32?
1. Plug the USB flash drive into your Windows PC and wait until the device is recognized.
2. Open Windows Explorer (press the Windows key + E simultaneously) and locate the USB flash drive in the left-hand pane under “This PC” (expand the entry) or in the main window under “Devices and Drives.”
Important—please note:- Make sure you have selected the correct drive before proceeding with the next steps, as failure to do so may result in data loss and/
or damage to your system! - Make sure there is no data left on the USB drive that you still need—the entire contents of the USB drive will be deleted in the next steps!
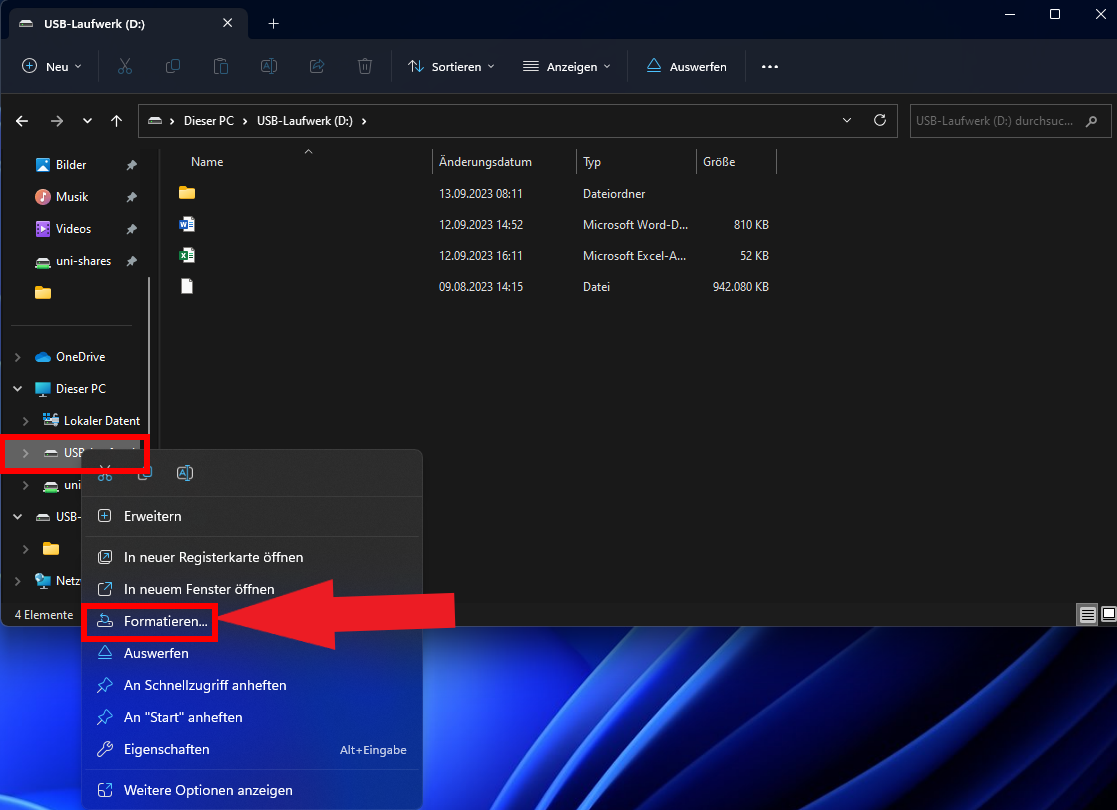
3. Right-click the USB flash drive and select “Format” from the menu:
In the next window, select “FAT32” as the file system and enter a name for the USB flash drive in the “Volume Label” field (e.g., “MFP-Stick”).
Make sure the checkbox next to “Quick Format” is selected, and then click “Start”: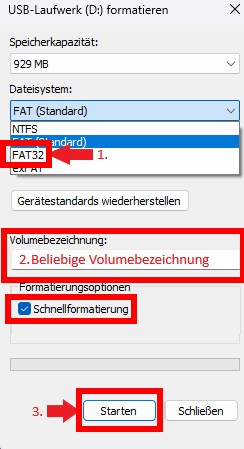
5. If you are certain that all data on the USB flash drive should be deleted, click “OK” to confirm the following warning message and reformat the USB flash drive using the FAT32 file system:
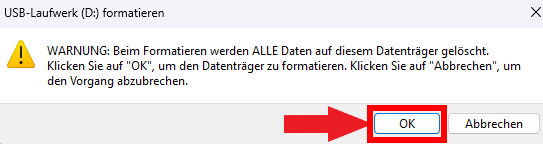
6. Please then safely remove the USB drive from the system as usual (“Safely Remove Hardware”). The USB drive can now be used on Ricoh copiers for “Scan to USB” and for printing files.
Print Online
You would like to print something out? Just use your ecUM or library card to make printouts or photocopies in any of the libraries. You are somewhere else on campus? No problem! Please use our Online print service Papercut. Papercut is accessible from the university network or via VPN.
How can I print my documents?
You can either submit a print job from one of the University Library computers or directly from your mobile device. You will then be able to print out your documents within 48 hours using any photocopier of the library.
To this end, you need:
- sufficient balance on your virtual print account
- your ecUM or University Library card (to print on location)
Ready to print from your mobile device? Log in here:
How do I top up my virtual print account?
To transfer your ecUM credit to your personal print account, you can now use the UNIT application PayPerecUM. You can use this application on the public computers in the university library. There are two PayPerecUM terminals
- near the desks in the libraries A3 and A5,
- in the Schloss Ehrenhof,
- in the Central Lending Library in the Westflügel, and
- in Schloss Schneckenhof (info center).
You can identify the PayPerecUM terminals on the screen of the university library terminals by the words “Druckkonto aufladen” (“Recharge print account”). When you click on it, the application opens and you are guided step by step through the process, either in German or English:
- place the ecUM on the card reader,
- enter the password for your Uni-ID,
- view your account balances,
- enter the amount to be transferred.
Where can I top up my ecUM?
You can quickly and conveniently load your ecUM with cash at the registers in the cafeteria, Café Soleil, and Cafeteria EO.
Are you enrolled in the cashless Autoload program offered by the Mannheim Student Services Organization? Once you’ve registered for the Autoload program (online or at the information desk in the Mensaria am Schloss), you can top up your ecUM via direct debit through the Autoload service portal.
You can also find more information about topping up your ecUM card on the Studierendenwerk website.
How will my credit be refunded?
Any credit balance can be refunded (e.g., upon disenrollment). The reimbursement will usually be transferred to your bank account within three weeks. Cash payments are not possible.
To request a refund, please send an e-mail to itsupportuni-mannheim.de with the following information:
- First name, last name
- Uni-ID
- street, house number
- postal code, city
- IBAN
- BIC
How do I print in the University Library?
To find step-by-step instructions on printing at the University Library, please click here:
How do I print from mobile devices?
To find step-by-step instructions on how to print from mobile devices, please click here:
Printer Management
All printers are accessible via the administrative network. As a rule, HP LaserJet series models are used on workstation PCs. Each department usually also has Konica Minolta copiers, which can also be used as printers (for example, for larger print jobs).
How do I add a printer?
- Open the Control Panel by typing “Control Panel” in the search box on the taskbar at the bottom of the desktop.
- Under “Hardware,” click “View devices and printers.”
- Select the appropriate network printer.
The printer you're looking for isn't listed?
- Select “Add Printer.”
- Click “The printer I want isn't listed.”
- Click “Search for a printer in the directory by location or printer features,” and then click “Next.”
- Click “Search Now.”
- Double-click the desired printer in the list to select it, and then click “Next.”
- If necessary, check “Set as default printer” and click “Finish” to complete the process.

Wi-Fi is not required to use printers and multifunction devices. Devices issued by the University IT Department are already configured accordingly. Please be sure to disable Wi-Fi on printers procured independently to reduce the load on the university’s Wi-Fi network.