
Microsoft Exchange
By introducing Microsoft Exchange, we will provide all employees and students of the University of Mannheim with a standardized system for e-mails, calendars and address books.


Login
Outlook Web App
Open exchange.uni-mannheim.de and log in using your Uni-ID and the corresponding password.

You can add your e-mail account into an email client. You can find instructions at:
FAQ
These instructions apply only to the Outlook Web App. For further questions about the Outlook desktop application, please see Outlook FAQ.
What is my Exchange e-mail address?
- Go to https://exchange.uni-mannheim.de/ in your web browser.
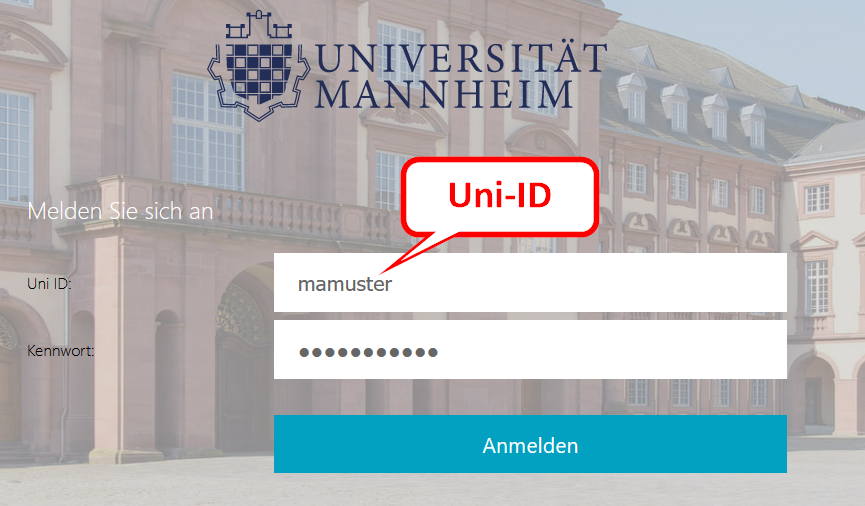
- Login with your Uni-ID and the corresponding password.
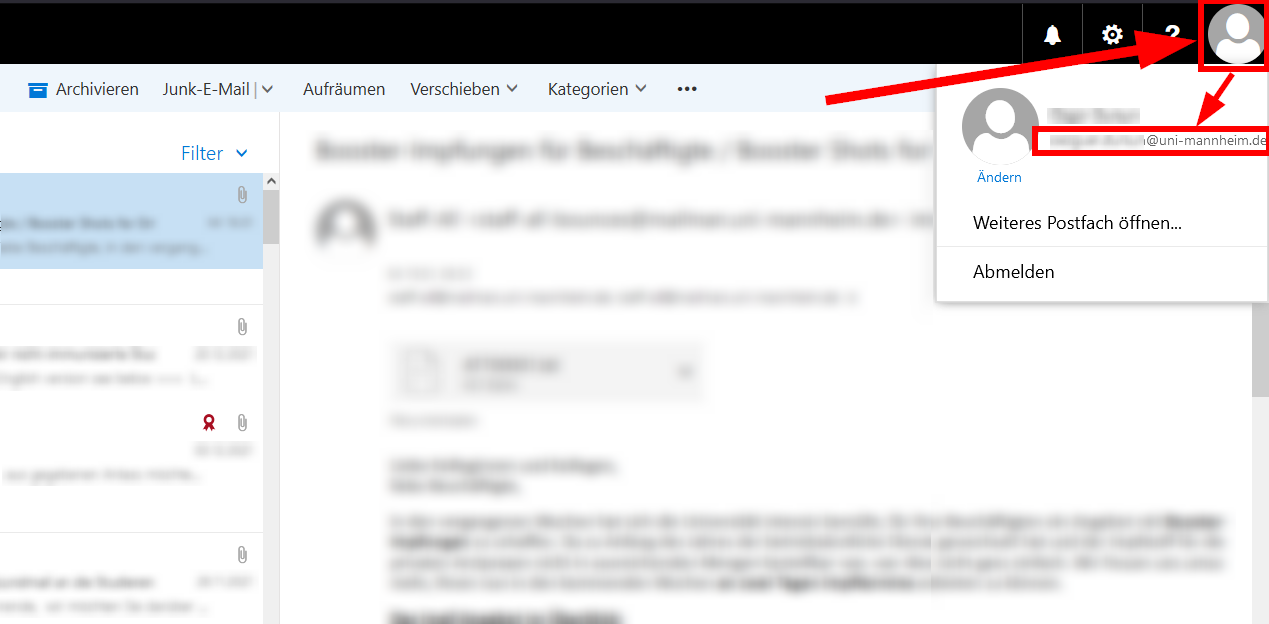
- After the login, click on the profile picture in the upper right corner. Your e-mail address will be displayed in the pop-up window that opens.
How do I set up an out-of-office reply in the OWA?
1. Open the Outlook Web App (OWA) and login with your Uni-ID and the corresponding password.
2. Click on the gear symbol (1) > options (2) > e-mail (3) > automatic processing (4) > Create automatic replies (5).

3. Please proceed as follows to store the out-of-office reply for senders within your organization:
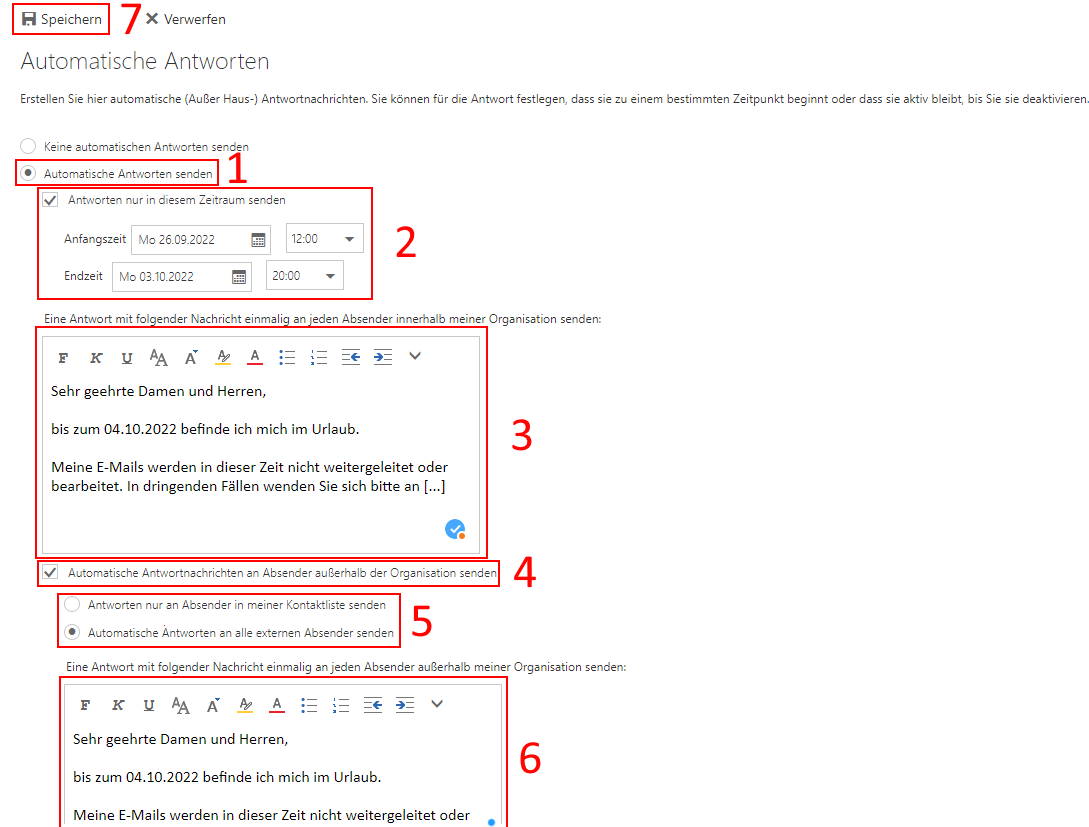
(1) Enable “Send automatic replies”.
(2) If you want to send the replies only in a specific time frame, check the box “Only send during this time range” and enter the start time and end time (optional).
(3) Enter your out-of-office reply.
(4) Enable “Sending automatic replies to senders outside your organization”, if you want senders without an @uni-mannheim.de mail address to receive your out-of-office reply.
(5) You can decide if only senders from your contact list or all external senders without an @uni-mannheim.de e-mail address will receive your out-of-office reply.
(6) Enter your out-of-office reply for senders without an @uni-mannheim.de e-mail address.
(7) Click “Save” in order to save the settings and the out-of-office reply.
How do I create a signature?
- Create a signature using the University of Mannheim form and copy the signature you have created.
- Sign in to Outlook Web App.
- Click on the cog icon in the top right-hand corner, then click on Options.
- In the menu on the right, under Layout, click on Email signature.
- Paste the signature you copied in step 1 here, then click Save.
Why do I receive some e-mails as attachment?
Incoming e-mails sent and signed by external senders, cannot have the note indicating that they have been sent by an external sender and mst be treated with caution. The Exchange e-mail system create a new, empty e-mail, adds the note to the e-mail and attaches the original e-mail.
If you trust the content of the original e-mail and/
or have read the warning, you can move the attachment to the inbox: 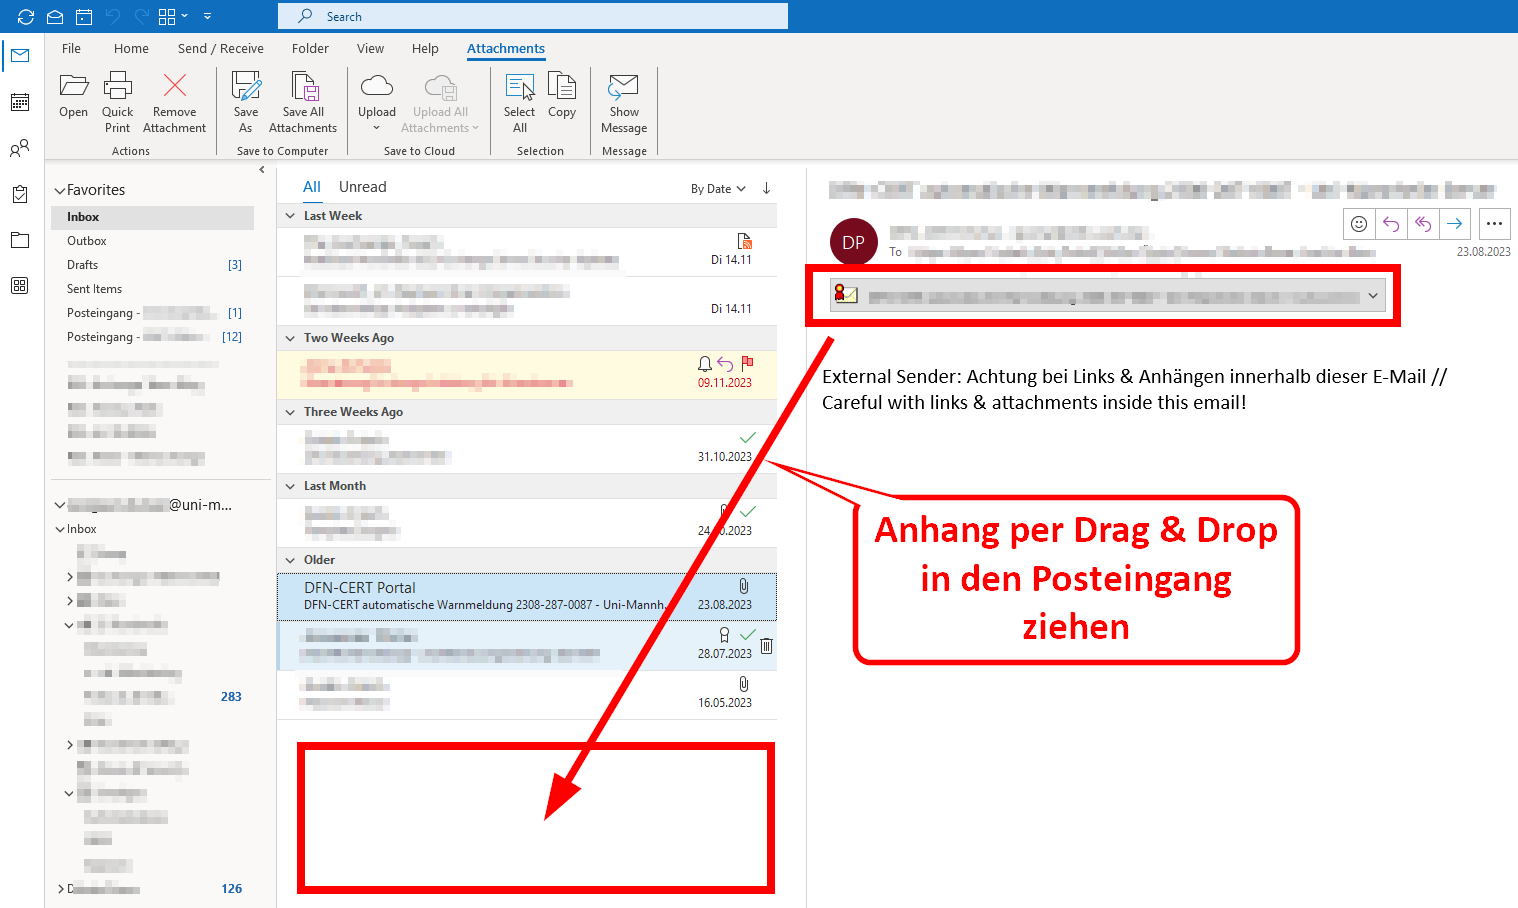
The original e-mail is then created in the inbox and you can treat this e-mail like any other e-mail and reply etc.
Please also take note of the next FAQ-entry. There we show you an alternative external-sender-disclaimer that does not put signed e-mails into attachments and delivers them normally.
How can I change the external sender notification?
E-mails coming from external senders are marked with a warning note at the top. You can change the type of notification via MyUni-ID (e-mail/Uni-ID → external e-mails) by selecting one of the following options:
Default disclaimer
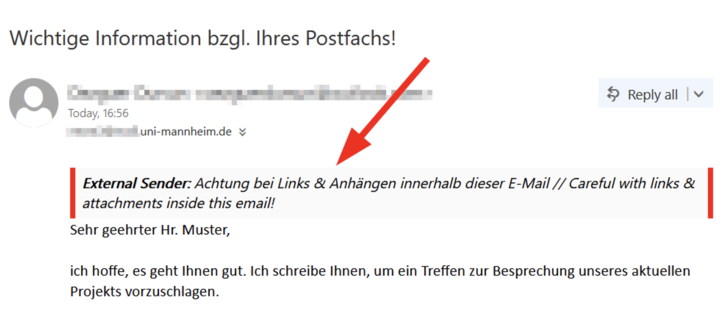
Default disclaimer and best used with PC/
Laptop versions of e-mail clients. Encrypted or signed emails will be added as attachments. Short disclaimer
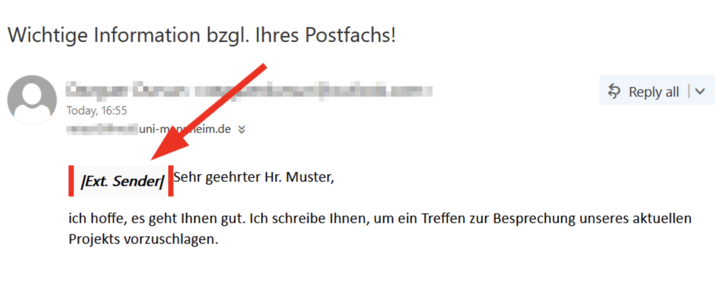
This option will change the preview of a message only slightly and is therefore the best to be used with smartphones. Encrypted or signed emails will be added as attachments.
Prefix in subject
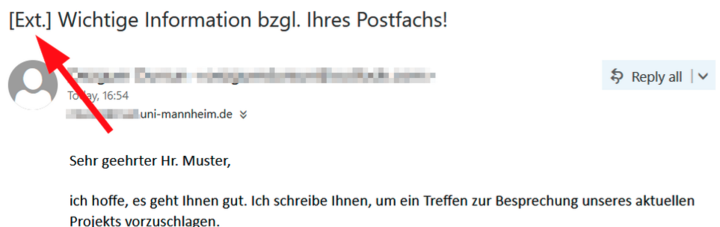
This option adds a prefix to the message subject. Depending on what kind of email client you are using, this can interfere with showing emails as a single conversation and splitting them into individual emails. Encrypted or signed emails will be received normally and not added as attachments.
How do I Send an E-mail from a Shared E-mail Account?
- Go to the Outlook web app and login with your Uni-ID and the corresponding password.
- Click on the user profile picture / your initials in the upper right corner.
- Click on Open another mailbox.
- Enter the name of the shared e-mail account in the “Open another mailbox” window and click on “Open”. The shared mailbox will open in a new tab. If your browser shows a warning message, please allow the opening of tabs for exchange.uni-mannheim.de.
- Click on New > e-mail to write an e-mail from the shared account in the OWA webmail system. The e-mail address of the shared e-mail account will be shown as sending address.
- To complete the process, simply close the tab of the shared e-mail account. You will then see your own account in the webmail system.
How Can I Set Up E-mail Forwarding to Another University E-mail Address?
You have the possibility to automatically forward incoming e-mails in your Exchange account to another university e-mail address.

Please note:
- Employees of the University of Mannheim must not set up e-mail forwarding to private e-mail accounts and/
or servers outside the university. - Students are obliged to regularly check their university e-mail account, since notifications of the University of Mannheim are only sent to this account. In order to make sure that you receive important information, we advise you to refrain from forwarding e-mails to private e-mail accounts (see disadvantages of forwarding e-mails to private e-mail addresses).
Step 1
Click on the gear symbol in the upper right corner to access the settings and then the Options.
Step 2
Click on Inbox and sweep rules and then on the “+” symbol in the menu which opens.

Step 3
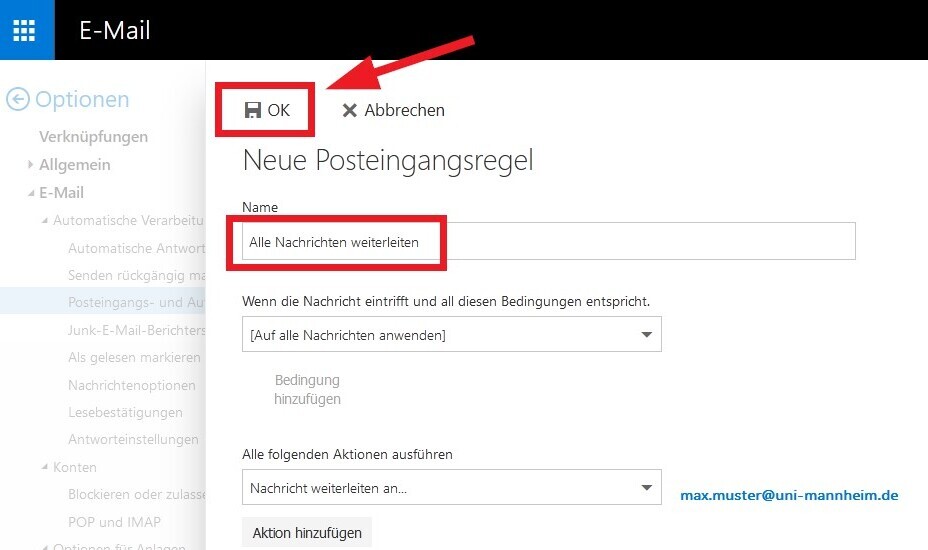
Below the line When the message arrives, and it matches all of these conditions, select the option [Apply to all messages].

Step 4
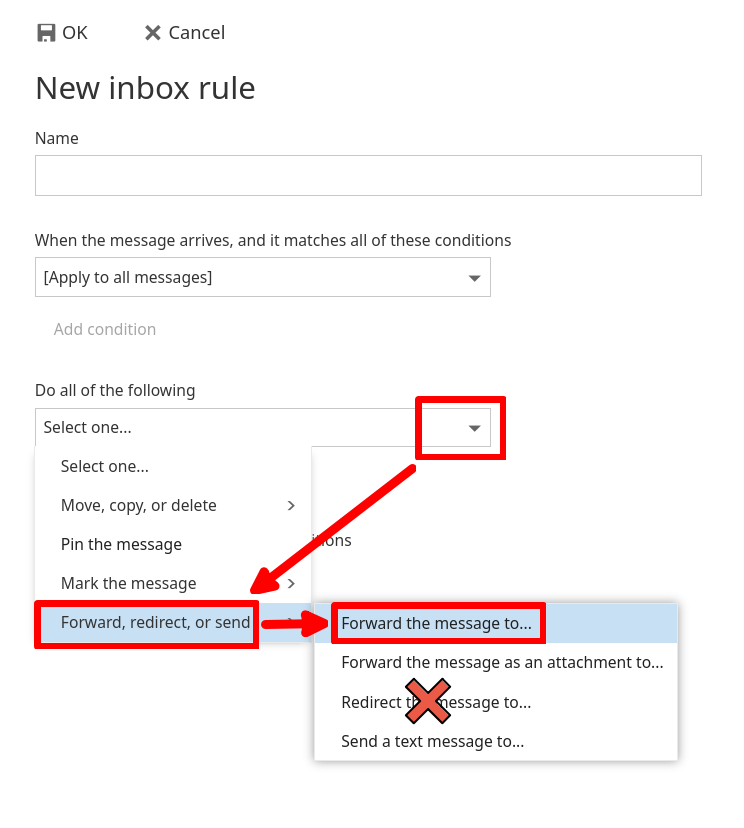
Below the line Do all of the following, please select the option Forward, direct, or send and:
- Forward message to… -> forwards the message to the target inbox, the original sender of the message will be replaced by the current, forwarding e-mail account
- Do NOT use Redirect message to…
Step 5
Enter the name and click on one of the suggested contacts or search the Exchange address book.

Step 6
You have the option to have the e-mail deleted automatically after it has been forwarded. Please note: We strongly advise students against using this feature.
You can use this feature for employee mailboxes or shared mailboxes that are used by several people to save storage space by not keeping copies of forwarded e-mails.
Click on the Add action button.
Select Delete message under Move, copy or delete.

Step 7
You can then enter a name for the forwarding rule if the automatically generated name is not sufficient. Then click OK.
- Employees of the University of Mannheim must not set up e-mail forwarding to private e-mail accounts and/
How can I Recover Deleted E-mails ?
If you use an Exchange e-mail account, you can recover deleted e-mails within 14 days after you permanently deleted them.
In the Exchange e-mail system, you delete e-mails in most e-mail programs (like Outlook, for example) in 2 steps:
- By “simply” deleting e-mails (for example by clicking the “Delete” button in Outlook), the e-mail will be moved to the “Deleted items” folder. The item will stay in this folder indefinitely and you can move it to your inbox or another folder, if necessary.
- By permanently deleting an e-mail, the item will be moved to the trash folder and will be permanently deleted after 14 days. After that, you are no longer able to recover the item.
Step 1
Click on the Deleted items folder in your account and then on the link Recover deleted items.

Step 2
Another window will open (if this does not happen automatically, you need to enable pop-ups for https://exchange.uni-mannheim.de in your web browser) and will show all e-mails you deleted within the last 14 days.
- Select the e-mails you want to recover in the list, by checking the box.
- Then click the Recover button.

Step 3
Another window will open and inform you that the e-mails will be recovered in the original folders (in which you deleted them, if the folders still exist).
The e-mail could thus be recovered in the Inbox, Deleted items or Sent items or another location. Confirm by clicking OK.
How do I create mailing lists?
Mailing lists are created and managed on mailman.uni-mannheim.de. You can find more Information on Mailman.
I didn't receive an email I was expecting – What is the Spam Quarantine Box?
Spam Quarantine Box (Proxmox Mail Gateway)
To improve our measures against spam and phishing attacks, we have a mail gateway for all of the university's mailboxes (the so-called “Proxmox Mail Gateway”). This means that detected spam and phishing emails are not delivered to the Exchange mailbox, but kept in quarantine, where they are automatically deleted after 30 days. In the quarantine box, these emails can be read, deleted, forwarded to your mailbox, whitelisted or blacklisted.
If you haven't received an expected email, check your quarantine box to see if the email was intercepted there.
Daily Spam Report and Web Access to Quarantine Box
Once a day, an email is sent to your Exchange mailbox to inform you if new spam/
phishing emails have been received in the quarantine box in the last 24 hours (if none have been received, no report is sent). The links in this email lead directly to your quarantine box. The quarantine box can also be accessed at any time via a web browser at https://mailknast.uni-mannheim.de. You can log in as follows:
Username uni-id@ad.uni-mannheim.de Password Password of your Uni-ID 
Note
When logging in from a mobile device, you may see an “Authentication Error” message. This is currently an issue on the manufacturer's end. To work around this error, switch to desktop mode in your browser or use a laptop or desktop computer instead.
Reading View
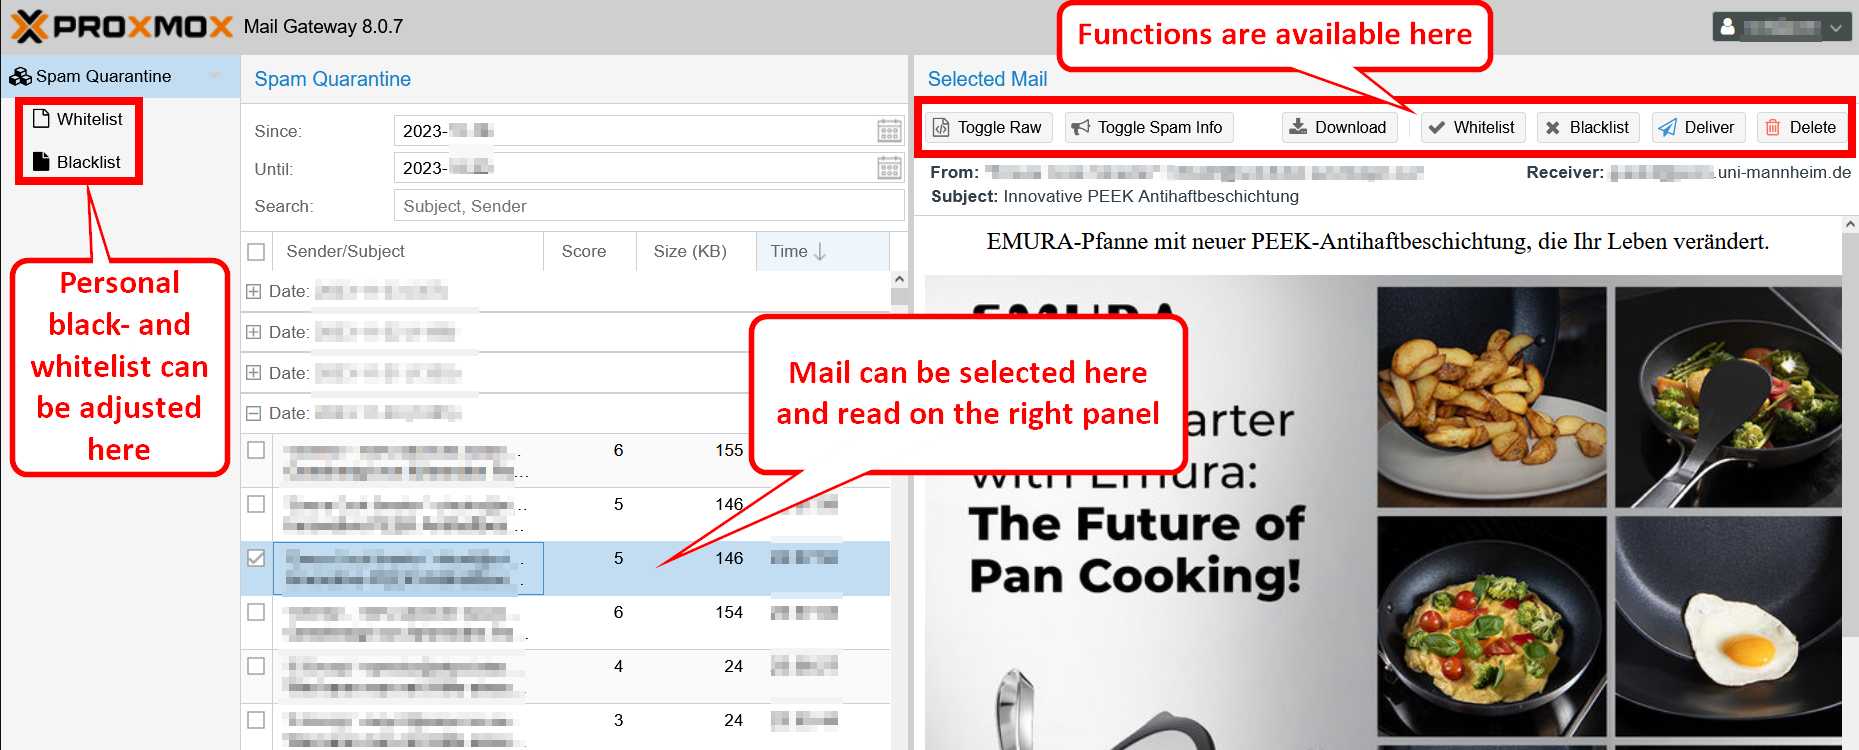
Button Description Toggle Raw Show source code of the selected email. Toggle Spam Info Show spam evaluation information of the selected email. Download Download the selected email as an .eml file. Whitelist Add the sender of the selected email to your personal whitelist. This means that emails from this sender will no longer be classified as spam and will be delivered directly to the Exchange mailbox. Also delivers the selected email to your Exchange mailbox. Blacklist Add the sender of the selected e-mail to the personal blacklist. This means that emails from this sender will be deleted immediately in future and will not be kept in the quarantine box or delivered to the Exchange mailbox. Also deletes the selected email. Deliver Deliver the selected email to your Exchange mailbox. Delete Permanently delete the selected email. Not all emails are displayed?
By default, you only see emails from the last 7 days. To ensure that older emails are also displayed (up to 30 days in the past), the date filter must be changed:
Whitelist
Addresses and domains can be whitelisted here, i.e. emails coming from these addresses and domains are delivered directly to your Exchange mailbox without a spam check.
Examples:
*@gmail.com All emails that come from senders ending in @gmail.com. *unit.uni-mannheim.de All emails ending in the address range unit.uni-mannheim.de, e.g. melanie.muster@sekretariat-unit.uni-mannheim.de, rundmails@info.unit.uni-mannheim.de etc. melanie-mustervertrieb-xyz.de All emails coming from this address. 
Blacklist
Addresses and domains can be blacklisted here. This means that emails that come from these addresses and domains are deleted directly and irrevocably without a spam check.
The entries are created in the same way as for the whitelist (see above).How do I create a word filter rule to fight spam e-mails?
You can create your own word filter for your Exchange mail account to fight spam e-mails. If you do not wish to receive e-mails from entire domains, please refer to the chapter on blacklists in our Mail Gateway instructions.
Check your junk folder regularly after you have created the word filter rule.
Step 1
Click on the gear symbol in the upper right corner to access the settings and then the Options button.

Schritt 2
Click on Inbox and sweep rules and then on the “+” symbol in the menu which opens.
Step 3
Enter a name for the rule and then click on the drop down menu under When the message arrives [...], and then on It includes these words and then on In the subject line… .
Step 4
In the window which opens, enter the words you want to filter. After each word, click on the “+” symbol and confirm by clicking OK.
Step 5
Then select Do all of the following, please select the option Move, copy or delete and then Move message to folder… .
Step 6
Select the junk folder and confirm by clicking OK.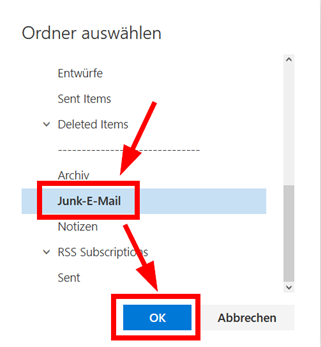
How can I display my academic title in Exchange?
In order to have your academic title displayed in Exchange, go to the MyUni-ID website and check the relevant box under “E-mail | Uni-ID” → “Status Uni-ID”. If you need to update the academic title that is displayed, please contact the human resources department at the University of Mannheim.
Where are e-mails stored that are sent from a shared e-mail account?
After we enabled an additional convenience setting for shared e-mail accounts (Funktionspostfächer), all emails that you send from a shared e-mail account will be stored in your personal mailbox and also as a copy in the shared e-mail account under “Sent items” from February 1, 2023 onwards. This makes it easier and more convenient to use a shared e-mail account with several people, as all communication is displayed in the mailbox. Time-consuming manual moving of sent messages is therefore no longer necessary.
How can I share my calendar with others?
You can only share your calendar with persons with a “...@uni-mannheim.de” address that are also in the domain “uni-mannheim.de”. If you try to share your calendar with another domain, such as “xyz@gmx.de”, sharing will be blocked as this is an external address.
Step 1
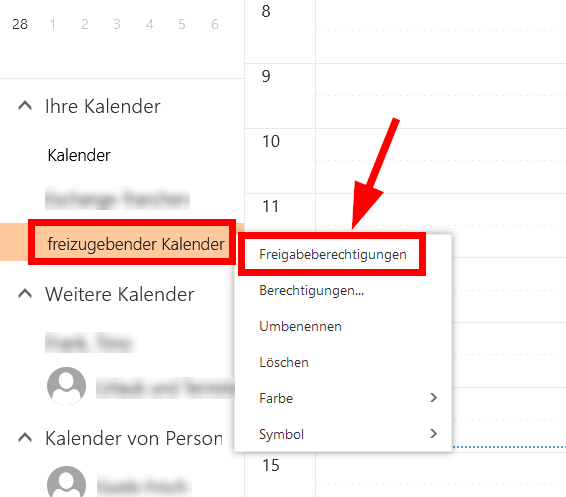
Click with the right mouse button on the desired calendar in the left column and select “Calendar properties”:
Step 2
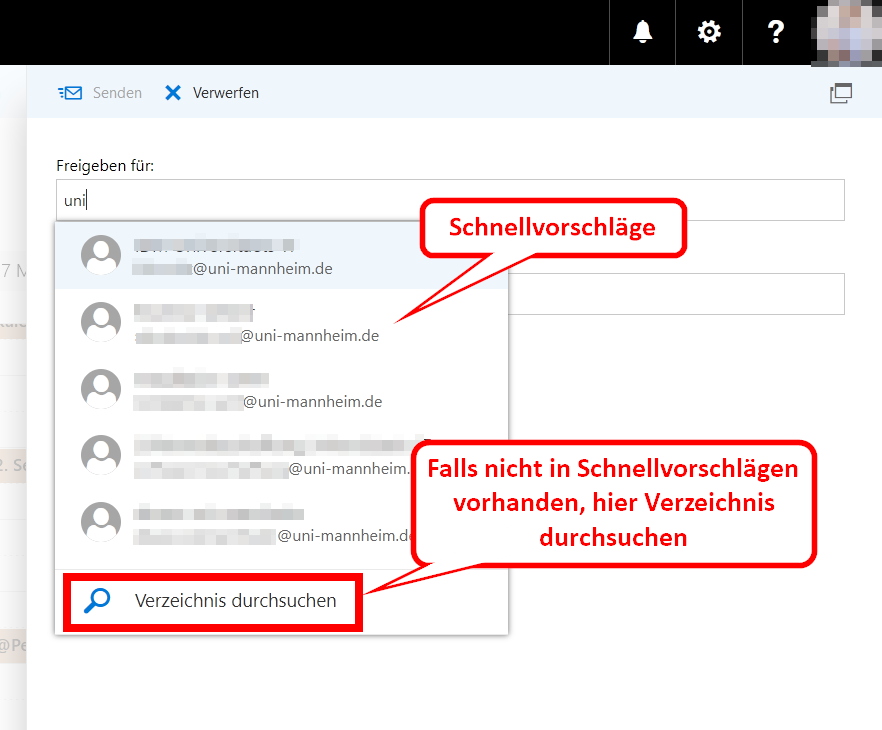
In the menu that opens, you can search for users of the Exchange mail system. Enter the name in the “Add user” field and select the relevant person. If you cannot find the right person in the suggestions, click on “Search Directory”:
Schritt 3
Im Menü können Sie nach Nutzer*innen suchen. Tippen Sie im Feld Freigeben für: den Namen ein und wählen Sie die entsprechende Person aus. Falls die gesuchte Person nicht gleich gefunden wird, klicken Sie auf Verzeichnis durchsuchen.
Step 4
You can also add several persons at once, if you enter name after name in the “Add user” field and click on these names to add them:
Step 5
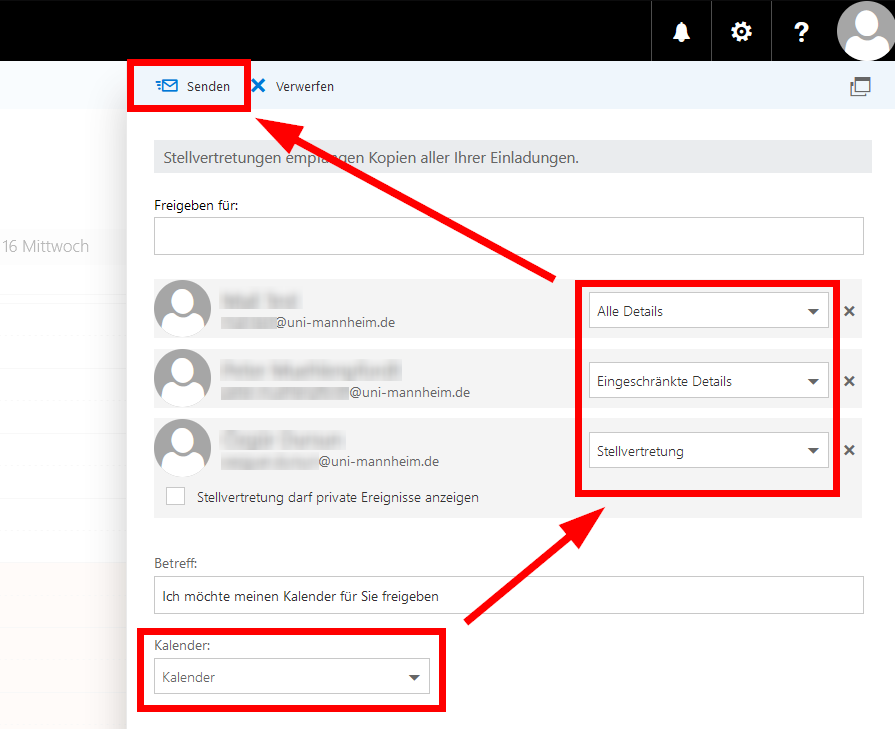
If you have selected the relevant person, please select the level of details you want to share with this person. You can choose from several levels of details:
If you share your own primary calendar, you can assign the following authorizations (your primary calendar is called “calendar”):
- Availability only: The person only sees the time slots and no information on the meetings*.
- Limited details: The person sees the time slots, location and title of the meetings*.
- Full details: The person is able to see the full details of your meetings*.
- Contact: The person sees all details*, can edit your meetings and create new meetings.
- Deputies: The person sees all details*, can edit your meetings, create new meetings, send and accept invitations on behalf of you (this is only possible for members of the Exchange server of the university).
If you share a secondary calendar (one that has been created by you), you can assign the following authorizations:
- Full details: The person is able to see the full details of your meetings*:
- Contact: The person sees all details*, can edit your meetings and create new meetings.
* except for meetings marked as “private”. Only you can see these meetings.
Step 6
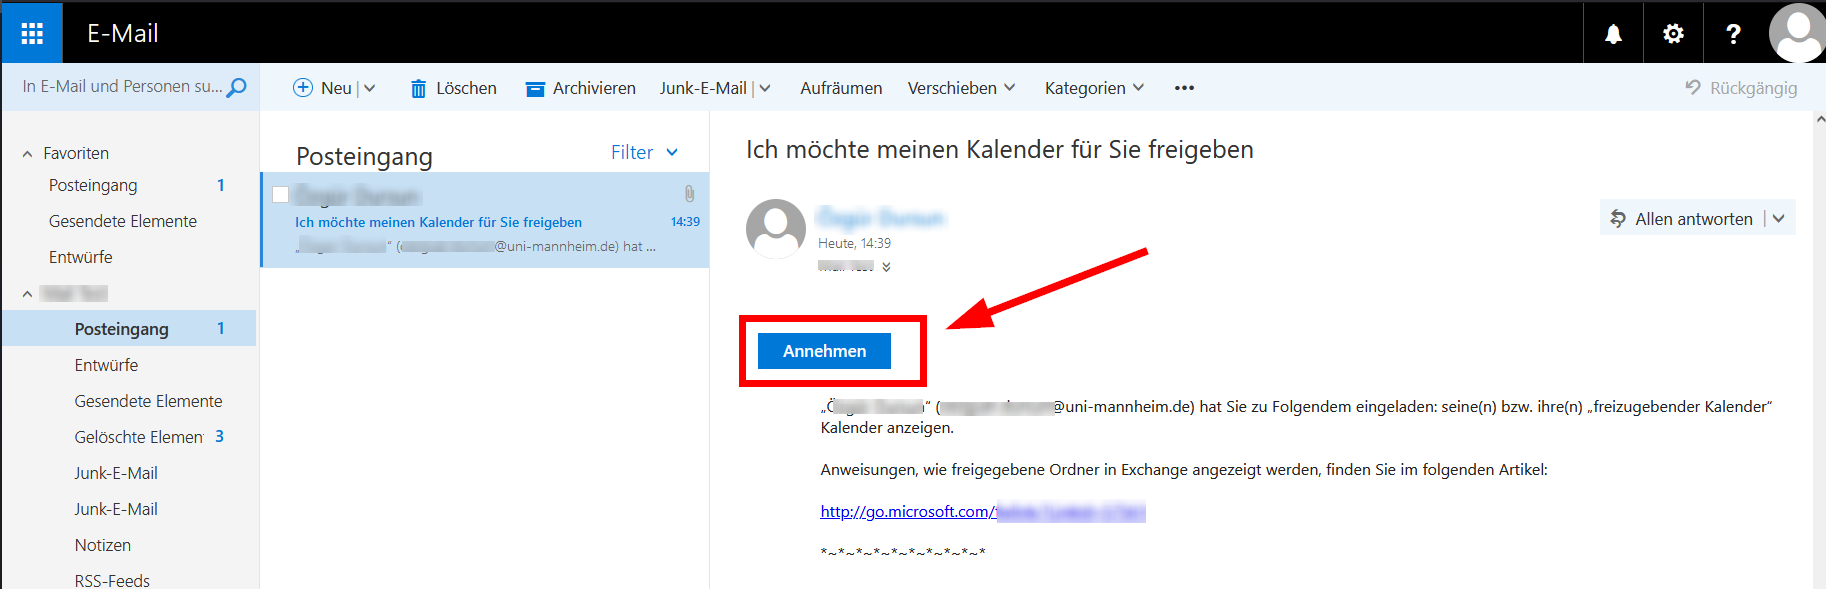
Then click the “Send” button. The persons you selected will now receive an invitation.
How can I edit or delete the authorization to view my calendar?
Step 1
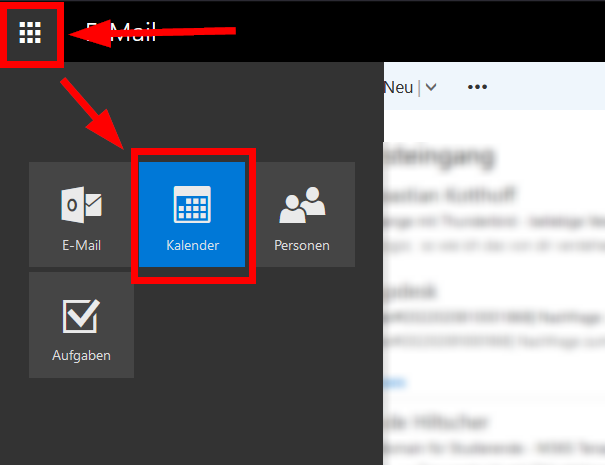
Click on the menu in the upper left corner and then on “calendar”:
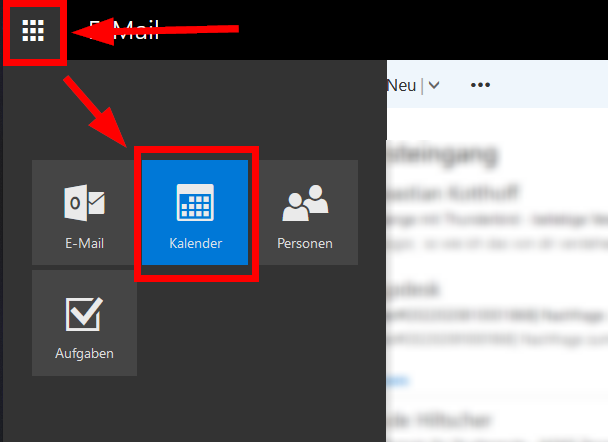
Step 2
Go to the left column and click with the right mouse button on the calendar you want to edit. Then select “Permissions....”:
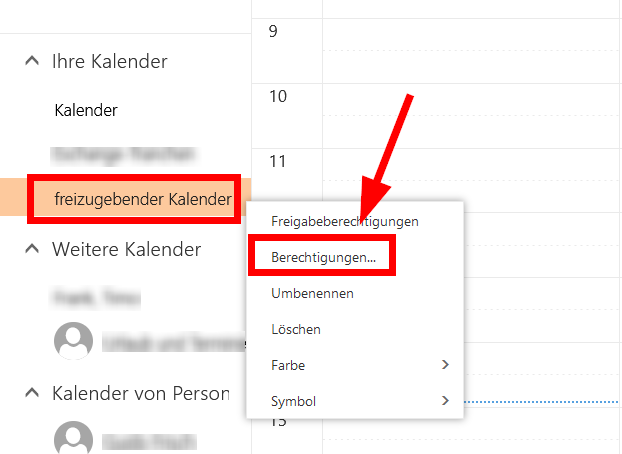
Step 3
In the menu that opens, you can see all persons permitted to view this calendar. You can update or delete these authorizations. After you have made your changes, click the “Save” button:
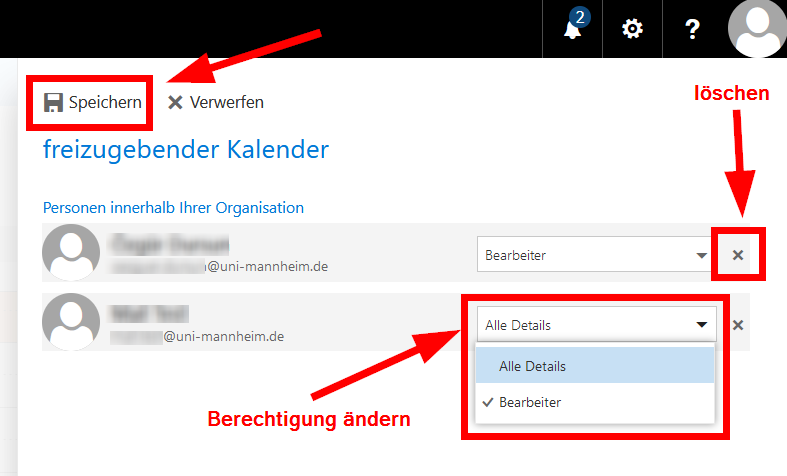
How do I share a folder?
In order to share a folder, please proceed as follows:
1. Click on the desired folder with the right mouse button (“Internal” on the screenshot).
2. Click on “Authorizations” with the left mouse button.
3. The window “Authorizations for the Internal folder” will appear. Click on the “+” sign.
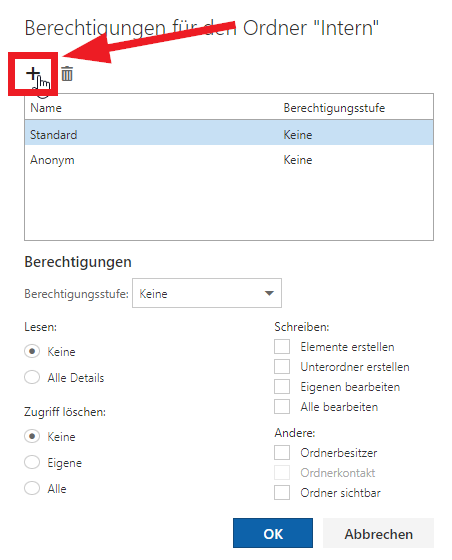
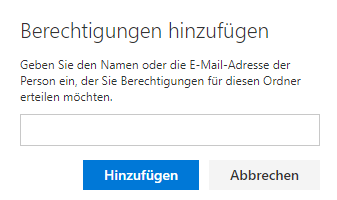
4. The window “Add authorizations” will appear. Enter the name or the e-mail address of the person you want to grant access to and confirm by clicking “Add”.
5. The window “Authorizations for the “Internal” folder” will be displayed. The name of the authorized person appears at the bottom of the list.
Mark the name and select the desired authorizations or select an authorization level. On the official Microsoft website under Microsoft Support, you will find an overview on the authorization levels.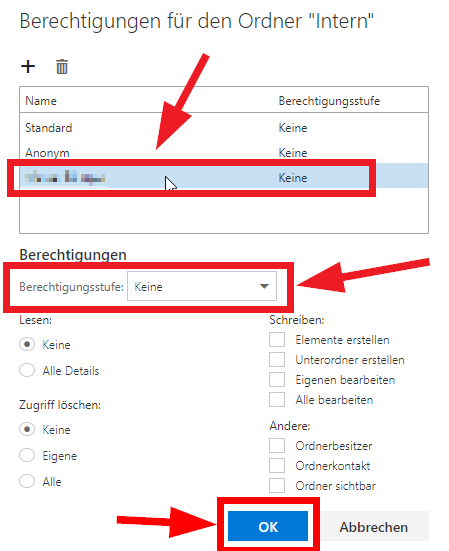
6. Click “OK” to save the authorizations.
How do I add a shared folder?
In order to add a folder that has been shared with you to your mailbox, please proceed as follows:
1. Click on your mailbox with the right mouse button (your name).
2. Click on “Add shared folder...” with the left mouse button.
3. The window “Add shared folder” will appear.
Enter the name or the e-mail address of the person who has shared a folder with you and click “Add”.
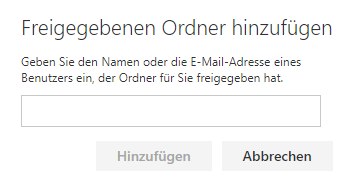
4. The folder will be displayed under the name of the person who has shared the folder with you in your Outlook.
How do I configure Outlook Web App for accessibility?
Sending accessible messages in Outlook
To check whether the content is accessible before sending an email:- Whilst composing the message, click the three dots in the top bar.
- Click Check for accessibility.
- A bar containing accessibility tips will appear on the right-hand side of the screen.
Receiving accessible e-mails in the Exchange mail system
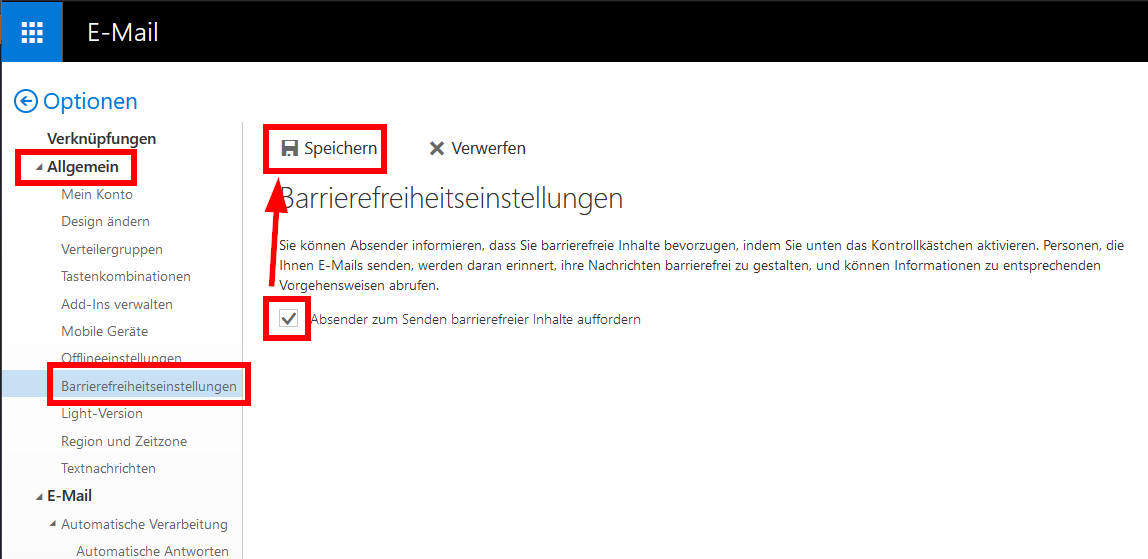
You can inform the senders that you want to receive accessible e-mails. You can adjust this setting in the web application.- Step1: Go to https://exchange.uni-mannheim.de in your browser and login with your Uni-ID and the corresponding password.
- Step 2: Click on the gear symbol next to your profile picture and select “Options” in the window that opens.
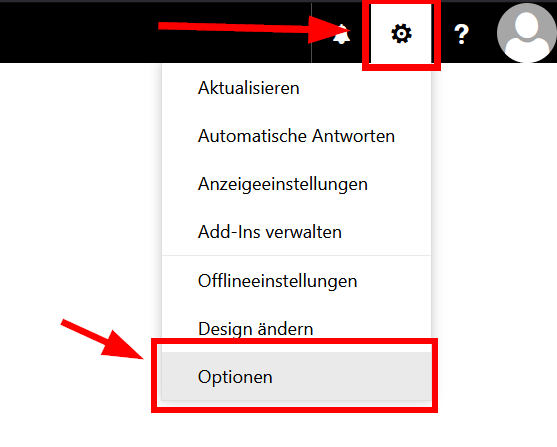
- Step 3: Go to “Accessibility settings” in the “General” section in the left column. Here, you can request that the persons sending you e-mails only send you accessible content. Select the relevant box and click “Save”.
How do I use the archive account? (Employees)
The e-mail accounts of employees (not of students) on the university's Exchange mailsystems regularly achive e-mails, which are older than three years, in the background and store them in a separate archive account. Due to this process, your account is downsized and the performance and reliability of your e-mail client (such as Outlook, for example) is improved.
Information
- The archiving will be done at regular intervals and not immediately. It may take several weeks until the archiving for your mailbox is started, completed or updated. During this time, you can use your mailbox without any restrictions.
- When the archiving is done, the folder structure in the mailbox will remain the same. Even if all emails of a folder have been moved to the archiving mailbox, the empty folder will still be there.
- You can always move emails and folders from your mailbox to the archiving mailbox yourself, if you want to free mailboxspace or structure your inbox.
- Notes will also be archived. The archiving feature for notes can only be deactivated on the webmailer (“OWA”) and not on the Outlook applications on your PC or Mac.
- Calendar and Tasks were archived initially in November 2023, since then the function is deactivated and there are no longer archived.
The archiving account appears automatically in the list below your account as “In-Situ-Archiv – Name of the account“:

Archiving e-mails / folders newer than three yearsExchange automatically archives e-mails which are older than three years and the corresponding folder structure. If you want to, you can also archive e-mails or entire folders on your own.
Just move the e-mails/folders with drag/drop to the archiving account. Please do not use the Archive button, as this button moves the e-mails only within the normal account: Searching the archiving mail account
In order to search the archiving mail account, please proceed as follows:
- Select the archiving mail account from the list and a subfolder, if applicable, by clicking on it.
- Enter your search term in the search bar at the top and start the search.
- If you do not get the results you expect, please make sure that you have selected the correct folder/
subfolder.
2. Tippen Sie nun wie gewohnt oben in der Suchleiste Ihren Suchbegriff ein und starten Sie die Suche.
3. Falls Sie nicht die erwarteten Ergebnisse angezeigt bekommen, vergewissern Sie sich, dass Sie den korrekten Ordner/
Unterordner ausgewählt haben: 
Exclude e-mails / folders from archiving
You can exclude e-mails or entire folders (as well as the “Notes” folder) from automatic archiving. Select the desired e-mail/folder, click with the right mouse button on the e-mail/folder and go to “Assign policy” and select the options “Nicht archivieren – Never archive (Nie)“:

Spam and phishing
For information on how you can detect malicious e-mails and protect yourself against attackers,
please refer to our
security tips