
Microsoft Exchange – integrate mailbox
By introducing Microsoft Exchange, we will provide all employees and students of the University of Mannheim with a standardized system for e-mails, calendars and address books. You have the option of integrating Microsoft Exchange with an email programme such as Outlook.
You can also access Microsoft Exchange at any time via your web browser at exchange.uni-mannheim.de.





Recommendation
We recommend using Outlook as e-mail client so that you can use all features of your Exchange mailbox (such as calendars or address books). When other alternative e-mail clients (Thunderbird, for example) are connected with your Exchange mailbox, the features may be limited and may require add-ons. There is no guarantee that these add-ons will be updated or will work in future. Due to this, the University IT only offers extensive support for Outlook.
You can also access your Exchange mailbox at any time via a web browser if you do not wish to use an installed PC client:

On Windows, please do not use the new Outlook (“Outlook,” “Outlook new”), but rather the old Outlook (“Outlook classic,” “Outlook Legacy”).
We do not currently support Outlook new on Windows, and we strongly advise against using it.
Windows
Instructions for Microsoft Outlook 365
When you first connect Outlook on your computer/
laptop with the Exchange e-mail account, please perform the following steps once: 1. Download the file “Outlook Autodiscovery RegKey setzen.bat” :
Download Outlook Autodiscovery RegKey.batPlease install Outlook 365 before downloading the file.
2. Execute the file “Outlook Autodiscovery RegKey setzen.bat” by double-clicking on the file:
- If the file is blocked by Windows Defender or another antivirus software, please allow the file to be executed.
- If you see a black command window, enter “j” into the window and confirm by clicking Enter.
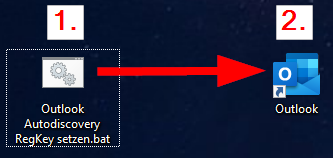
3. Open your Internet browser (e.g. Firefox or Chrome) and go to https://exchange.uni-mannheim.de.
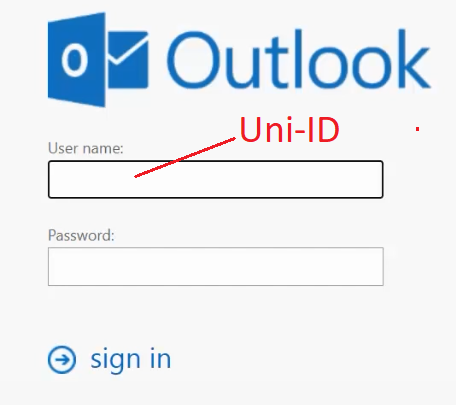
4. Enter your Uni-ID and the corresponding password and click on the “Login” button:
5. After the login, click on the profile picture in the upper right corner. Your e-mail sending address will be displayed in the pop-up window that opens:
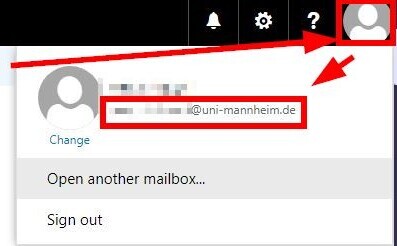
6. Please write this address down -> This is your Exchange sending e-mail address which you will need for the connection.
In order to connect Outlook 365 to your new account, please proceed as follows:
1. Start Outlook 365 on your computer.
If you start Outlook for the first time, you will automatically be requested to connect an account.
Then click on the the “File” tab: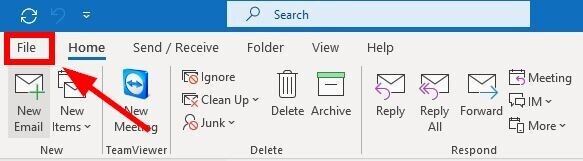
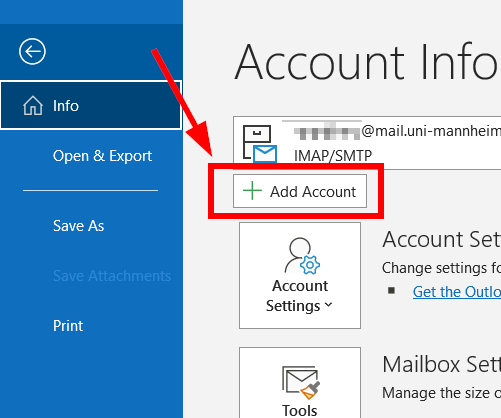
2. Then click the “+ Add account” button:
3. Please enter your Exchange e-mail address*. Then click “Advanced options”, check the box indicating you want to manually set up your account and proceed by clicking “Connect”:
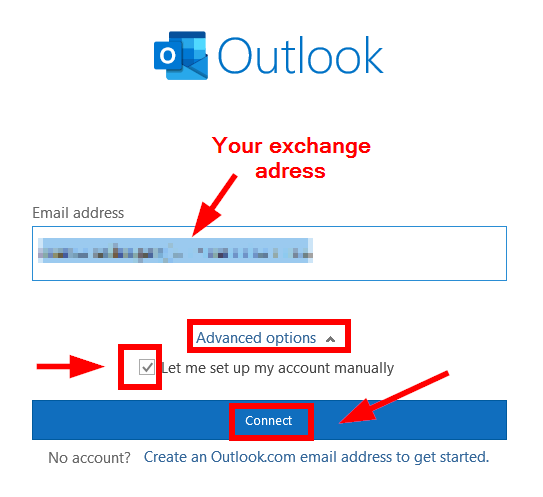
*See steps 3–6 of the initial steps above
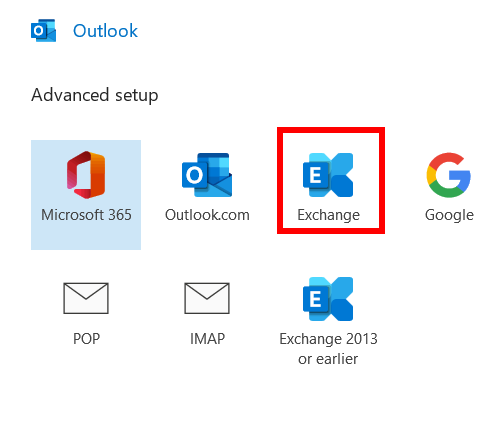
4. In the window that appears next, select “Exchange”:
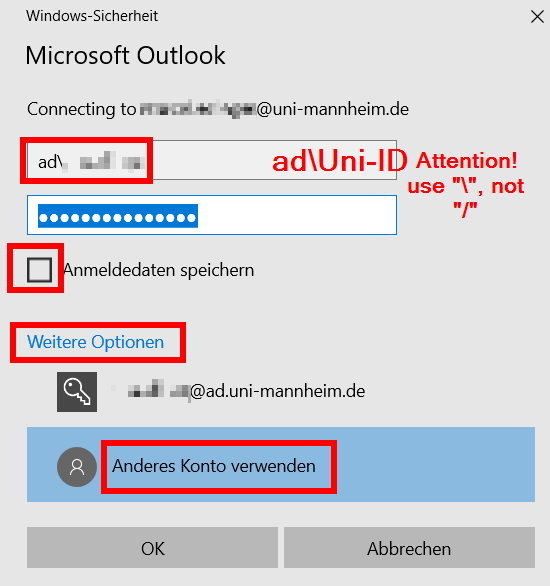
5. Please proceed as follows in the login window that appears next:
- Open “Advanced settings” --> “Use other account”.
- Then enter your Uni-ID (= previously “user ID”), preceded by “ad\“ and your password.
Important: Please make sure to use “\“ and not ”/“. - Check the box “Save login information” and continue by clicking “Ok”:
6. If another pop-up appears, please confirm this by clicking “OK”:

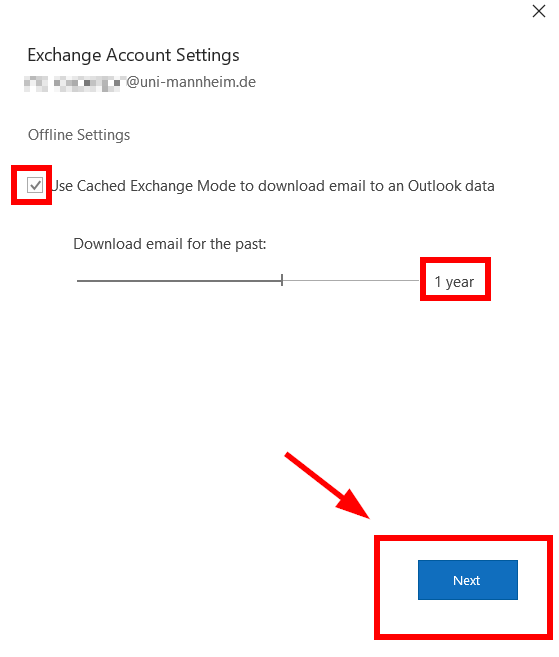
7. Leave the box “Use the Exchange cache mode ,[..]“ ticked, do not change the download option which is set to “one year” and then click “Next”:
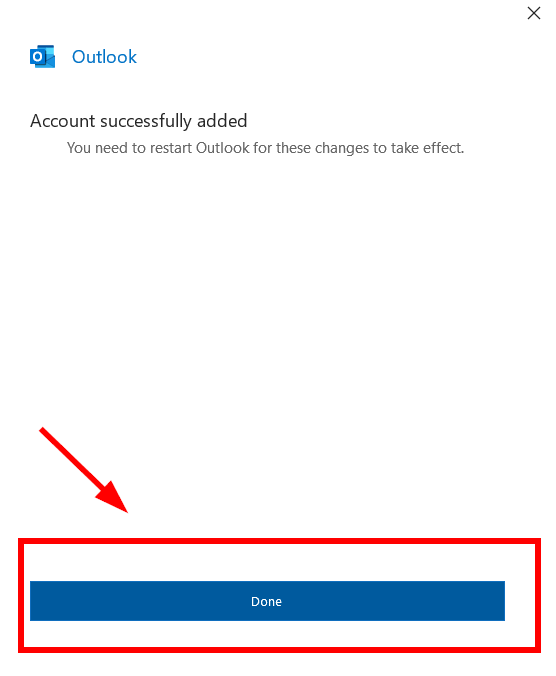
8. In the following window, confirm by clicking “Process completed”:
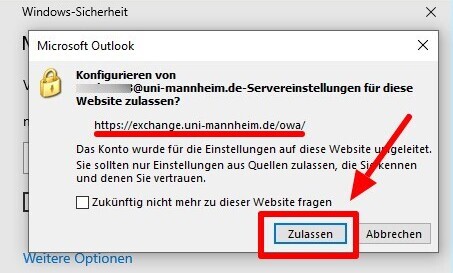
9. Then you may be requested to allow the page exchange.uni-mannheim.de to make changes to the settings of your account. Please confirm this request:
10. Close Outlook and re-start the program. Your mailbox will then be synchronized and you have successfully added your account.
Instructions for Thunderbird
Connect email account
Step 1
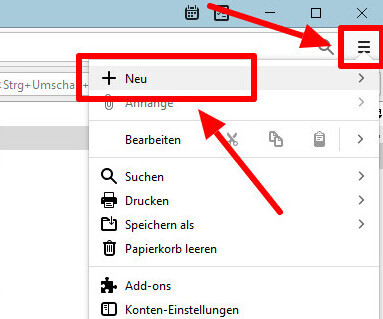
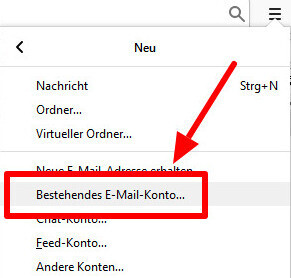
Start Thunderbird and click on the application menu in the upper right corner and then on the option “New”. Then select the entry “Existing e-mail account....”:
Step 2
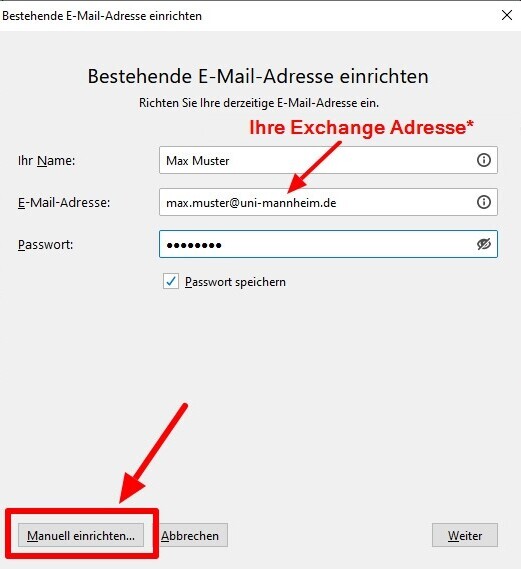
In the window that appears next, please enter your name, your new Exchange senders address and the password of your Uni-ID (=formerly “user ID”). Then click on the button indicating that you choose the manual setup:
Step 3
Please enter the following values in the windows that open and then click on the “Finish” button:
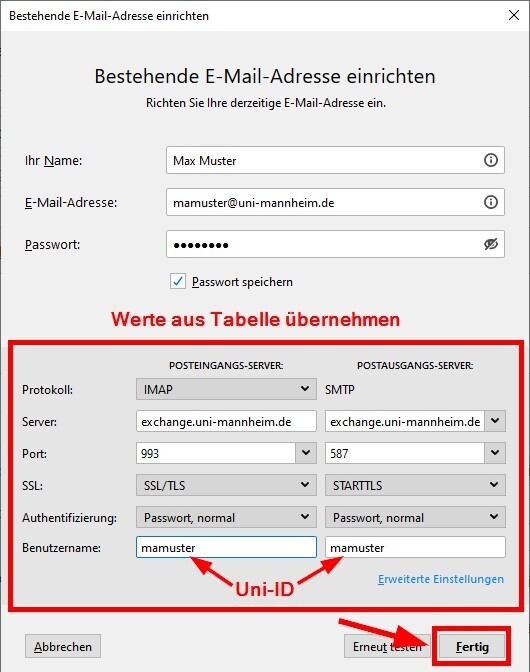
Incoming mail server:
Protocol IMAP Server exchange.uni-mannheim.de Port 993 SSL SSL/ TLS Authentication Password, normal User name Uni-ID Outgoing mail server:
Server exchange.uni-mannheim.de Port 587 SSL STARTTLS Authentication Password, normal User name Uni-ID Thunderbird will then connect to your new mailbox and synchronize your e-mails.
Updating the system folders in Thunderbird
We recommend setting up the system folders in your e-mail client in such a way that they are identical to the folders of the Microsoft Exchange OWA (Outlook web access). This way, the same folders will be used in the e-mail client and OWA.Please proceed as follows to update the system folders:
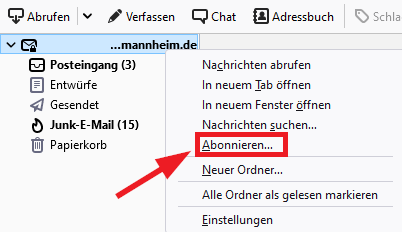
1. Please make sure that all Exchange folders are displayed. Click with the right mouse button on the e-mail account and select “Subscribe...”:
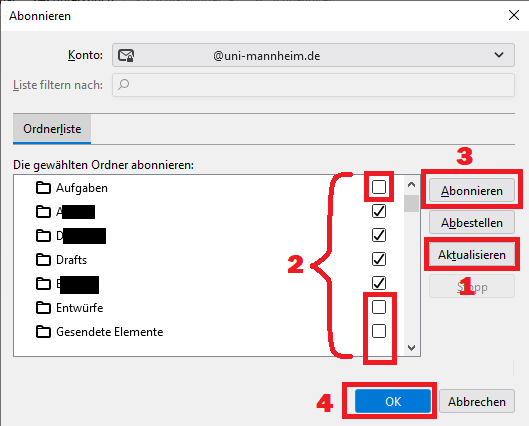
2. Click “Update” (1) in order to receive the latest Exchange folder list. Then check the boxes of the folders that should be displayed in Thunderbird (2). Then click “Subscribe” (3) and then “OK” (4). Now the new folders will be displayed in Thunderbird:
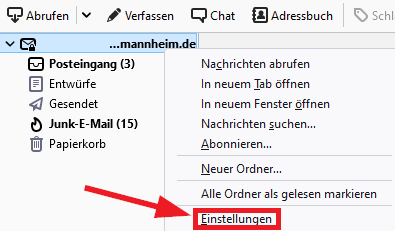
3. Click with the right mouse button on your e-mail account and select “Settings”:
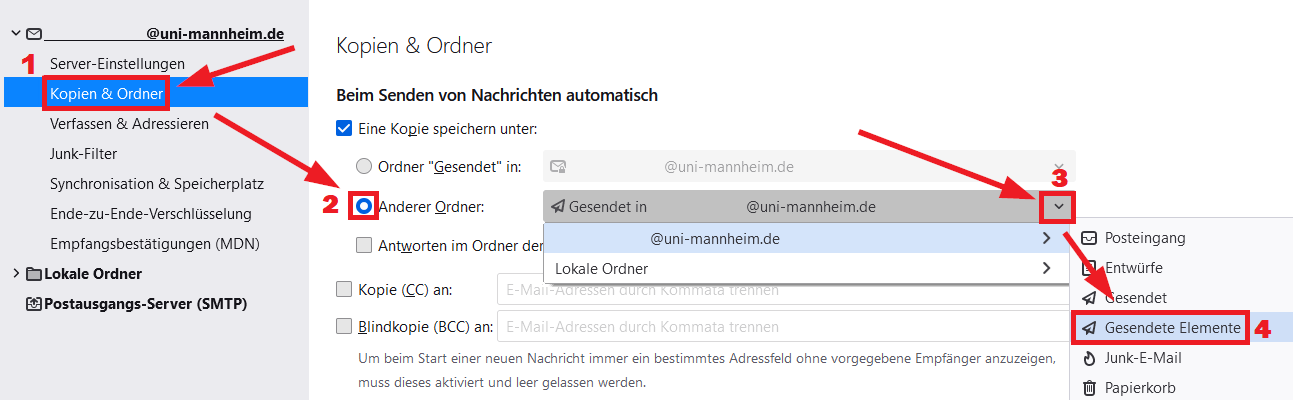
4. In our example, we describe how the folder for sent e-mails is updated. In the menu on the left, click “Copies & folders” (1). In the middle, activate the option “Other folder” (2) under “When sending messages automatically”. Then click on the drop down arrow (3) and select the folder “sent elements” (f) under your e-mail account (NOT “Local folder“)
The system folders should now be displayed correctly, at the latest after you closed and re-started Thunderbird.
Kalender und Kontakte verbinden
The permanent functionality of these calendar and contacts add-ons depends on the developers of the individual add-ons. If these add-ons are not updated, you may not be able to use them with your Exchange mailbox. In this case, UNIT cannot offer support. Therefore, we expressly recommend the Outlook clients for Windows/
Mac or Outlook web client for using your Exchange account.
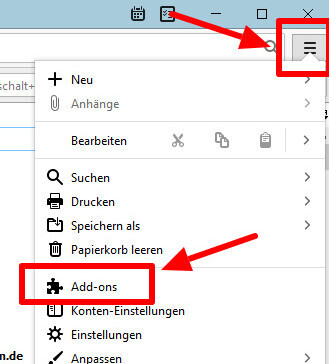
In order to synchronize not only your e-mails but also the calendar and contacts of your new Exchange mailbox in Thunderbird, you need to install and set up two add-ons:1. Click on the application menu in the upper right corner in Thunderbird and choose the “add-ons” option:
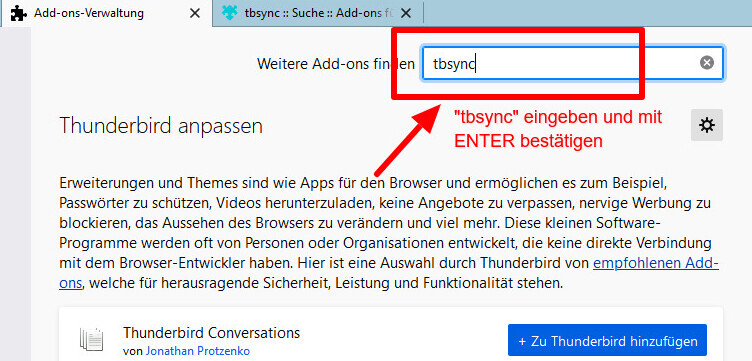
2. In the window that appears, enter “tbysync” in the search bar at the top and confirm by clicking the “Enter” key:
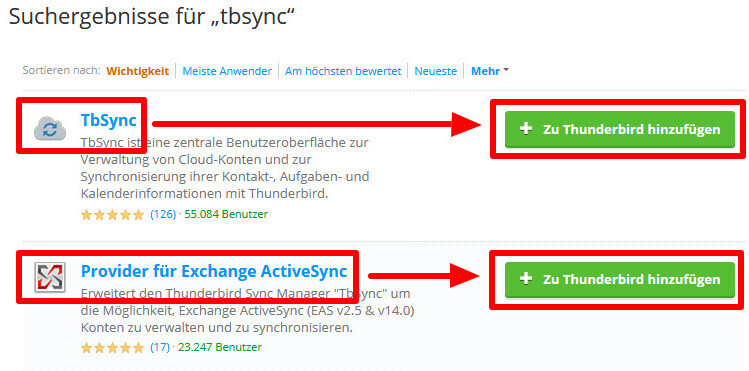
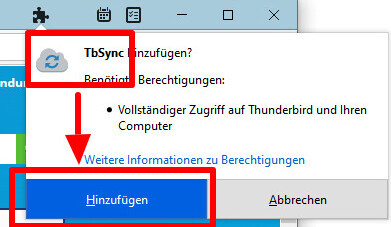
3. A tab with search results will appear. First, click on the button “Add to Thunderbird” in the section for the “TbSync” add-on, confirm and repeat the process for the add-on “Provider for Exchange ActiveSync”:

4. Close the two add-on tabs and switch back to the main window of Thunderbird:

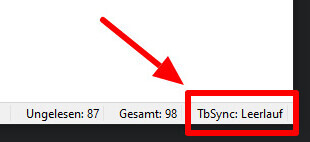
5. In the lower right corner, click on “TbSync: Leerlauf”:
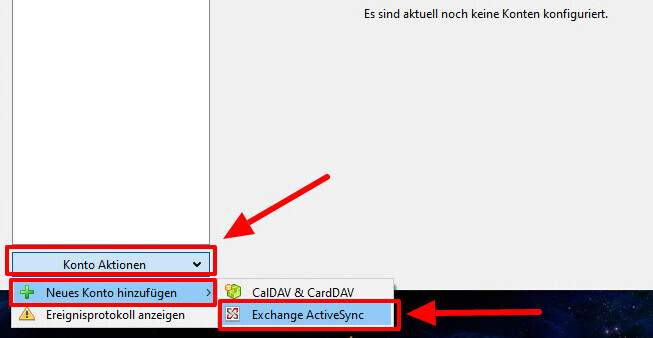
6. This will open the TbSync account management. Then go to the lower left corner and choose “Account actions” -> “Add new account” -> “Exchange-ActiveSync”:
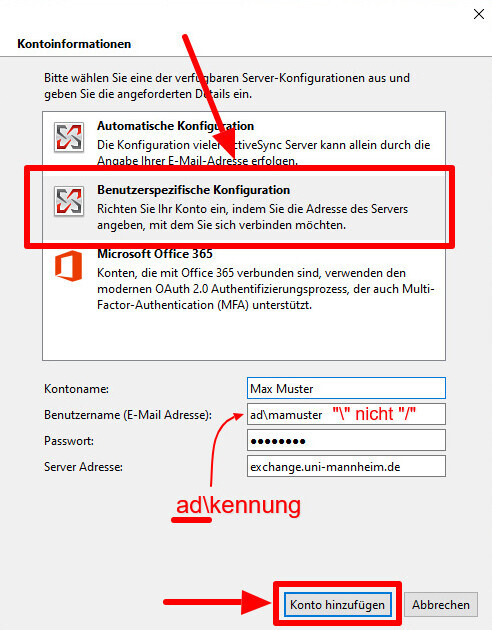
7. Then select “User-specific configuration” and enter your data. In the field “User name (e-mail address)” enter your ad\Uni-ID, for example ad\mamuster. Then click on the “Add account” button:
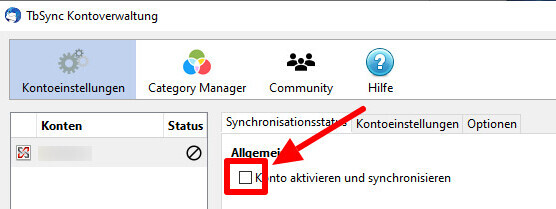
8. The account will then be added and must be activated. Check the box “Activate and synchronize account”:
9. Then a selection menu will open in which you can choose the contents to be synchronized. For your calendar and your contacts, check the boxes “Contacts” and “Calendar”. Then set the periodical synchronization (≥ 5min) and click on the “Synchronize now” button:
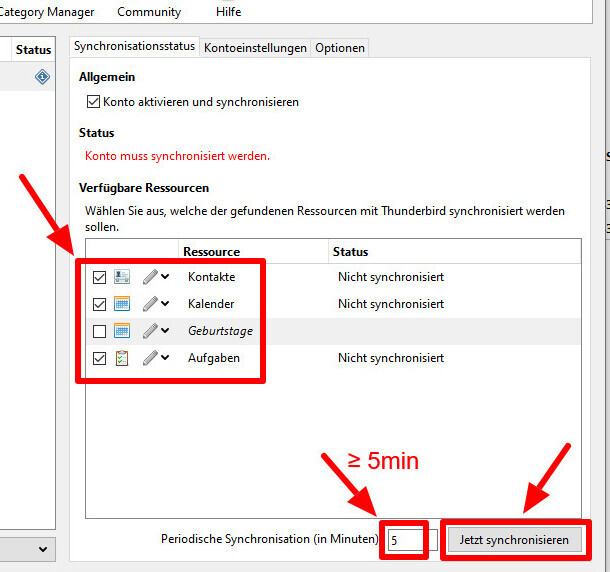
10. Then the elements you selected will be synchronized. If a green tick appears next to your account name, the synchronization has been successful.
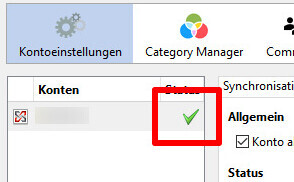
Now you can access your calendar and contacts.
If you want to search for contacts in the university’s global address books, switch to the address book in Thunderbird, mark your new Exchange account by clicking on it and then search for your contacts in the search bar in the upper right corner:

Hinweise und Fehlermeldungen
Bitte beachten Sie, dass Thunderbird sich über das IMAP-Protokoll nur in eingeschränktem Funktionsumfang mit Ihrem neuen Exchange Postfach verbinden kann. Unter anderem werden alle Ihre E-Mail-Ordner nicht automatisch in derselben Struktur wie in Ihrem Exchange Postfach synchronisiert und angelegt. Dafür müssen Sie in den Einstellungen selbst das Ordner-Mapping vornehmen. Hierfür bietet die UNIT keinen Support an. In Outlook 365, Outlook 2019, Outlook 2016 und dem Web-Client wird dies automatisch übernommen.
Please note that Thunderbird’s functions will be restricted when connected via the IMAP protocol with your new Exchange mailbox. For example, when you create and synchronize your e-mail folders, they will not automatically have the same structure as in your Exchange mailbox. You need to go to the settings to adjust the folder mapping. In this case, UNIT is unable to provide support. In Outlook 365, Outlook 2019, Outlook 2016 and the web client, this will appear automatically.
Error messages when synchronizing
If you see error messages when synchronizing:
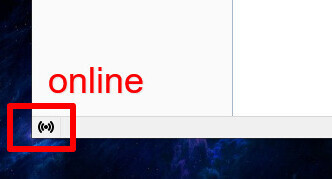
- Make sure that Thunderbird is in online mode. If this is not the case, click the button in the lower left corner:

MacOS (MacBook)
Instructions Outlook for Mac
Step 1
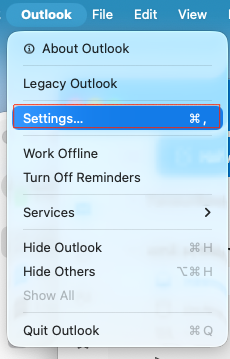
Start Outlook 365. Click “Outlook” in the upper left corner and then “Settings”.
Step 2
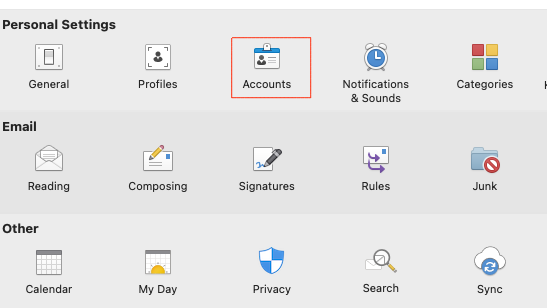
Then click on “Accounts”.
Step 3
Click “+ Add account”.
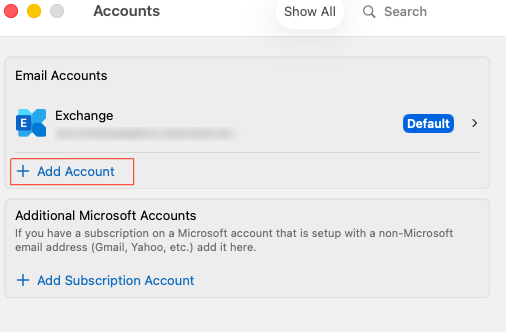
Step 4
Please enter your Exchange senders address. Then click the button indicating you want to proceed.
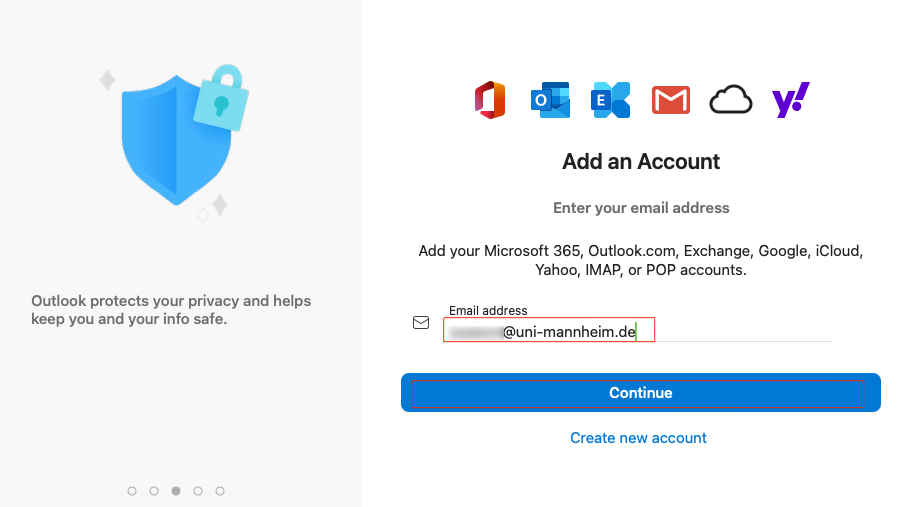
Step 5
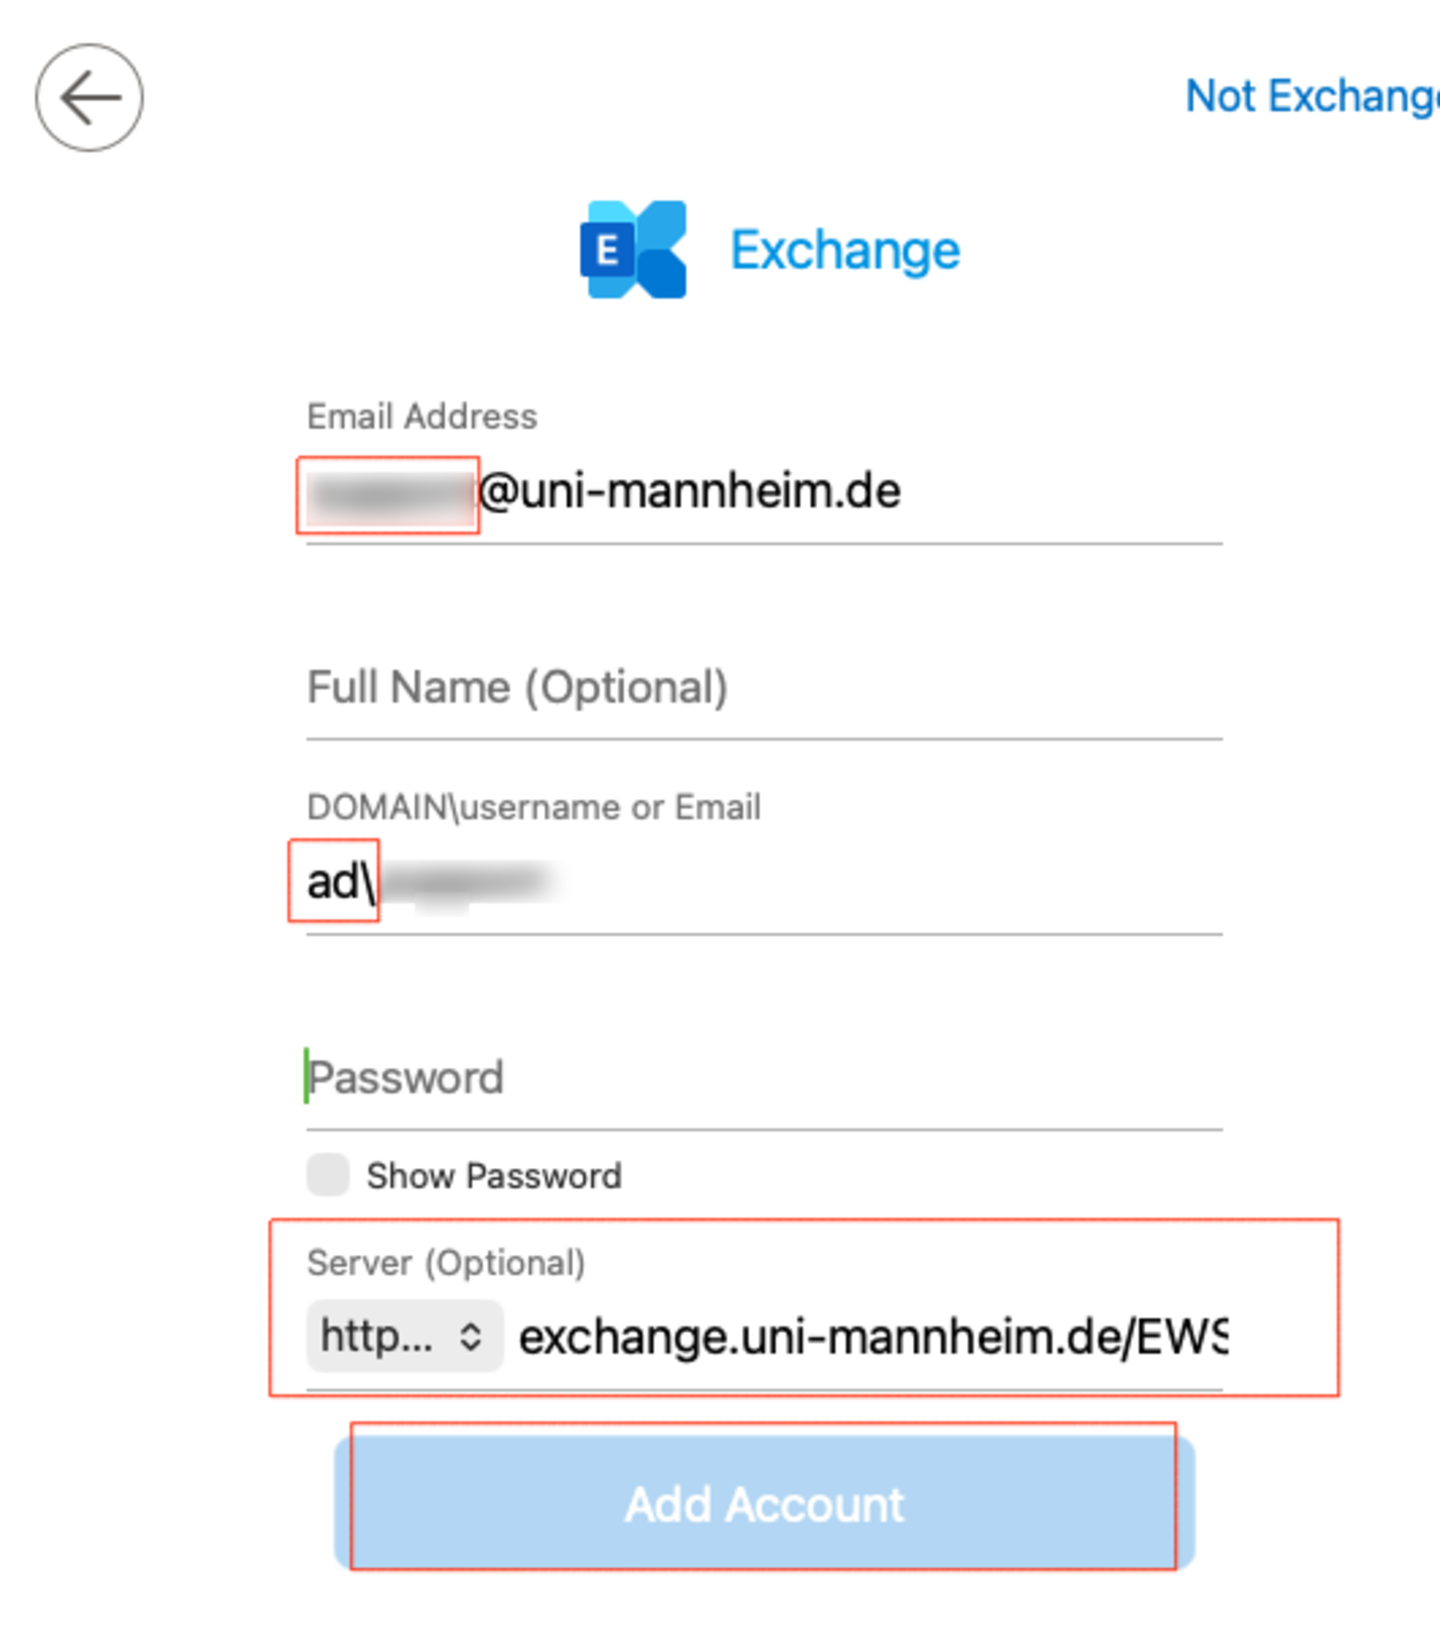
Enter “AD\Uni-ID” in the field “DOMAIN\User name” (such as for example “AD\memuster“).
Please make sure to use “\“ and not “/”! For this, please press ALT + Shift + 7.Enter the password of your Uni-ID and exchange.uni-mannheim.de/EWS/Exchange.asmx in the field for the server and confirm by clicking “Add account”:

Step 6
Enter “AD\Uni-ID” in the field “DOMAIN\User name” (such as for example “AD\memuster“).
Please make sure to use “\“ and not “/”! For this, please press ALT + Shift + 7.Enter the password of your Uni-ID and exchange.uni-mannheim.de/EWS/Exchange.asmx in the field for the server and confirm by clicking “Add account”:

Step 7
Enter “AD\Uni-ID” in the field “DOMAIN\User name” (such as for example “AD\memuster“).
Please make sure to use “\“ and not “/”! For this, please press ALT + Shift + 7.Enter the password of your Uni-ID and exchange.uni-mannheim.de/EWS/Exchange.asmx in the field for the server and confirm by clicking “Add account”:

Step 5
Enter “AD\Uni-ID” in the field “DOMAIN\User name” (such as for example “AD\memuster“).
Please make sure to use “\“ and not “/”! For this, please press ALT + Shift + 7.Enter the password of your Uni-ID and exchange.uni-mannheim.de/EWS/Exchange.asmx in the field for the server and confirm by clicking “Add account”:
Step 6
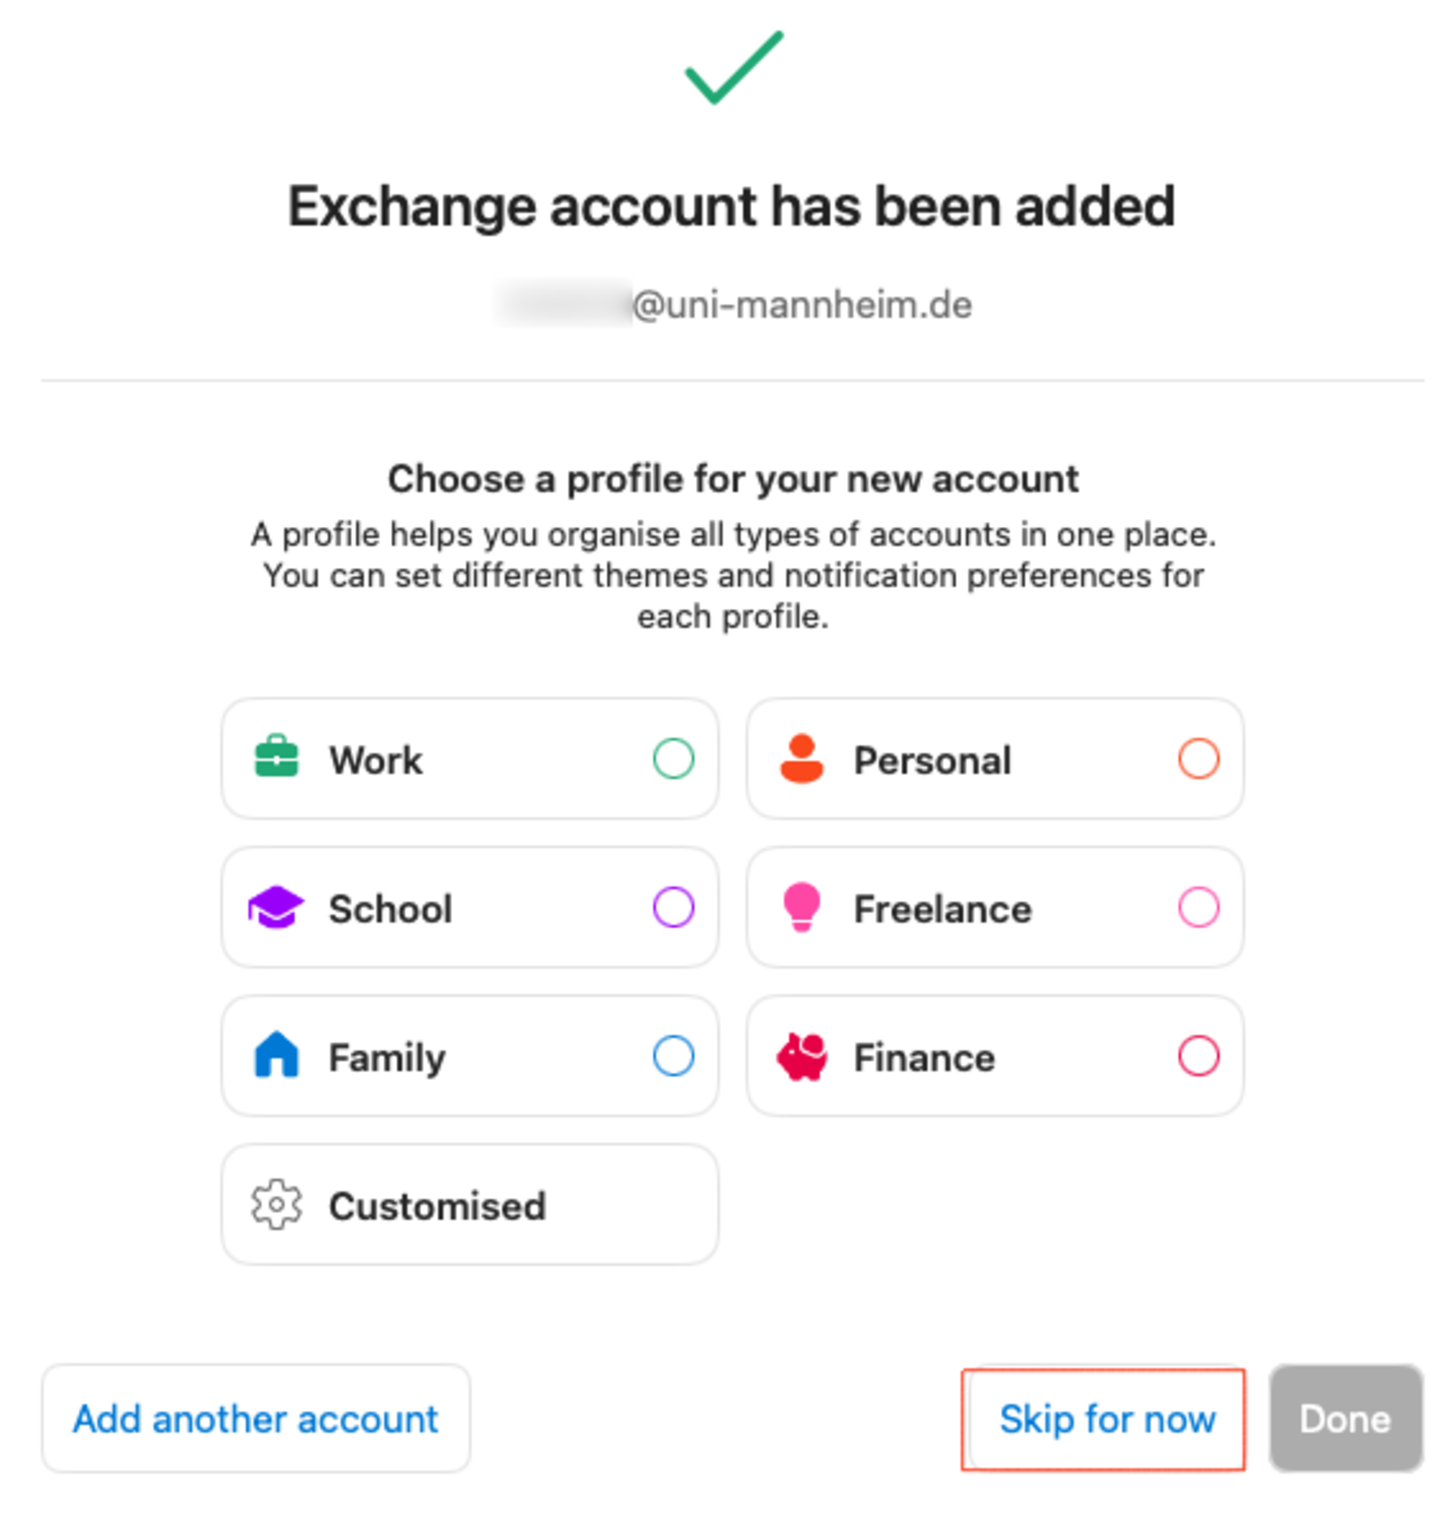
Confirm again by clicking “Skip for now”. Your mailbox is now set up and will by synchronized. Depending on the size of your mailbox, this will take some time.
Instructions for Apple Mail
Please proceed as follows if you want to add your new e-mail account to Apple mail:
1. Open your Internet browser (e.g., FireFox, Safari or Chrome) and go to https://exchange.uni-mannheim.de.
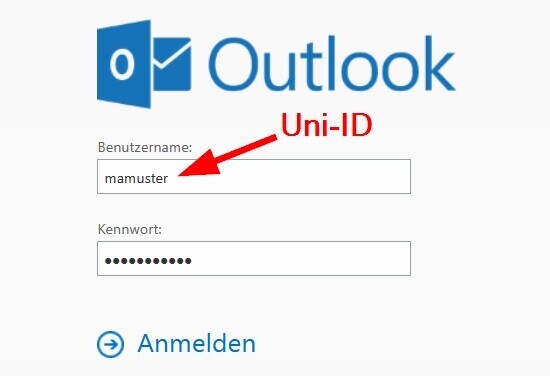
2. Enter your Uni-ID and the corresponding pasword and then click the “Login” button:
3. After the login, click on the profile picture in the upper right corner. Your e- mail sending address will be displayed in the pop-up window that opens:
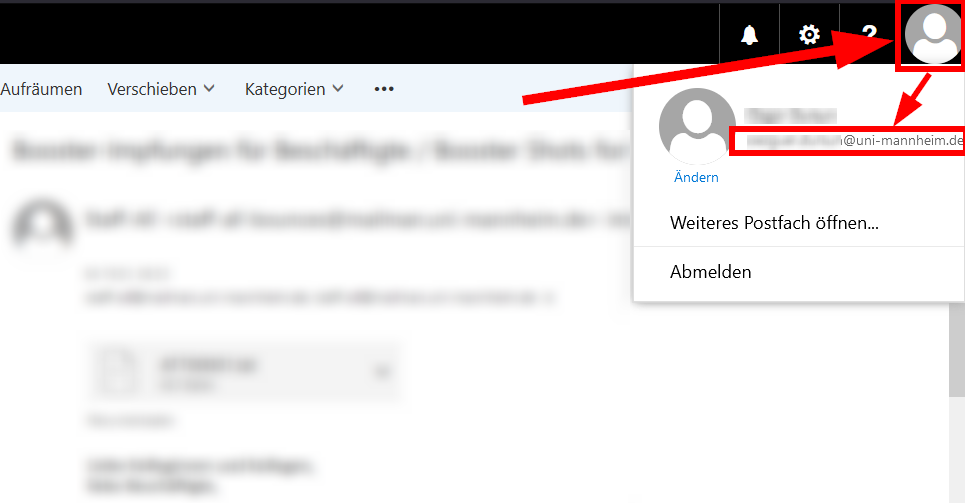
4. Please write this address down -> This is your Exchange sending e-mail address which you will need for the connection.
You have not added an account to Apple Mail? Then continue with step 7. Otherwise, continue here:
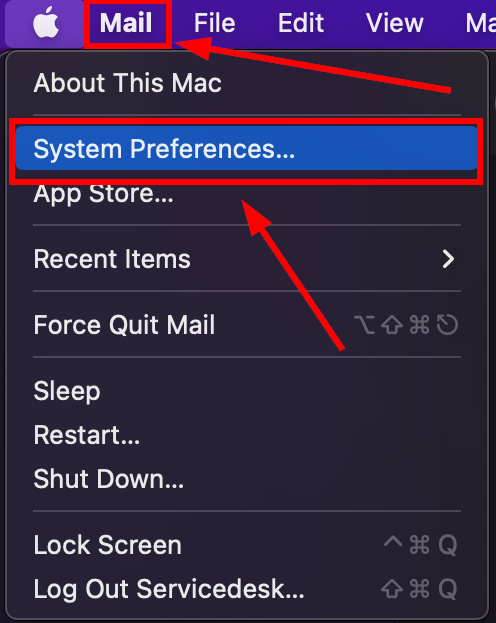
5. Start the mail app on your Mac and click “Mail” and then “System Preferences”:
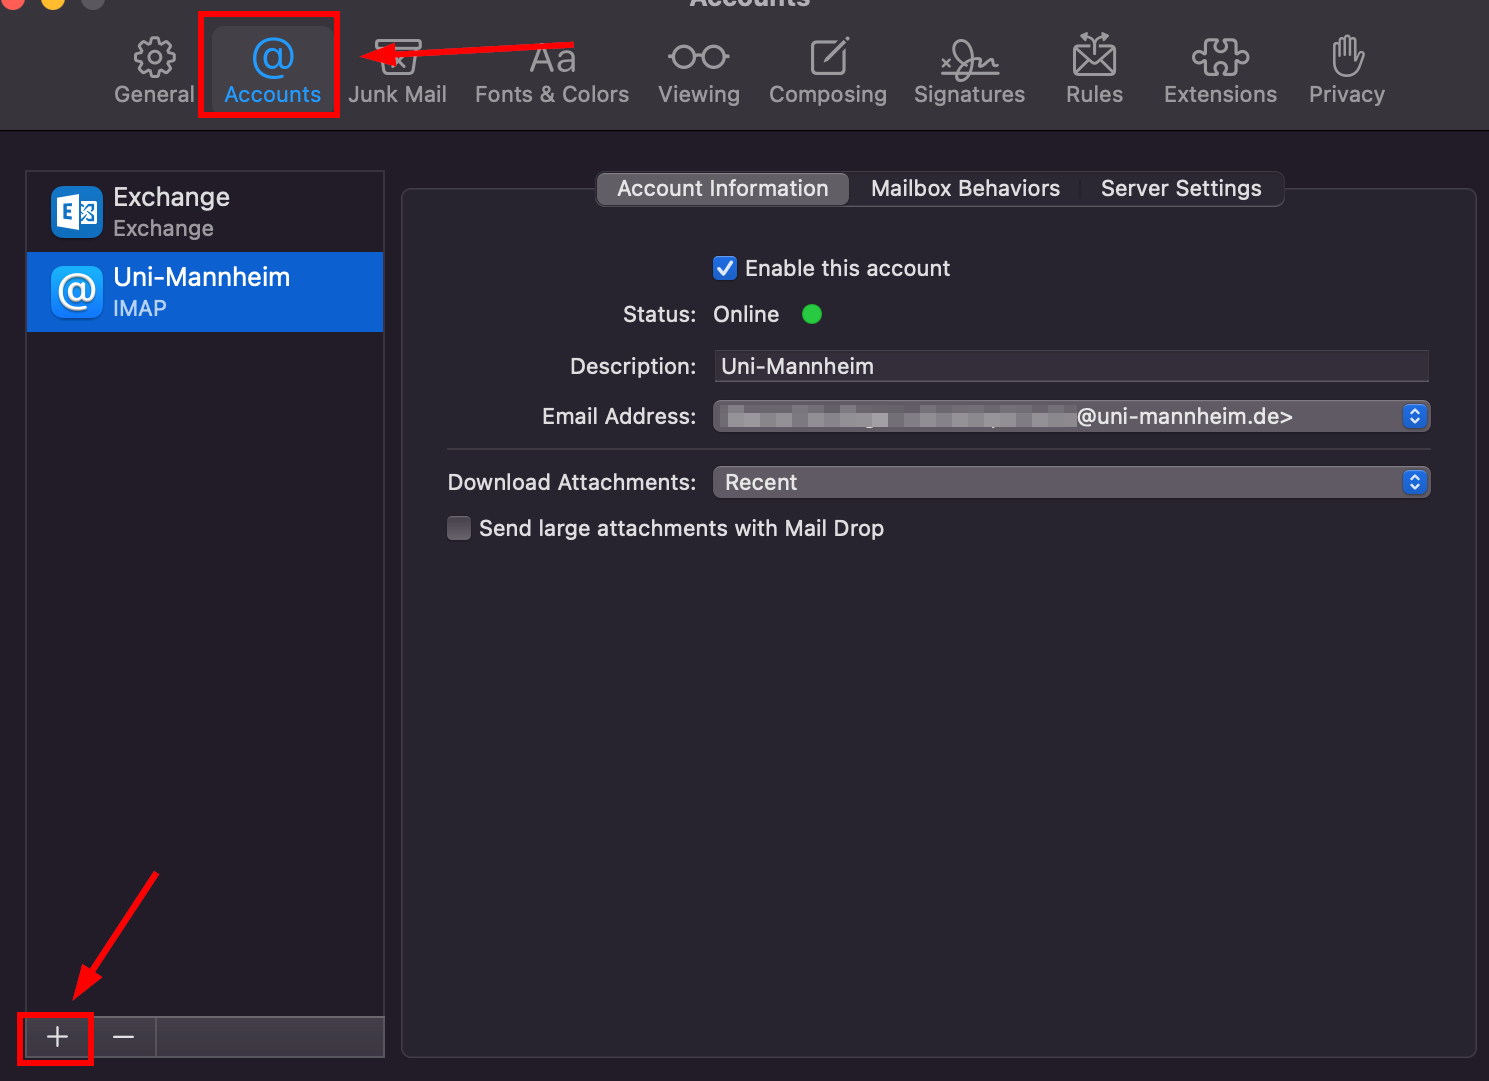
6. In the following window, click on the “Accounts” tab and then on the “+” symbol:
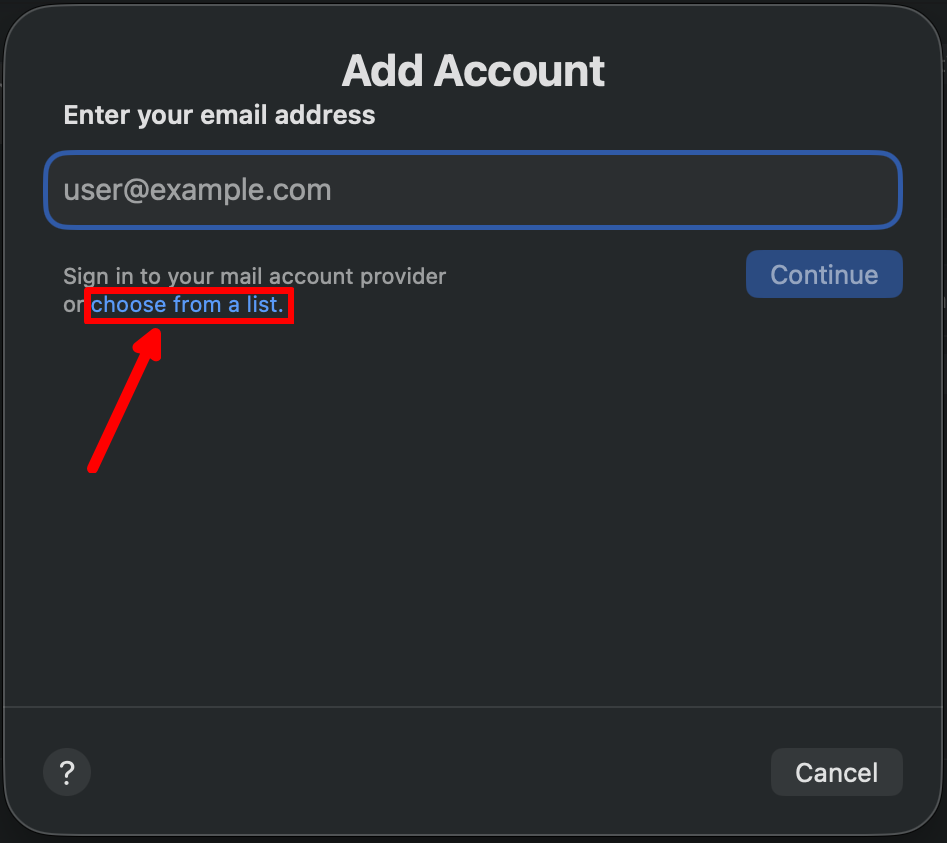
7. Click on the link ‘choose from a list’.
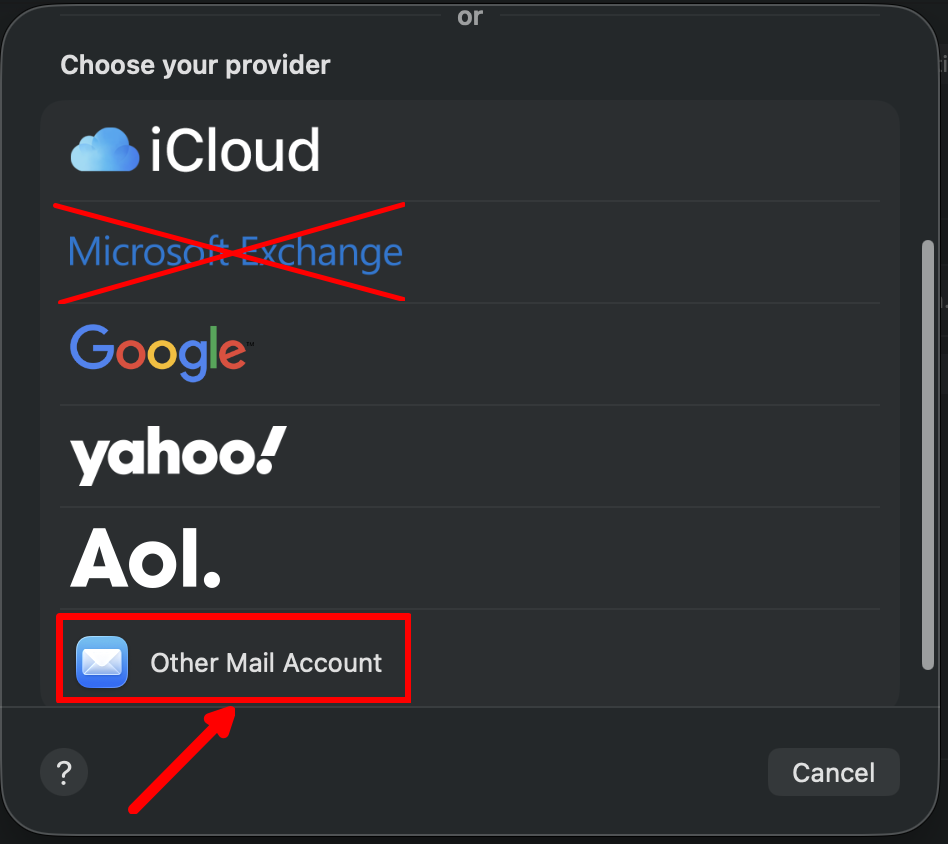
8. Scroll down the list and click on ‘Other Mail Account’.
9. In the next window, enter the chosen name, your Exchange sender address* and the password for your Uni-ID (=”User ID”). Then click “Sign In”:
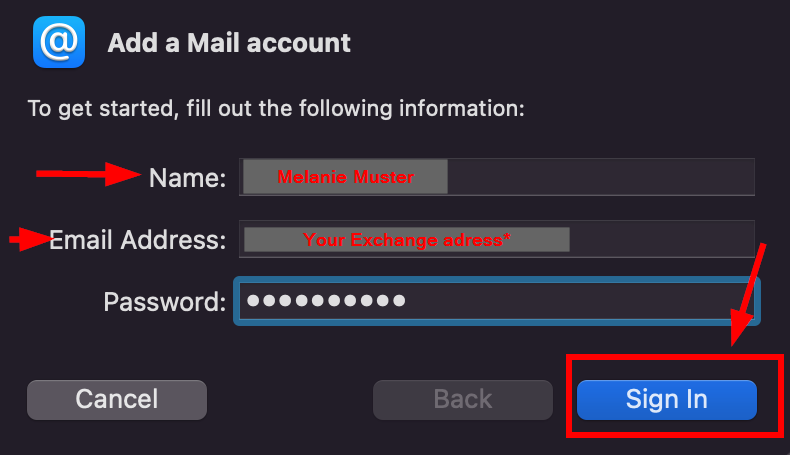
*See steps 1–4.
10. A notification will appear that the account name/
password could not be verified. This is normal. Please enter your user name in the format “AD\Uni-ID” (also for example “Ad\memuster”), enter “exchange.uni-mannheim.de” in the fields for incoming and outgoing e-mails and click on “Sign In”: 
Please note: Use “\“ and not “/”. Please press Alt + Shift + 7 to insert the backwards slash. Confirm by clicking “Sign In”:
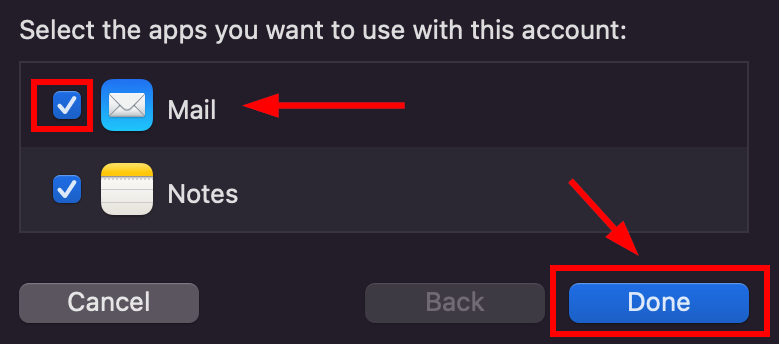
11. Select “Mail” and, if applicable, also “Notes” and click the button indicating “done”:
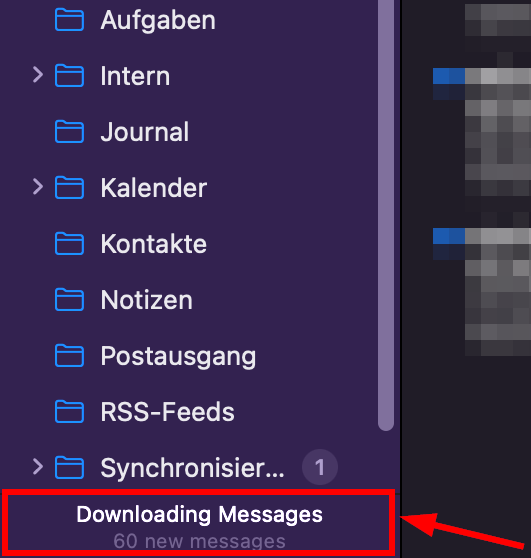
Your e-mail account will now be set up and synchronized. Depending on the size of your mailbox, this will take some time. You can see the status at the lower left corner:
In order to integrate your calendar, please continue with the following steps:
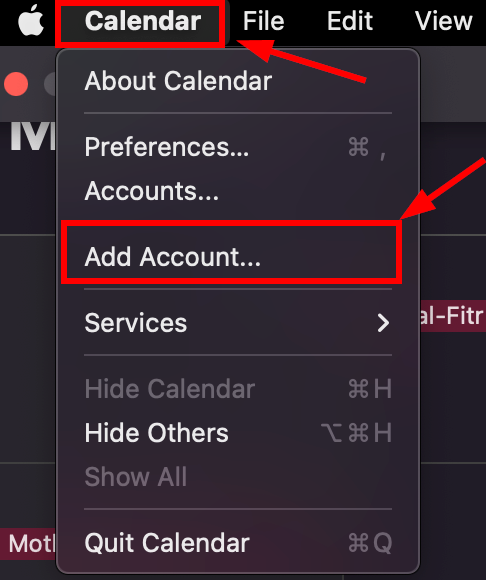
12. Open the calendar app and click on “Calendar” in the upper left corner and then on “Add account...”:
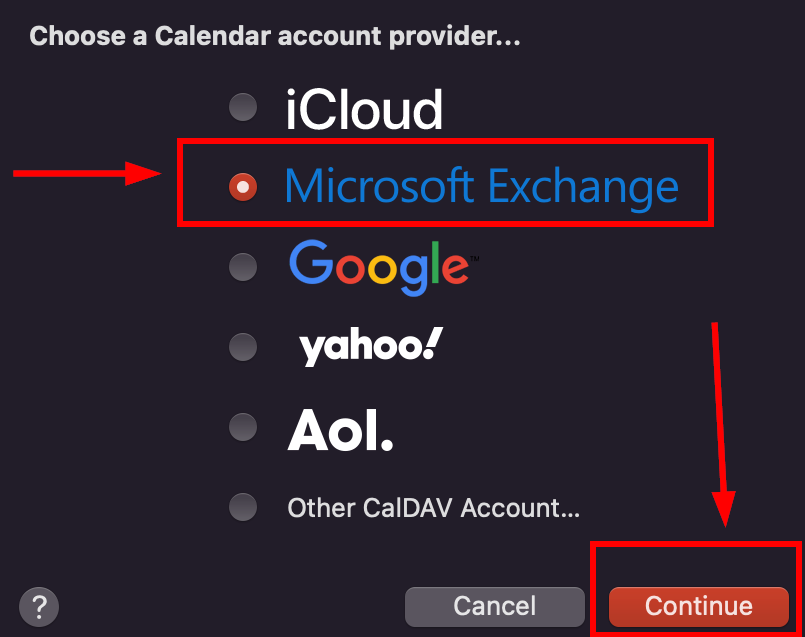
13. Select “Microsoft Exchange” and click “Continue”:
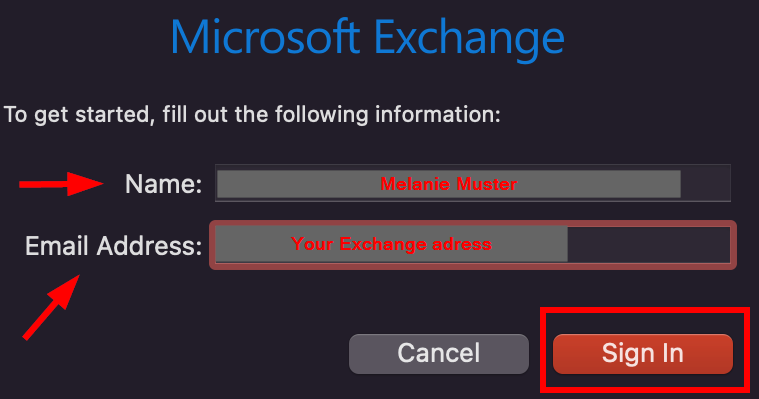
14. Enter your name and your Exchange address and click on “Sign In”:
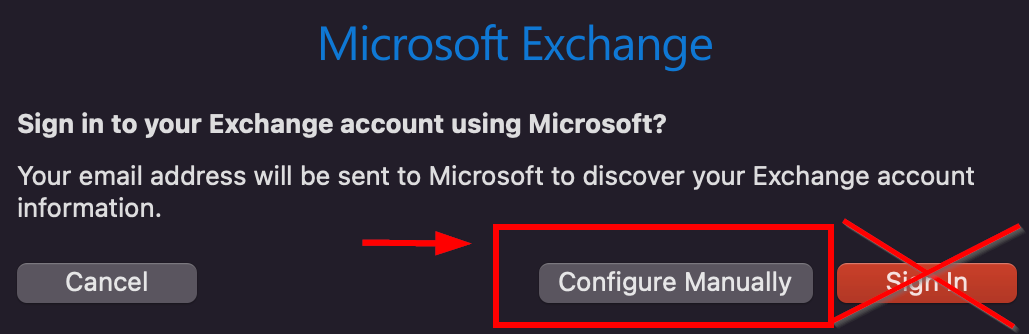
15. In the window that appears next, select “Configure manually”:
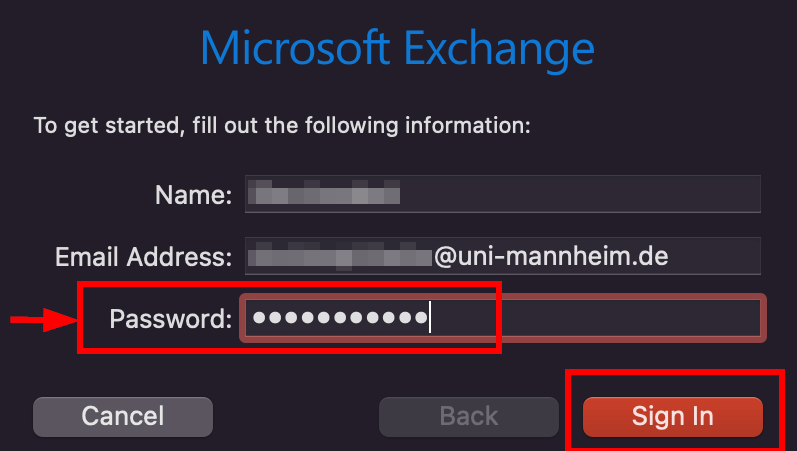
16. Enter the password of your Uni-ID and click on “Sign in”:
17. A notification will appear that the account name/
password could not be verified. This is normal. In the “User name” field, enter your Uni-ID in the format “AD\Uni-ID” (e.g., Ad\memuster“) and click “Sign In”: 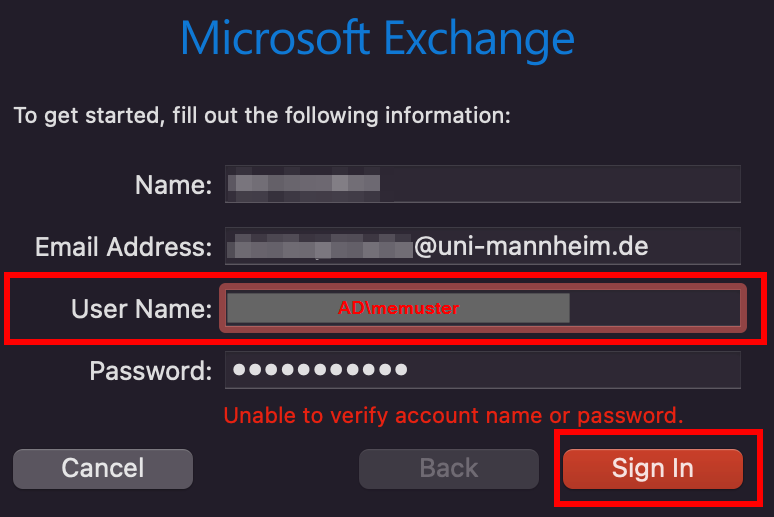
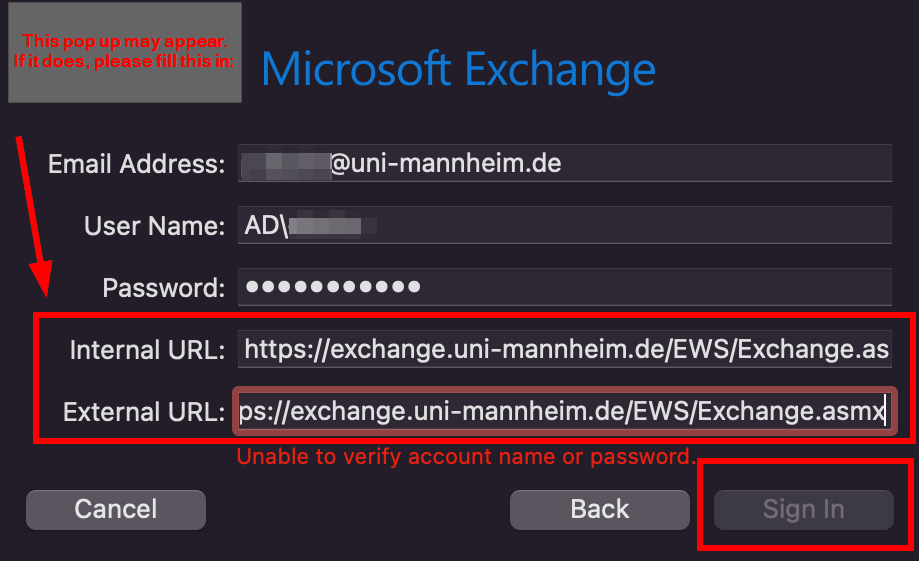
18. If the following window appears, enter “https://exchange.uni-mannheim.de/EWS/Exchange.asmx“ in the boxes Internet and external URL and click “Sign In”:
19. In the next window, select “Calendar”, “Reminders” and “Contacts” and click “Done”. Do NOT select “Mail”:
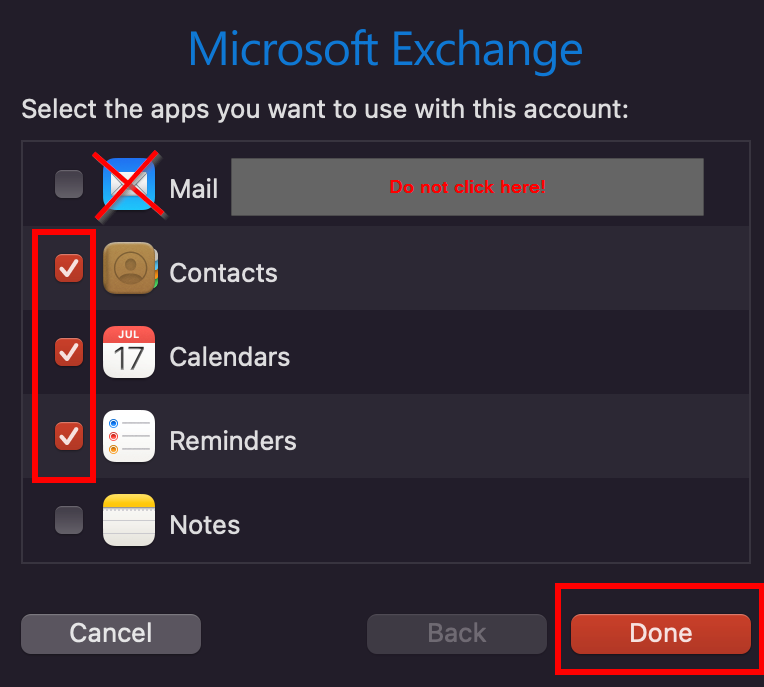
Your calendar and the calendars shared with you will now be synchronized. Depending on the size of the calendar, this may take a while.
IOS (iPhone/iPad)
Connecting your Exchange account with the official Outlook app for iOS is not possible since the app is blocked due to data protection reasons.
Instructions for Apple Mail
Note: The order of the steps may vary depending on whether you have already added an email account to your device.
Step 1:
Open the “Settings” app on your smartphone or tablet.
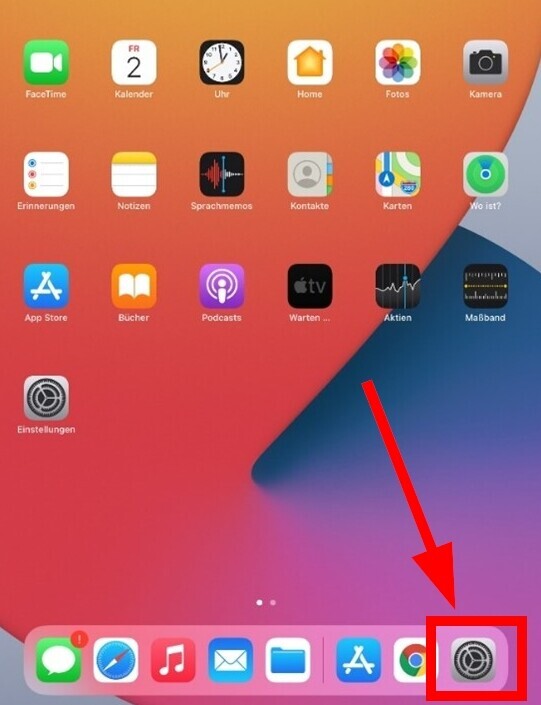
Step 2:
Select “Apps” and then “Mail.”

Step 3:
Select “Mail Accounts” or “Add Mail Account.”

Step 4:
Select “Add Account.”

Step 5:
Enter your university email address here.

Step 6:
Select “Microsoft Exchange” here.
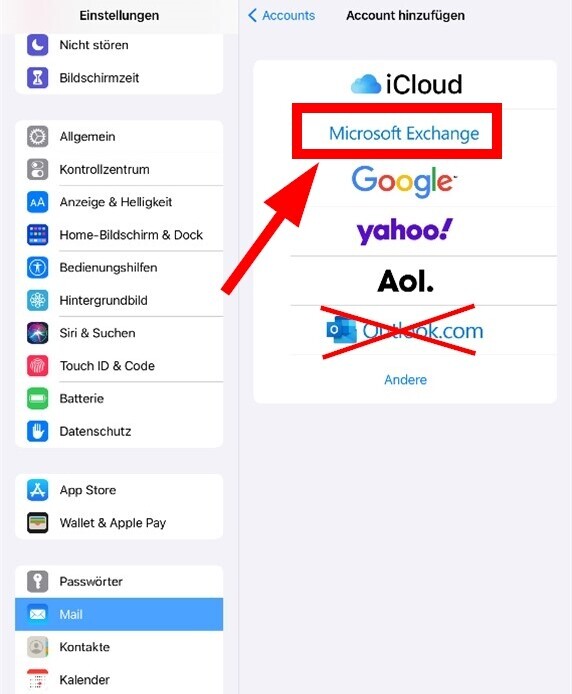
Step 7:
Select the description you want, then tap “Next.”

Note: The text displayed below the input fields states that Exchange Administration can manage the device remotely. This refers to the ability to remotely reset the device if the PIN required to unlock it has been entered incorrectly multiple times in a row. This reset option is DISABLED on the University of Mannheim’s Exchange server. The University IT department does not have access to your smartphone data.
Step 8:
In the next window, select “Configure manually.”

Step 9:
Enter the following information here:
Server: exchange.uni-mannheim.de
Domain: ad
Username: Your Uni-ID
Password: Your Uni-ID password
Step 10:
The Mail app will then connect to your new mailbox, and a list will appear showing which apps should be used with the new Exchange account.
Check all the boxes and click “Save.”
Android
Die Verknüpfung mit der offiziellen Outlook-App für iOS ist nicht möglich, da die App hier aus datenschutzrechtlichen Gründen gesperrt ist.
Instructions for Gmail
1. Open the Gmail app.
2. Tap the menu icon in the upper left corner.
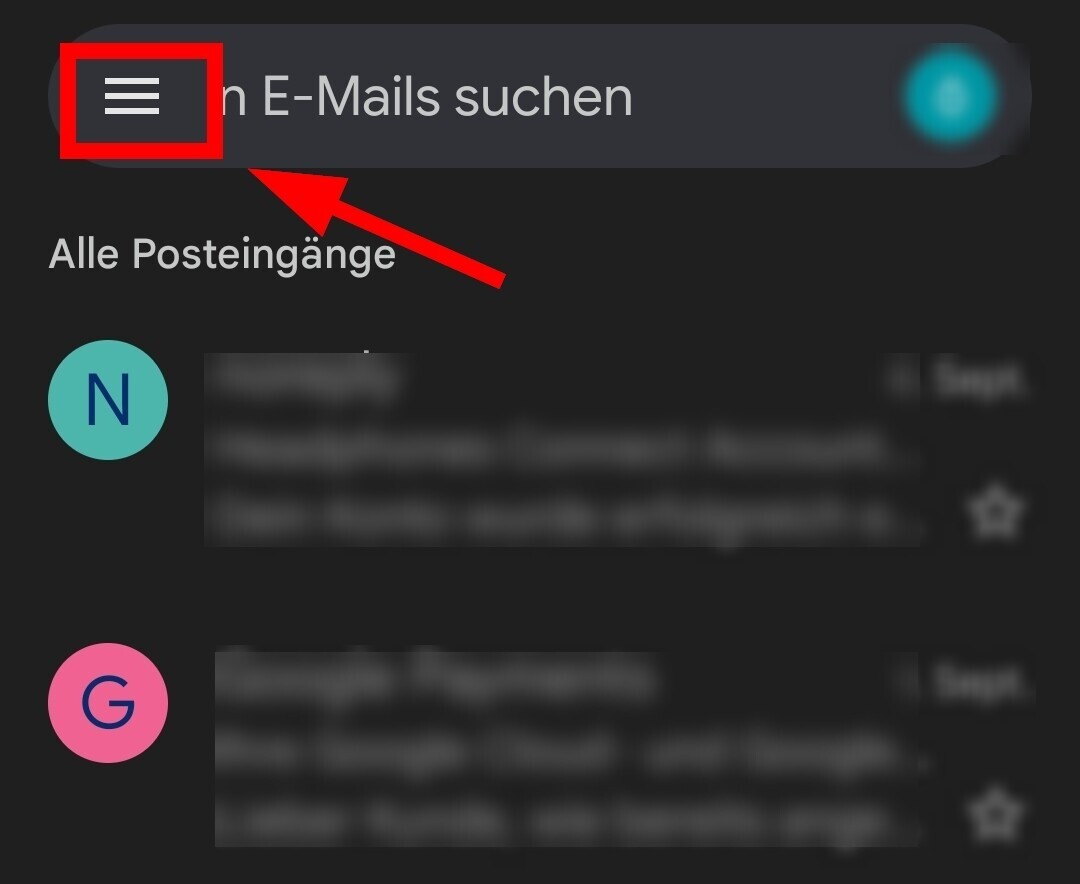
3. Then tap settings.

4. Tap “add account”:

5. In the menu which opens, select “Exchange and Office 365”:

6. Enter your e-mail address and tap ”Set up manually”:

7. Enter the following values in the window that opens and then tap “Next”:
- Password: the password of your Uni-ID
- Domain\User name: ad\Uni-ID
- Server: exchange.uni-mannheim.de
- Port: 443
- Security type: SSL/TLS

8. Your account has now been set up.
Optional: As a rule, your e-mails from last week will be synchronized. If you want to extend this period, go to settings and select your new account:
Under “synchronize e-mails”, you can select a longer period of time:
Linux
Anleitung für Thunderbird
Adding your Exchange e-mail account to Thunderbird
Step 1
Start Thunderbird and click on the application menu in the upper right corner and then on the option “New”. Then select the entry “Existing e-mail account....”:
Step 2
In the window that appears next, please enter your name, your new Exchange senders address and the password of your Uni-ID (=formerly “user ID”). Then click on the button indicating that you choose the manual setup:
Step 3
Please enter the following values in the windows that open and then click on the “Finish” button:
Incoming mail server:
Protocol IMAP Server exchange.uni-mannheim.de Port 993 SSL SSL/ TLS Authentication Password, normal User name Uni-ID Outgoing mail server:
Server exchange.uni-mannheim.de Port 587 SSL STARTTLS Authentication Password, normal User name Uni-ID Thunderbird will then connect to your new mailbox and synchronize your e-mails.
Updating the system folders in Thunderbird
We recommend setting up the system folders in your e-mail client in such a way that they are identical to the folders of the Microsoft Exchange OWA (Outlook web access). This way, the same folders will be used in the e-mail client and OWA.Please proceed as follows to update the system folders:
1. Please make sure that all Exchange folders are displayed. Click with the right mouse button on the e-mail account and select “Subscribe...”:
2. Click “Update” (1) in order to receive the latest Exchange folder list. Then check the boxes of the folders that should be displayed in Thunderbird (2). Then click “Subscribe” (3) and then “OK” (4). Now the new folders will be displayed in Thunderbird:
3. Click with the right mouse button on your e-mail account and select “Settings”:
The system folders should now be displayed correctly, at the latest after you closed and re-started Thunderbird.
Connect the calendar and contacts
The permanent functionality of these calendar and contacts add-ons depends on the developers of the individual add-ons. If these add-ons are not updated, you may not be able to use them with your Exchange mailbox. In this case, UNIT cannot offer support. Therefore, we expressly recommend the Outlook clients for Windows/
Mac or Outlook web client for using your Exchange account.
In order to synchronize not only your e-mails but also the calendar and contacts of your new Exchange mailbox in Thunderbird, you need to install and set up two add-ons:1. Click on the application menu in the upper right corner in Thunderbird and choose the “add-ons” option:
2. In the window that appears, enter “tbysync” in the search bar at the top and confirm by clicking the “Enter” key:
3. A tab with search results will appear. First, click on the button “Add to Thunderbird” in the section for the “TbSync” add-on, confirm and repeat the process for the add-on “Provider for Exchange ActiveSync”:
4. Close the two add-on tabs and switch back to the main window of Thunderbird:
5. In the lower right corner, click on “TbSync: Leerlauf”:
6. This will open the TbSync account management. Then go to the lower left corner and choose “Account actions” -> “Add new account” -> “Exchange-ActiveSync”:
7. Then select “User-specific configuration” and enter your data. In the field “User name (e-mail address)” enter your ad\Uni-ID, for example ad\mamuster. Then click on the “Add account” button:
8. The account will then be added and must be activated. Check the box “Activate and synchronize account”:
9. Then a selection menu will open in which you can choose the contents to be synchronized. For your calendar and your contacts, check the boxes “Contacts” and “Calendar”. Then set the periodical synchronization (≥ 5min) and click on the “Synchronize now” button:
10. Then the elements you selected will be synchronized. If a green tick appears next to your account name, the synchronization has been successful.
Now you can access your calendar and contacts.
If you want to search for contacts in the university’s global address books, switch to the address book in Thunderbird, mark your new Exchange account by clicking on it and then search for your contacts in the search bar in the upper right corner:
Information and error messages
Please note that Thunderbird’s functions will be restricted when connected via the IMAP protocol with your new Exchange mailbox. For example, when you create and synchronize your e-mail folders, they will not automatically have the same structure as in your Exchange mailbox. You need to go to the settings to adjust the folder mapping. In this case, UNIT is unable to provide support. In Outlook 365, Outlook 2019, Outlook 2016 and the web client, this will appear automatically.
Error messages when synchronizing
If you see error messages when synchronizing:
- Make sure that Thunderbird is in online mode. If this is not the case, click the button in the lower left corner:
- If this does not solve your issue, please check your account settings again, by un-checking the box “Activate and synchronize your account” and then switch to the tab “Account settings”.
IMAP Kontoeinstellungen für Exchange
Wir empfehlen Ihnen „Exchange“ als Kontotyp bzw. Protokoll zu verwenden. Falls Sie abweichend davon eine Verbindung über IMAP herstellen wollen, können Sie folgende Verbindungsdaten dafür verwenden:
| IMAP bzw. Posteingangs-Server: | |
|---|---|
| Protokoll | IMAP |
| Server | exchange.uni-mannheim.de |
| Port | 993 |
| Sicherheitstyp/ | SSL/ |
| Benutzername | Uni-ID |
| Passwort | Passwort Ihrer Uni-ID |
| SMTP bzw. Postausgangs-Server: | |
|---|---|
| Server | exchange.uni-mannheim.de |
| Port | 587 |
| Sicherheitstyp/ | STARTTLS |
| “Anmeldung/ Authentifizierung erforderlich” | ja |
| Benutzername | Uni-ID |
| Passwort | Passwort Ihrer Uni-ID |