What Is KeePass?
A password manager is a type of vault in which you can securely store your passwords so that you can access them when needed.
A password manager is not centrally provided by the University of Mannheim, however, we recommend the free password manager “KeePass”.
Attention:
Only download KeePass from the links provided in these instructions.
Attackers often recreate websites in order to trick you into downloading malware.
How can I use KeePass?
Download
Step 1: Download KeyPass
Please download the “Professional Edition Portable” version of KeePass by clicking on the link:
https://www.heise.de/download/product/keepass-15712/download
If needed, you can download the German language pack as well.
Please note: Version 2.59 which is shown here may no longer be the latest version, since KeePass is regularly updated.
After the download, please un-zip the files on your desktop.
 Credit: Informationssicherheitsteam
Please note that these files and these instructions are only for Windows systems. If you need a KeePass version for another operating system, please visit: https://keepass.info/
Step 1: Download KeePass
Please download the “Professional Edition Portable” version of KeePass by clicking on the link:
https://www.heise.de/download/product/keepass-15712/download
If needed, you can download the German language pack as well.
Please note: Version 2.59 which is shown here may no longer be the latest version, since KeePass is regularly updated.
After the download, please un-zip the files on your desktop.
Please note that these files and these instructions are only for Windows systems. If you need a KeePass version for another operating system, please visit: https://keepass.info/
Start KeePass
Step 1: Open EXE file
Open the program “KeePass.exe”.
 Credit: Informationssicherheitsteam
Step 2: Enable automatic update check
In order to receive regular notifications on updates, please select “enable (recommended)”.
 Credit: Informationssicherheitsteam
Create new database
Step 1: Create a new database
Before you can store your first passwords in KeePass, you need to create a new database by clicking on “File” -> “New...”.


Step 2: Select storage location
Select the storage location and the name of the file.
Please note: When selecting the storage location, please note that the database must only be accessible by you! Additionally, the storage location should not be the KeePass folder. This way, the database will not be deleted if you delete an older KeePass version (for more information, please refer to the section on updates).
For employees working in the administration, a special folder will be created on the network drive. If the folder has not yet been created, please contact Mr Martin Stachniss martin.stachniss@uni-mannheim.de or -3181).

Step 3: Master password
Please choose a master password.
Please note: Please note that the master password protects all your other passwords! Therefore, it should be very complex and long. It should at least have 12 characters and contain uppercase and lowercase letters, symbols and letters.

Step 4: Decision on key file
If you want to additionally protect your database (two factor authentication) with a key file, please proceed with the next section Protect database WITH key file . Otherwise, you can go directly to Create database WITHOUT key file.
As employee in the administration you work in a secure network. In order to protect this network, potential external interfaces have been limited. Therefore, it is not possible to use a key file, since this key file cannot be backed up on an external storage device. Since the password database is securely stored in a special folder created for this purpose, a complex master password is sufficient for securely protecting the database. Please go directly to Create database WITHOUT key file.

Tip:
As an alternative, you can create a new database by clicking on the corresponding icon.

Protect database WITH key file
Step 1: Create key file
In order to additionally protect your database with a key file, please check the box “Show expert options:” and create a key file. This file serves as second factor to open the database. Therefore, it is indispensable that you store the key file securely. The key file must not be stored in the KeePass folder and should be stored separably from the database. In addition, you should back-up the file (e.g. on an encrypted external hard drive). Without the key file you cannot open the database with your passwords!


Step 2: Configure database settings
After confirming with “OK”, you can enter an individual database name including description in the tab “General”.


Step 3: Advanced settings
In the tab “Advanced”, you can select further settings for the master password. In order to be reminded to regularly change the master password, you can adjust the values as follows:

Step 4: Emergency Sheet
After confirming with “OK”, the database is created and you are asked if you want to print an emergency sheet. Please skip this step.
Please continue with Additional security settings .

Create database WITHOUT key file
Step 1: Configure database settings
If you do not want additional protection of a key file or you are not able to use a key file, you can enter an individual database name including description in the tab “General”, after you confirmed by clicking on “OK”.
Step 2: Advanced settings
In the tab “Advanced”, you can select further settings for the master password. In order to be reminded to regularly change the master password, you can adjust the values as follows:
Step 3: Emergency Sheet
After confirming with “OK” the database is created and you are asked if you want to print an emergency sheet. Please skip this step.
Please continue with Additional security settings .

Additional security settings
Step 1: Open “Options”
After you have created a database, you should got to “Tools” -> “Options...” to adjust the security settings.

Step 2: Configure security settings
In order to automatically lock KeePass when you do not use it, please check the box “Lock workspace after KeePass inactivity (seconds)” in the tab “Security” and select the value 120.
In addition, you should check the box “Enter master key on secure desktop” when you scroll to the bottom of the window. In this state, Windows pauses all background processes. Potential malware, such as a keylogger which may record your keystrokes, is then blocked when you enter your master password.

Tip:
You can also manually lock KeePass by clicking on the following icon or by pressing “ctrl + L”.

Disable Auto-Type
Step 1: Edit group
Select the predefined group, in our case “TestDatabase”, and select “Group" -> “Edit Group...”.

Step 2: Disable Auto-Type
Open the “Auto-Type” tab and select " Disabled” under “Auto-Type for entries in this group:".
This automatically disables the auto-type function for all groups created under this group and prevents your password from being accidentally copied into an incorrect input field and displayed in plain text.

Tip:
By right-clicking on the predefined group and on “Edit Group...” you can also change the settings.

Create new group
Step 1: Add group
You can save your password entries directly in the predefined group.
Under “Group” -> “Add Group...” you can also create and add your own groups.

Step 2: Define group properties
Please name the group. In addition, you can change the group’s icon by clicking on it.

Tip:
By right-clicking on the database and on “Add Group...” you can also add a new group.

Edit group
Step 1: “Edit Group...”
If you want to edit an existing group, please select this group. Then you can change the settings by clicking on “Group” -> “Edit Group...”.

Tip:
You can also change the settings by right clicking on the group and then on “Edit Group...”.

Add new entry
Step 1: Select group
If you want to create a new entry, you need to select the group for the entry.

Step 2: “Add Entry...”
Then you can add a new entry by clicking on “Entry” -> “Add Entry...”.

Step 3: Define entry settings
You can then add an entry with title, user name and password. The quality bar shows you how secure your password is. The greener the bar and the higher the number of bits, the more secure your password.

Step 4: Show password
To see the password, please click on the icon with the three dots.

Step 5: Let KeePass generate a password
Besides entering the password yourself, you can also let the password generator integrated in KeePass generate a password for you. Please click on the icon with the key and the star and select “(Automatically generated passwords for new entries)”.
In the section Create your own profile for the password generator , we explain how you can create your own profile in the password generator.

Tip 1:
With “Drag & Drop” you can also move an existing entry to another group.
Tip 2:
As an alternative, you can also add an entry by clicking on the relevant icon.

Create your own profile for the password generator
Step 1: Open password generator
To create your own profile for the creation of passwords, please open the password generator by clicking on “Tools” -> “Generate Password...”

Step 2: Custom profile
Select “Custom” at the top next to “Profile”. You can then select your preferred settings.
If you want to create a profile which fulfills the requirements of the User ID, you need to check the boxes for upper-case and lower-case numbers as well as digits. In addition, please add the following symbols under “Also include the following characters”: !@#$%()+=:;",.?/

If the save icon is grayed out, click on the highlighted icon to activate it. However, you need administrator rights on your computer for doing this.
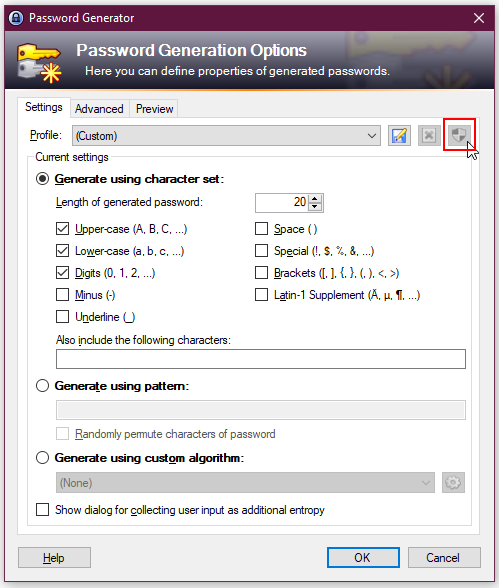
Step 3: Save profile
Save your profile by clicking on “Save current settings as a profile”, e.g. under the name “ID requirements” and confirm your changes by clicking on “OK”. Close the window “Password Generator” by clicking on “Cancel”.

Step 4: Select your profile
Now you can use this profile to generate new passwords.

Login
Step 1: Login on websites and applications
To login on a website or application, the relevant entry has to be selected. By clicking on the entry with the right mouse button or by clicking on the icons you can select the next step.
If a URL is added to the entry, you can open it by clicking on “URL(s)” or the globe icon.
By clicking on “Copy User Name” or the icon symbolizing a person, you can temporarily store the user name to enter it on the website.
By clicking on “Copy Password” or the key icon you can temporarily store the password to enter it on the website as well.

Update
Step 1: Download new version
As soon as a new portable version for Windows is available, please download this version under https://www.heise.de/download/product/keepass-15712/download and complete the first two steps of these instructions (Download, Start KeePass).
Versions for other operating systems are available here: https://keepass.info/
Step 2: Add your former password database
You can add your former password database by clicking on “File” -> “Open” -> “Open File...”.

Step 3: Enter your master password (including key file, if applicable)
Please enter your master password. Please do also select your key file, if you have created one.

Step 4: Confirm selection
By clicking on “OK”, your former password database will be added to the new version.

Step 5: Delete old version
After that, please delete the folder with the old KeePass version. Please make sure that the database with your passwords and the key file are not in the folder.
Tip:
You can also add your password database by clicking on the icon.
